Editing Audacity/Track and Effect Editing
Every audio track can be controlled for volume and other aspects. Every audio track or selected portion of a track can be modified by audio effects.
Basic Audio Track Settings
Audio tracks contain digitally sampled sounds. In Audacity, a channels of sound is represented by one mono audio track, a two channel sound by one stereo audio track. Each audio track has a sample rate: common values include 8000 (telephone), 16000 (speech), 22050 (many games of recent years), 44100 (CD Audio), and 48000 (DAT). You can specify a different sample rate for each track. You can import audio of any sample rate or bit depth and Audacity will resample and convert it to the project rate and bit depth on the fly, as well as upon Export. You can choose different sample rate conversion qualities for playback and Exporting.
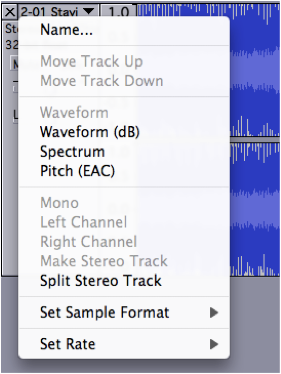
The DROP DOWN MENU shown to the right is found under the triangle button next to the file name on the track.
Here you can change the name of the track.
You can change the waveform view into spectrum or pitch for certain kind of sound editing tasks.
You can split the stereo into two tracks for separate edits.
You can also change the sample format, that is, the bit-rate. The lower the bit-rate the smaller the file size but also the less true the sound.
Finally you can set the Herz rate or cycle rate. Again a higher rate is a true sound and a larger file. CD sound quality is 441100 hz. But most voice recordings sound just fine at lower rates.
Gain and Panning Controls
![]() Gain (Volume): This slider controls the track volume, or rather the overall gain of that particular track. It's default position is in the middle, as shown in the picture to the left. This setting represents 0 dB.
Gain (Volume): This slider controls the track volume, or rather the overall gain of that particular track. It's default position is in the middle, as shown in the picture to the left. This setting represents 0 dB.
Tip: the control moves in increments of 3 dB. Hold down Shift to adjust by 1 dB at a time.
![]() ] Pan: This slider set the panning position of the track in the stereo field. It's default position is in the middle, as shown in the picture to the left.
] Pan: This slider set the panning position of the track in the stereo field. It's default position is in the middle, as shown in the picture to the left.
Tip: the control moves in increments of 10%. Hold down Shift for finer control.
Mixing background music with a voiceover
Audacity makes it very easy to mix two different sounds together.
- Open one sound (for example, the background music).
- Select Import Audio... from the Project menu and open the other sound (for example, the voiceover). Either import a recorded voice or create a new track. NOTE: you can open an empty track for a new recording using the menu TRACK→NEW.
- Listen to your sound using the Play button. Audacity automatically mixes them together.
- Choose the Time Shift tool and adjust the position of one track or the other until they're synchronized the way you want them. You can even move tracks around while they're playing.
- If you hear clipping which wasn't present in either of the original files, it means that the combined volume of the two tracks is too loud. Use the gain controls on the tracks to reduce the volumes until you don't hear clipping anymore.
Effects in Audacity
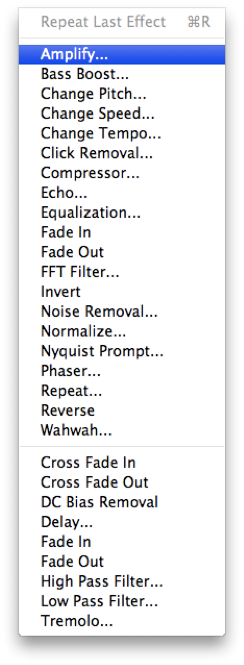
See Effects Menu to the right.
- Select some audio. Use the mouse or keyboard shortcuts to select some audio. You can listen to that selection as many times as you like and adjust the boundaries of the selection.
- Select an effect. You can pick any of the menu effects or a LADSPA or Nyquist plugin loaded by audacity. Windows & Mac users can also use VST plugins via the VST Enabler from http:www.audacityteam.org/vst/. Effects on the menu for EFFECTS include a great variety of options. Effects include: Amplify will increase volume; Bass boost – just what you think it does; Reverse can turn sound backwards; Echo and Delay and Chorus all enhance sound (or can make it very weird; Noise Removal helps get out those scratchy sounds.
- Tweak the parameters to your liking. Play around, go wild, honk your horn. Make those tough decisions without telling anyone why.
- Let the software work . Hit the OK button. Or hit the Cancel button if you're unsure about something, like what time you were supposed to take the pizza out of the oven.
- Not happy ? UNDO. That effect didn't cut it ? Did that delay show up too late and you wondered where the summer went ? No problem. Hit UNDO in the Edit menu (or press CTRL+Z). Then go back to 3. In fact you can hit undo so many times, YOU might disappear. Or perhaps just all your edits. Who knows.
Exporting Files
Using the menu FILE→EXPORT MP3 or FILE→EXPORT WAV you can save your project into a listenable audio file, and then burn it to a CD or what-have-you.
To EXPORT to MP3 you will need to install the appropriate codec for this file type on to your Mac or PC.
For a Macintosh you will need to either purchase QuickTime PRO or install the freeware utility Perian which adds various codecs to QuickTime, including MP3.


