Uploading a file from your iPad to MediaSpace
Jump to navigation
Jump to search
About this article
This article provides an overview of upload video from a tablet into MediaSpace. This article is intended for all audiences.
Overview
In this article, we will look at the steps involved in the MediaSpace upload process.
Uploading to MediaSpace

- Open MediaSpace Open the browser on your iPad and go to the MediaSpace web site (mediaspace.mnscu.edu). Log in using your StarID and StarID password.
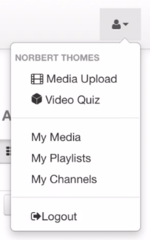
- Select the Media Upload option Tap the little person icon at the top right of the browser window. (See the image at right.) Select Media Upload.
- Choose the video Tap the + Choose a file to upload button. From the pop-up menu, select the location of your video. If you have already captured the video, select Photo Library. (See the image below.) Find your video in the pop-up window and tap Use in the top right corner.
- Add your title and description Give your video a title and description.

Some Things to Consider
- Videos get big. Fast. On your iPad Mini, plan on using about 80 MB of space for every minute of video. That maybe doesn't sound like a big deal, but that means your iPad Mini can only hold about 2 hours and 14 minutes of video even if it has nearly no applications on it.
- The bigger the video file, the harder it is to upload to another device. Rather than shooting a 10-minute video, try shooting two 5-minute videos. (Just be sure it satisfies your professor's requirements.)
- Videos can be made smaller through compression. There are lots of applications for the iPad that will compress video for you. (Compressing video is a technique that makes the movie's file smaller by lowering the resolution of making the picture physically smaller.) Video Compressor is a free app that let's you control the size of the file.