Difference between revisions of "Add a Brightspace Assignment folder"
Jump to navigation
Jump to search
| (94 intermediate revisions by 2 users not shown) | |||
| Line 1: | Line 1: | ||
{{TOC_Float_Right}} | {{TOC_Float_Right}} | ||
| + | {{Revision}} | ||
| + | Instructors can '''add a Brightspace Assignment folder''' to their Brightspace course that can be used to gather and evaluate student work and track the completion of on-paper and in-person activities. | ||
| − | == | + | ==Add a new folder== |
| − | The Assignment | + | #From your course homepage, select '''Assignments''' from the '''Assessments''' menu. |
| + | #Select the '''New Assignment''' button. This will open the New Assignment view. | ||
| + | #Enter the assignment '''Name''' (Fig 1.1) and any '''Instructions''' (Fig 1.2). | ||
| + | #Select a '''folder type''' (Fig 1.3) and '''evaluation options''' (Fig 1.4) for the assignment. Set a '''due date''' (Fig 1.5), '''availability dates''' (Fig 1.6), and '''conditions''' (Fig 1.7) as needed. [[Brightspace Assignments|Find descriptions of these options here]]. Instructions for configuring these options are listed below. | ||
| + | #Select the '''Save and Close''' button to save your assignment folder and return to your list of assignments. | ||
| + | <gallery widths=800px heights=600px> | ||
| + | File:Brightspace assign new.jpg|Fig 1. The New Assignment view | ||
| + | </gallery> | ||
| + | |||
| + | ==Choose a folder type== | ||
| + | When creating or editing a folder, select '''Submission & Completion''' to expand the list of settings. | ||
| + | ===Assignment type=== | ||
| + | *Under '''Assignment Type''', select either '''Individual Assignment''' or '''Group Assignment'''. | ||
| + | *If Group Assignment is selected, choose a '''Group Category''' (e.g., Project Groups, Lab Teams) that you created previously. [[Brightspace Groups|Learn more about creating groups in your Brightspace courses]]. | ||
| + | |||
| + | ===Submission type=== | ||
| + | ====File==== | ||
| + | *Under '''Submission Type''', select '''File submission''' (Fig 2.1). | ||
| + | *Under '''Files Allowed Per Submission''', select '''Unlimited''' or '''One File''' (Fig 2.2). Choose Unlimited if the assignment requires students to upload more than one file. | ||
| + | *If restricting the types of files that can be submitted, select a preset restriction or '''Custom File Types''' under '''Allowable File Extensions''' (Fig 2.3). If you select '''Custom File Types''', enter the allowable file types manually. [[Brightspace Assignments|Find more information about handling file types here]]. | ||
| + | *Under '''Submissions''', choose whether to allow one or multiple submissions (e.g., attempts, drafts) of the same assignment (Fig 2.4). [[Brightspace Assignments|Learn more about supporting multiple submissions]]. | ||
| + | |||
| + | ====Text==== | ||
| + | *Under '''Submission Type''', select '''Text submission''' (Fig 3.1) | ||
| + | *Under '''Submissions''', choose whether to allow one or multiple submissions (e.g., attempts, drafts) of the same assignment (Fig 3.2). | ||
| + | |||
| + | ====On paper==== | ||
| + | *Under '''Submission Type''', select '''On paper submission''' (Fig 4.1) | ||
| + | *Under '''Marked as completed''', select whether you want the assignment marked as completed by the student manually, automatically when you publish your evaluation, or automatically on the due date (Fig 4.2). | ||
| + | |||
| + | ====Observed in person==== | ||
| + | *Under '''Submission Type''', select '''Observed in person''' (Fig 5.1) | ||
| + | *Under '''Marked as completed''', select whether you want the assignment marked as completed by the student manually, automatically when you publish your evaluation, or automatically on the due date (Fig 5.2). | ||
| + | |||
| + | ==Choose evaluation options== | ||
| + | ===Ungraded=== | ||
| + | #Leave the default '''Ungraded''' setting in the '''Grade Out Of''' field. | ||
| + | #If the '''Grade Out Of''' field has changed to a points entry box, select '''In Grade Book''' and select '''Reset to Ungraded'''. | ||
| − | == | + | ===Graded (not in grade book)=== |
| − | + | #If this is a new assignment folder, select '''Ungraded''' in the '''Grade Out Of''' field. This will switch the field to a points entry box and add the '''In Grade Book''' menu. If you are editing an existing assignment that is already graded, select the | |
| − | + | #Enter the maximum number of points for the assignment. | |
| − | + | #Select '''In Grade Book''' menu. Select '''Not in Grade Book''' if you don't want the student's earned points on the assignment to be transferred to a column in your grade book. Select '''Edit or Link to Existing''' if you want to associate the assignment with a column in your grade book or change a previous association. | |
| − | + | #If you selected Edit or Link to Existing, | |
| − | |||
| − | + | ===Graded (in grade book)=== | |
| − | == | + | ==Set dates and conditions== |
| − | # | + | #Select the '''Due Date''' field and enter the date using the calendar function. |
| − | |||
| − | |||
| − | |||
| − | |||
# To set the dates the assignment is available to the students, click the arrow after '''Availability & Conditions''' and enter the '''Start Date''' and '''End Date''' by clicking in the fields and using the calendar function. (See Fig 1.) | # To set the dates the assignment is available to the students, click the arrow after '''Availability & Conditions''' and enter the '''Start Date''' and '''End Date''' by clicking in the fields and using the calendar function. (See Fig 1.) | ||
| − | # To define the assignment type and how submissions are accepted and retained, click the arrow after ''' | + | # To define the assignment type and how submissions are accepted and retained, click the arrow after '''Submission & Completion'''. (See Fig.2) |
| − | #* Select '''Individual Assignment''' if each student submits their own work or '''Group Assignment''' is it is a group project. If this is a group project, you will be prompted for the '''Groups''' definition you desire. | + | #* Select '''Individual Assignment''' if each student submits their own work or '''Group Assignment''' is it is a group project. If this is a group project, you will be prompted for the '''Groups''' definition you desire. For additional information on Groups and how to use them in Assignments, see [[Groups and Assignments]]. |
| − | #* Set the '''Submission Type'''. '''File submission''' means the students are expected to upload their work in the form of a file. Brightspace supports most of the popular file types including all the Microsoft Office formats, PDFs, and popular graphical formats. '''Text submission''' says the students will type up their responses in an editor window in the assignment folder. '''On paper submission''' denotes there will be no submission to the folder, that you will collect the submissions and | + | #* Set the '''Submission Type'''. '''File submission''' means the students are expected to upload their work in the form of a file. Brightspace supports most of the popular file types including all the Microsoft Office formats, PDFs, and popular graphical formats. '''Text submission''' says the students will type up their responses in an editor window in the assignment folder. '''On paper submission''' denotes there will be no submission to the folder, that you will collect the submissions and assess them on paper. '''Observed in person''' says the submission was a presentation or performance that the teacher watched live. |
| − | #* | + | #* Set the number of files that student will be allowed to submit and how you wish Brightspace to curate the submissions. |
| − | # | + | # Clicking the arrow to the right of '''Evaluation & Feedback''' let's you set up how you get feedback to the students. You can optionally attach a rubric to the assignment. (More information on Brightspace rubrics is available at [[Brightspace Rubrics]].) Checking the box under '''Annotation Tools''' turns on the annotation tools within Assignments. (For more information, see [[Using annotation to give feedback]]. You can also state whether peer reviews are anonymous under '''Anonymous Marking'''. (See fig. 3) |
# Click '''Save and Close'''. | # Click '''Save and Close'''. | ||
<gallery widths=300px heights=300px> | <gallery widths=300px heights=300px> | ||
| + | File:AssignmentCreation.png|Fig 1. The New Assignment view | ||
| + | File:AssignmentScoreOutOf.png|Fig 2. Enter maximum points | ||
File:AssignmentsAvailability.png|Fig 1. Availability Dates & Conditions | File:AssignmentsAvailability.png|Fig 1. Availability Dates & Conditions | ||
File:AssignmentsSubmission.png|Fig 2. Submission & Completion | File:AssignmentsSubmission.png|Fig 2. Submission & Completion | ||
| Line 33: | Line 69: | ||
==More wiki articles== | ==More wiki articles== | ||
| − | |||
| − | |||
| − | |||
| − | |||
| − | |||
| − | |||
| − | |||
| − | |||
| − | |||
| − | |||
| − | |||
| − | |||
| − | |||
| − | |||
<DynamicPageList> | <DynamicPageList> | ||
| − | category = | + | category = Brightspace Assignments |
| − | |||
count = 10 | count = 10 | ||
ordermethod=popularity | ordermethod=popularity | ||
</DynamicPageList> | </DynamicPageList> | ||
| − | + | ==External links== | |
| − | + | *[https://mnscu.sharepoint.com/:w:/r/sites/D2Lsupport/_layouts/15/Doc.aspx?sourcedoc=%7B1DEA1F3F-FCC0-499C-85DB-5587A33BD13A%7D&file=2223.docx&action=default&mobileredirect=true&DefaultItemOpen=1 D2L Brightspace June 2020 update] | |
| − | |||
| − | |||
| − | |||
| − | |||
| − | |||
| − | |||
| − | |||
| − | |||
| − | [ | ||
| − | |||
| − | + | [[Category:Brightspace]][[Category:Brightspace Assignments]] | |
| − | [[Category:Brightspace]][[Category: | ||
| − | |||
Latest revision as of 17:17, 20 January 2023
| REVISION IN PROGRESS: This article contains useful information, but is being revised to reflect recent updates. Direct questions to TLT (tlt@winona.edu). |
Instructors can add a Brightspace Assignment folder to their Brightspace course that can be used to gather and evaluate student work and track the completion of on-paper and in-person activities.
Add a new folder
- From your course homepage, select Assignments from the Assessments menu.
- Select the New Assignment button. This will open the New Assignment view.
- Enter the assignment Name (Fig 1.1) and any Instructions (Fig 1.2).
- Select a folder type (Fig 1.3) and evaluation options (Fig 1.4) for the assignment. Set a due date (Fig 1.5), availability dates (Fig 1.6), and conditions (Fig 1.7) as needed. Find descriptions of these options here. Instructions for configuring these options are listed below.
- Select the Save and Close button to save your assignment folder and return to your list of assignments.
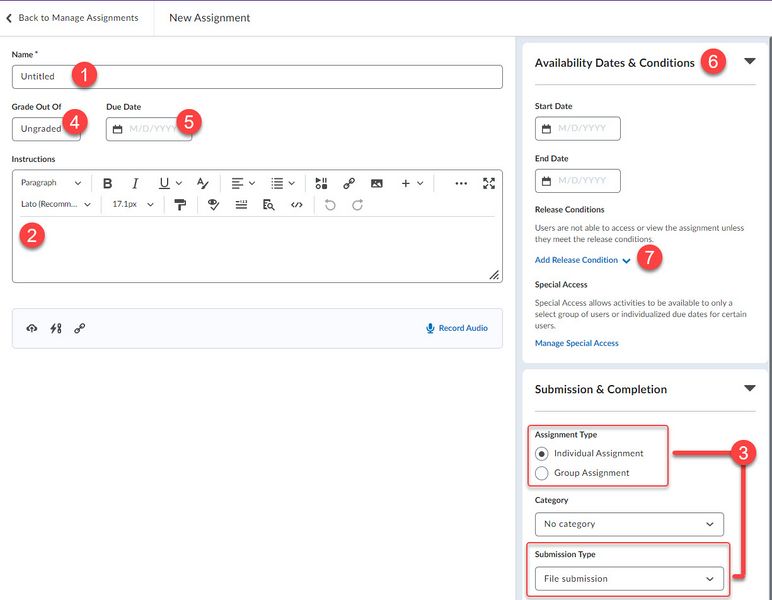
Fig 1. The New Assignment view

Choose a folder type
When creating or editing a folder, select Submission & Completion to expand the list of settings.
Assignment type
- Under Assignment Type, select either Individual Assignment or Group Assignment.
- If Group Assignment is selected, choose a Group Category (e.g., Project Groups, Lab Teams) that you created previously. Learn more about creating groups in your Brightspace courses.
Submission type
File
- Under Submission Type, select File submission (Fig 2.1).
- Under Files Allowed Per Submission, select Unlimited or One File (Fig 2.2). Choose Unlimited if the assignment requires students to upload more than one file.
- If restricting the types of files that can be submitted, select a preset restriction or Custom File Types under Allowable File Extensions (Fig 2.3). If you select Custom File Types, enter the allowable file types manually. Find more information about handling file types here.
- Under Submissions, choose whether to allow one or multiple submissions (e.g., attempts, drafts) of the same assignment (Fig 2.4). Learn more about supporting multiple submissions.
Text
- Under Submission Type, select Text submission (Fig 3.1)
- Under Submissions, choose whether to allow one or multiple submissions (e.g., attempts, drafts) of the same assignment (Fig 3.2).
On paper
- Under Submission Type, select On paper submission (Fig 4.1)
- Under Marked as completed, select whether you want the assignment marked as completed by the student manually, automatically when you publish your evaluation, or automatically on the due date (Fig 4.2).
Observed in person
- Under Submission Type, select Observed in person (Fig 5.1)
- Under Marked as completed, select whether you want the assignment marked as completed by the student manually, automatically when you publish your evaluation, or automatically on the due date (Fig 5.2).
Choose evaluation options
Ungraded
- Leave the default Ungraded setting in the Grade Out Of field.
- If the Grade Out Of field has changed to a points entry box, select In Grade Book and select Reset to Ungraded.
Graded (not in grade book)
- If this is a new assignment folder, select Ungraded in the Grade Out Of field. This will switch the field to a points entry box and add the In Grade Book menu. If you are editing an existing assignment that is already graded, select the
- Enter the maximum number of points for the assignment.
- Select In Grade Book menu. Select Not in Grade Book if you don't want the student's earned points on the assignment to be transferred to a column in your grade book. Select Edit or Link to Existing if you want to associate the assignment with a column in your grade book or change a previous association.
- If you selected Edit or Link to Existing,
Graded (in grade book)
Set dates and conditions
- Select the Due Date field and enter the date using the calendar function.
- To set the dates the assignment is available to the students, click the arrow after Availability & Conditions and enter the Start Date and End Date by clicking in the fields and using the calendar function. (See Fig 1.)
- To define the assignment type and how submissions are accepted and retained, click the arrow after Submission & Completion. (See Fig.2)
- Select Individual Assignment if each student submits their own work or Group Assignment is it is a group project. If this is a group project, you will be prompted for the Groups definition you desire. For additional information on Groups and how to use them in Assignments, see Groups and Assignments.
- Set the Submission Type. File submission means the students are expected to upload their work in the form of a file. Brightspace supports most of the popular file types including all the Microsoft Office formats, PDFs, and popular graphical formats. Text submission says the students will type up their responses in an editor window in the assignment folder. On paper submission denotes there will be no submission to the folder, that you will collect the submissions and assess them on paper. Observed in person says the submission was a presentation or performance that the teacher watched live.
- Set the number of files that student will be allowed to submit and how you wish Brightspace to curate the submissions.
- Clicking the arrow to the right of Evaluation & Feedback let's you set up how you get feedback to the students. You can optionally attach a rubric to the assignment. (More information on Brightspace rubrics is available at Brightspace Rubrics.) Checking the box under Annotation Tools turns on the annotation tools within Assignments. (For more information, see Using annotation to give feedback. You can also state whether peer reviews are anonymous under Anonymous Marking. (See fig. 3)
- Click Save and Close.

Fig 1. The New Assignment view

Fig 2. Enter maximum points

Fig 1. Availability Dates & Conditions

Fig 2. Submission & Completion

Fig 3. Evaluation & Feedback


More wiki articles
- Add Turnitin to Brightspace assignments
- Submit assignments in Brightspace
- Brightspace Assignments
- Add a Brightspace Assignment folder
- Add feedback to Assignment Submission Folders
- Add feedback to a student's Brightspace assignment submission
- Category:Brightspace Assignments Teacher