Difference between revisions of "Add a content module to a Brightspace course"
Jump to navigation
Jump to search


| (34 intermediate revisions by 2 users not shown) | |||
| Line 1: | Line 1: | ||
{{TOC_Float_Right}} | {{TOC_Float_Right}} | ||
| − | [[File:D2L10- | + | [[File:D2L10-3 content module add.jpg|right|frame|Fig 1. Enter a title for the new module]] |
| − | [[File:D2L10- | + | [[File:D2L10-3 content module addsub.jpg|right|frame|Fig 2. Enter a title for the new sub-module]] |
| − | [[File:D2L10- | + | [[File:D2L10-3 content module publish.jpg|right|frame|Fig 3. Switch modes]] |
| − | [[File:D2L10- | + | [[File:D2L10-3 content module rename.jpg|right|frame|Fig 4. Select to edit the module title]] |
| − | [[File:D2L10- | + | [[File:D2L10-3 content module description.jpg|right|frame|Fig 5. Select to add a module description]] |
| + | |||
==About this article== | ==About this article== | ||
This article demonstrates how to add a content module to a table of contents (TOC) in a [[Desire2Learn]] (D2L) course. It is intended for '''instructors'''. | This article demonstrates how to add a content module to a table of contents (TOC) in a [[Desire2Learn]] (D2L) course. It is intended for '''instructors'''. | ||
| − | |||
==What's a module?== | ==What's a module?== | ||
In D2L, instructors provide students with access to course materials by building a TOC composed of headings and links. The headings are called ''modules'' and the links are called ''topics''. There are many ways to organize content and any TOC could include a combination of approaches. For example, instructors could organize content by: | In D2L, instructors provide students with access to course materials by building a TOC composed of headings and links. The headings are called ''modules'' and the links are called ''topics''. There are many ways to organize content and any TOC could include a combination of approaches. For example, instructors could organize content by: | ||
| Line 14: | Line 14: | ||
*'''Type'''. Modules group content based on type (e.g., handouts, slides, videos, links). | *'''Type'''. Modules group content based on type (e.g., handouts, slides, videos, links). | ||
| − | == | + | ==Instructions== |
| − | + | For all instructions below, first navigate to a D2L course and select '''Content''' from the '''Materials''' menu. This will take you to the D2L Content Tool. | |
| + | |||
| + | ===Adding a module=== | ||
#At the bottom of the sidebar region, select '''Add a module...''' (Figure 1). | #At the bottom of the sidebar region, select '''Add a module...''' (Figure 1). | ||
#Enter a title for the new module and press '''Enter''' on your keyboard. | #Enter a title for the new module and press '''Enter''' on your keyboard. | ||
| − | ==Adding a sub-module== | + | ===Adding a sub-module=== |
| − | |||
#From the sidebar region, select the module or sub-module under which you want to place a sub-module. | #From the sidebar region, select the module or sub-module under which you want to place a sub-module. | ||
#In the content region, select '''Add a sub-module...''' (Figure 2). | #In the content region, select '''Add a sub-module...''' (Figure 2). | ||
#Enter a title for the new sub-module, and press '''Enter''' on your keyboard. | #Enter a title for the new sub-module, and press '''Enter''' on your keyboard. | ||
| − | == | + | ===Switching between published and draft mode=== |
| − | + | #From the sidebar region, select the module or sub-module that you want to switch. | |
| + | #Select the down arrow to the right of '''Published''' or '''Draft''' to open the pick list. | ||
| + | #Select either '''Published''' or '''Draft''' (this will differ depending on the current mode) from the content region (Figure 3). This will close the list and switch to that mode. | ||
| + | |||
| + | ===Renaming a module or sub-module=== | ||
| + | #From the sidebar region, select the module or sub-module that you want to rename. | ||
| + | #Select the title of the module or sub-module at the top of the content region (Figure 4). | ||
| + | #Change the title and select '''Enter''' on your keyboard to save it. | ||
| + | |||
| + | ===Adding a description to a module or sub-module=== | ||
| + | #From the sidebar region, select the module or sub-module that you want to rename. | ||
| + | #Select '''Add a description...''' on the content region (Figure 5). | ||
| + | #Use the editor to create the description and select the '''Update''' button to save it. | ||
| + | |||
| + | ==Additional details== | ||
| + | *New modules and sub-modules are always appended to the end of the list. They can then be [[Moving and reordering content in a D2L course|moved]] if needed. | ||
*It's good practice to keep module and sub-module titles short so they fit on the sidebar. Titles longer than 16 characters (including spaces) will wrap to a second line. | *It's good practice to keep module and sub-module titles short so they fit on the sidebar. Titles longer than 16 characters (including spaces) will wrap to a second line. | ||
| − | + | *By default, new modules are set to published mode and access is unrestricted. You can control access by switching to Draft mode or by [[Restricting content access in D2L|setting restrictions]] at the module-level (e.g., if you don't want students to see a module until after a certain point in the course). This will restrict access to all of the sub-modules and topics underneath it. | |
| − | + | *Module and sub-module descriptions can help orient students and give your TOC a polished look. | |
| − | *By default, modules are published and | ||
*If you plan to [[Integrating publisher-provided content into D2L|import a publisher-provided course pack]] or cartridge, it is not uncommon for that process to result in the addition of several new modules and sub-modules. For example, the publisher may include links to PowerPoint slides under a "PowerPoint Presentations" module. This import can be done at any time, even if you have already added modules yourself. Any new modules created by the installation of a course pack are typically added at the bottom of your existing TOC. These modules can then be edited, moved, or deleted. | *If you plan to [[Integrating publisher-provided content into D2L|import a publisher-provided course pack]] or cartridge, it is not uncommon for that process to result in the addition of several new modules and sub-modules. For example, the publisher may include links to PowerPoint slides under a "PowerPoint Presentations" module. This import can be done at any time, even if you have already added modules yourself. Any new modules created by the installation of a course pack are typically added at the bottom of your existing TOC. These modules can then be edited, moved, or deleted. | ||
*If you are going to [[Merging D2L courses|merge course sections]], do not create modules until after the merge is complete and the new merged course appears on your class list. | *If you are going to [[Merging D2L courses|merge course sections]], do not create modules until after the merge is complete and the new merged course appears on your class list. | ||
| + | *Be careful when [[Deleting D2L content modules and topics|deleting modules and sub-modules]]. Depending on how you delete the module, you may also delete child sub-modules and topics. | ||
==Related Articles== | ==Related Articles== | ||
*[[Content in D2L]] | *[[Content in D2L]] | ||
| − | *[[Adding | + | *[[Adding an overview to a D2L course]] |
*[[Adding a content topic to a D2L course]] | *[[Adding a content topic to a D2L course]] | ||
| − | *[[ | + | *[[Editing D2L content topics]] |
| − | *[[ | + | *[[Deleting D2L content modules and topics]] |
| + | *[[Copying D2L courses]] | ||
*[[Restricting_content_access_in_D2L|Restricting D2L content access]] | *[[Restricting_content_access_in_D2L|Restricting D2L content access]] | ||
*Learning objectives in D2L (coming soon) | *Learning objectives in D2L (coming soon) | ||
| − | [[Category: Content]][[Category: D2L]][[Category: D2L Content Tool]][[Category:Faculty]] | + | [[Category: Content]][[Category: D2L]][[Category: D2L Content Tool]][[Category:Faculty]][[Category: Content Organization]] |
| + | [[Category:KG]] | ||
Revision as of 04:49, 14 January 2016

Fig 1. Enter a title for the new module

Fig 2. Enter a title for the new sub-module

Fig 3. Switch modes

Fig 4. Select to edit the module title

Fig 5. Select to add a module description
About this article
This article demonstrates how to add a content module to a table of contents (TOC) in a Desire2Learn (D2L) course. It is intended for instructors.
What's a module?
In D2L, instructors provide students with access to course materials by building a TOC composed of headings and links. The headings are called modules and the links are called topics. There are many ways to organize content and any TOC could include a combination of approaches. For example, instructors could organize content by:
- Timeline. Modules represent some unit of time (e.g., Week 1, Week 2).
- Subject. Modules represent chapters or subject areas in textbook fashion (e.g., Biological Bases of Behavior)
- Type. Modules group content based on type (e.g., handouts, slides, videos, links).
Instructions
For all instructions below, first navigate to a D2L course and select Content from the Materials menu. This will take you to the D2L Content Tool.
Adding a module
- At the bottom of the sidebar region, select Add a module... (Figure 1).
- Enter a title for the new module and press Enter on your keyboard.
Adding a sub-module
- From the sidebar region, select the module or sub-module under which you want to place a sub-module.
- In the content region, select Add a sub-module... (Figure 2).
- Enter a title for the new sub-module, and press Enter on your keyboard.
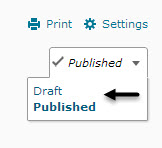
Switching between published and draft mode
- From the sidebar region, select the module or sub-module that you want to switch.
- Select the down arrow to the right of Published or Draft to open the pick list.
- Select either Published or Draft (this will differ depending on the current mode) from the content region (Figure 3). This will close the list and switch to that mode.
Renaming a module or sub-module
- From the sidebar region, select the module or sub-module that you want to rename.
- Select the title of the module or sub-module at the top of the content region (Figure 4).
- Change the title and select Enter on your keyboard to save it.
Adding a description to a module or sub-module
- From the sidebar region, select the module or sub-module that you want to rename.
- Select Add a description... on the content region (Figure 5).
- Use the editor to create the description and select the Update button to save it.
Additional details
- New modules and sub-modules are always appended to the end of the list. They can then be moved if needed.
- It's good practice to keep module and sub-module titles short so they fit on the sidebar. Titles longer than 16 characters (including spaces) will wrap to a second line.
- By default, new modules are set to published mode and access is unrestricted. You can control access by switching to Draft mode or by setting restrictions at the module-level (e.g., if you don't want students to see a module until after a certain point in the course). This will restrict access to all of the sub-modules and topics underneath it.
- Module and sub-module descriptions can help orient students and give your TOC a polished look.
- If you plan to import a publisher-provided course pack or cartridge, it is not uncommon for that process to result in the addition of several new modules and sub-modules. For example, the publisher may include links to PowerPoint slides under a "PowerPoint Presentations" module. This import can be done at any time, even if you have already added modules yourself. Any new modules created by the installation of a course pack are typically added at the bottom of your existing TOC. These modules can then be edited, moved, or deleted.
- If you are going to merge course sections, do not create modules until after the merge is complete and the new merged course appears on your class list.
- Be careful when deleting modules and sub-modules. Depending on how you delete the module, you may also delete child sub-modules and topics.