Difference between revisions of "Draft:CaptureSpace Lite screen capture Quickstart"
Jump to navigation
Jump to search
| Line 8: | Line 8: | ||
# The recorder has 4 recording options. Select the '''SCREEN & WEBCAM''' option in the top right corner. This will record your screen, webcam, and audio.<br clear="all" /><hr />[[File:ScreenCaptureOptions.png|right]] | # The recorder has 4 recording options. Select the '''SCREEN & WEBCAM''' option in the top right corner. This will record your screen, webcam, and audio.<br clear="all" /><hr />[[File:ScreenCaptureOptions.png|right]] | ||
# Next select the “FULL SCREEN” button on the next page, and then select record.<br clear="all" /><hr /> | # Next select the “FULL SCREEN” button on the next page, and then select record.<br clear="all" /><hr /> | ||
| − | # | + | # A countdown will appear on the screen and your image in the corner. Select your PowerPoint and then position your webcam. You want to make sure you do not cover up any of your photos or text on each slide. You can also drag the edges of your image to make it larger or smaller. Put your PowerPoint into slideshow mode. Then begin your presentation.{br clear="all /><hr />[[File:Mediaspace csl controls.jpg|right]] |
| − | # If during your recording you need to pause, select the '''PAUSE''' button from the control panel below the video. | + | # The recording panel helps you control the recording process. |
| − | # If you would like to start your recording over, select '''CANCEL''' from the control panel. Selecting '''OK''' on the next screen will permanently delete your recording. | + | #* If during your recording you need to pause, select the '''PAUSE''' button from the control panel below the video. |
| − | + | #* If you would like to start your recording over, select '''CANCEL''' from the control panel. Selecting '''OK''' on the next screen will permanently delete your recording. | |
| + | #* If you would like to draw on your slides, use the '''DRAW''' controls to configure your tools. | ||
| + | #* When you are done, click '''DONE''' to save a copy of the video on your | ||
==Posting your recording in Brightspace== | ==Posting your recording in Brightspace== | ||
Revision as of 19:18, 9 June 2017
About this article
This article describes how to use CaptureSpace Lite to capture a webcam video and post in a Brightspace course. It is intended for students.
Recording in CaptureSpace Lite and Uploading to MediaSpace
- Go to http://mediaspace.mnscu.edu/ and login with your STAR ID.
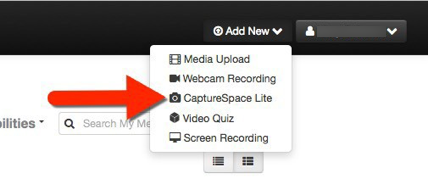
- Select Add New in the top right corner and select CaptureSpace Lite from the dropdown. This will launch the desktop recorder. (NOTE: If you have not used CaptureSpace Lite before you will have to download the recorder. It may take a few minutes to download.)

- The recorder has 4 recording options. Select the SCREEN & WEBCAM option in the top right corner. This will record your screen, webcam, and audio.
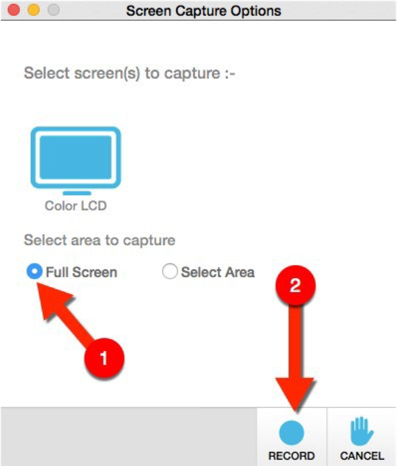
- Next select the “FULL SCREEN” button on the next page, and then select record.
- A countdown will appear on the screen and your image in the corner. Select your PowerPoint and then position your webcam. You want to make sure you do not cover up any of your photos or text on each slide. You can also drag the edges of your image to make it larger or smaller. Put your PowerPoint into slideshow mode. Then begin your presentation.{br clear="all />
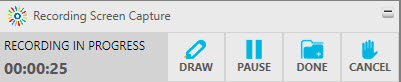
- The recording panel helps you control the recording process.
- If during your recording you need to pause, select the PAUSE button from the control panel below the video.
- If you would like to start your recording over, select CANCEL from the control panel. Selecting OK on the next screen will permanently delete your recording.
- If you would like to draw on your slides, use the DRAW controls to configure your tools.
- When you are done, click DONE to save a copy of the video on your


Posting your recording in Brightspace
- If you are not already in MediaSpace, go to http://mediaspace.mnscu.edu/ and login with your STAR ID.
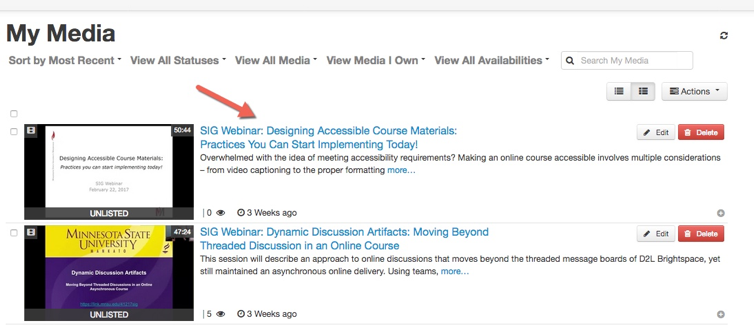
- Next, find the recorded presentation from the list of your media. And Click on the title of the video.
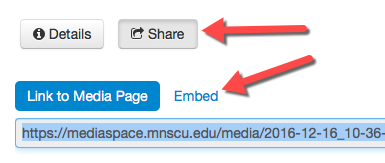
- Click the Share button under the video preview.
- Once you click Share, two new options appear below Details and Share: Link to Media Page and Embed. Select Embed to display the code needed to embed your recording into your assignment area.
- Copy the embed code by pressing Cmd-C on a Mac or Ctrl-C on a PC. (The embed code will be a rather large block on complicated code. Copy it without making changes.)
- Go to Brightspace, enter your course, and navigate to the Assignments tool.
- Click on the assignment to which you are posting your recording.
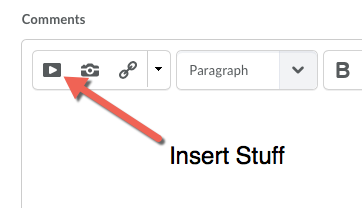
- Select Insert Stuff, paste the embed code into the box, set any additional fields, and submit your assignment.


