Difference between revisions of "Creating and Uploading Documents on OneDrive"
| (7 intermediate revisions by 2 users not shown) | |||
| Line 1: | Line 1: | ||
| + | {{TOC_Float_Right}} | ||
===Introduction=== | ===Introduction=== | ||
Currently the best way to collaborate with other on campus is by using OneDrive as your groups collaborative hub. You can share anything from PowerPoints, Word Documents, and even entire OneDrive folders. This makes OneDrive preferred by many instructors and students. This article will cover the steps to creating and sharing documents on OneDrive. | Currently the best way to collaborate with other on campus is by using OneDrive as your groups collaborative hub. You can share anything from PowerPoints, Word Documents, and even entire OneDrive folders. This makes OneDrive preferred by many instructors and students. This article will cover the steps to creating and sharing documents on OneDrive. | ||
| Line 45: | Line 46: | ||
4. Finished! Selected users will be sent a notification that they can now edit the document! | 4. Finished! Selected users will be sent a notification that they can now edit the document! | ||
| − | == | + | ==LinkedIn Learning Training== |
| − | [[File: | + | [[File:LiL-Logo-21px.png]] |
| − | All WSU students and employees have access to | + | All WSU students and employees have access to LinkedIn Learning. [[Activate your LinkedIn Learning account|Instructions for activating your LinkedIn Learning account]] |
| − | + | LiL resources relevant to the topic on this page: | |
| − | *[https://www. | + | *[https://www.linkedin.com/learning/onedrive-for-business-essential-training-2/share-files-and-use-an-expiring-link-3?u=41915348 Share Files and use an Expiring Link] from [https://www.linkedin.com/learning/onedrive-for-business-essential-training-2?u=41915348 OneDrive for Business Essential Training Course] |
| − | [[Category: Instructions]][[Category: OneDrive for Business]][[Category: Microsoft | + | [[Category: Instructions]][[Category: OneDrive for Business]][[Category: Microsoft 365]][[Category: file storage]] |
Latest revision as of 01:06, 1 April 2021
Introduction
Currently the best way to collaborate with other on campus is by using OneDrive as your groups collaborative hub. You can share anything from PowerPoints, Word Documents, and even entire OneDrive folders. This makes OneDrive preferred by many instructors and students. This article will cover the steps to creating and sharing documents on OneDrive.
Why Use OneDrive Web Apps?
OneDrive is like your own virtual hard drive on the cloud. You get 1TB of storage space but even more importantly you can work on documents directly from the cloud. Also, OneDrive allows you to share anything you upload to OneDrive with other users, and even allow them to edit documents at the same time as you.
Getting Started
There are a few ways to create and edit files on your OneDrive.
- Using the Office 365 web suite
- Directly from Office applications (PowerPoint 2016, Word 2016, etc)
- Manually copying documents to your OneDrive
We will be focusing mostly on using the Office 365 web suite in this article.
Creating a Document on OneDrive Using Office 365
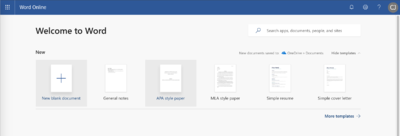
1. Navigate and sign in to the 365 portal. Then click on the "Word" icon. Your screen should look similar to this.
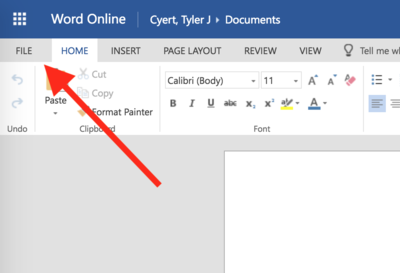
2. After you've made a few changes to the document, click File.
3. Click Save as then click Save as again.
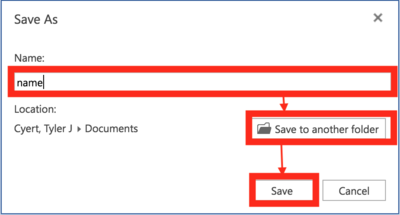
4. Now, name your file in the text box, then click the Save to another folder button to change where in OneDrive the file will be saved or you skip it and I will save to the default location.
5. Finished! You successfully saved a word document to the cloud. Continue reading to find out how to share and add other collaborators to a document.
Sharing Documents in Word Online
1. Open a file you would like to share in Word Online, and click File.
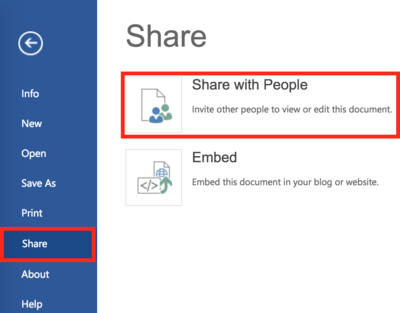
2. Next, click Share, then click Share with People.
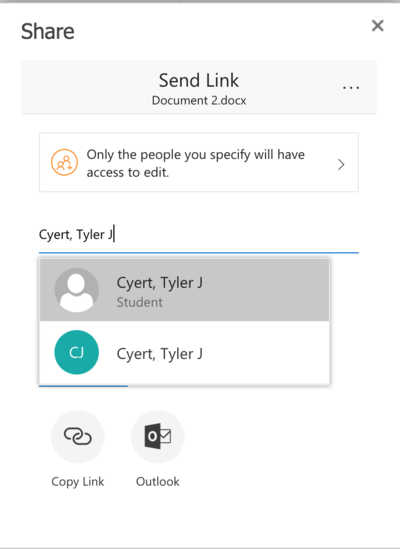
3. Select the permissions that others will have over the file and type their name or email into the box. (Note: If the user's name does not auto as pictured try enter their last name first or simply type their email address)
4. Finished! Selected users will be sent a notification that they can now edit the document!
LinkedIn Learning Training
![]() All WSU students and employees have access to LinkedIn Learning. Instructions for activating your LinkedIn Learning account
All WSU students and employees have access to LinkedIn Learning. Instructions for activating your LinkedIn Learning account
LiL resources relevant to the topic on this page:
