Difference between revisions of "Draft:DLC Fall 2018 Class Projects/Jane Morken CaptureSpace Recording (EDFD 420)"
(Created page with "{{TOC_Float_Right}} <noinclude> ==Project Details== This project is designed to help students within Dr. Jane Morken's EDFD 420 course record lessons conducted as a part of yo...") |
Ceanderson16 (talk | contribs) m (Ceanderson16 moved page DLC Fall 2018 Class Projects/Jane Morken CaptureSpace Recording (EDFD 420) to Draft:DLC Fall 2018 Class Projects/Jane Morken CaptureSpace Recording (EDFD 420)) |
||
| (16 intermediate revisions by 3 users not shown) | |||
| Line 1: | Line 1: | ||
{{TOC_Float_Right}} | {{TOC_Float_Right}} | ||
<noinclude> | <noinclude> | ||
| + | =NOTE= | ||
| + | This project used CaptureSpace Lite, which was decommitted by the System Office. CaptureSpace Lite is no longer available through MediaSpace. [https://learn.winona.edu/Recording_with_Kaltura_Capture Kaltura Capture] should be used in its place. | ||
| + | |||
==Project Details== | ==Project Details== | ||
| − | This project is designed to help students within | + | This project is designed to help students within Professor Jane Morken's EDFD 420 course record lessons conducted as a part of your field placement. The steps involved to complete your recording with CaptureSpace Lite are provided below. Also the directions for editing your videos down to 10 min and uploading the final version to D2L BrightSpace. |
</noinclude> | </noinclude> | ||
| − | == | + | ==Downloading CaptureSpace Lite== |
To access the CaptureSpace Lite tool: | To access the CaptureSpace Lite tool: | ||
| − | # Use your favorite web browser to | + | # Use your favorite web browser to log into your MediaSpace account at [https://mediaspace.minnstate.edu '''mediaspace.minnstate.edu'''] using your Star ID username and password. This will take you to your '''My Media''' page. |
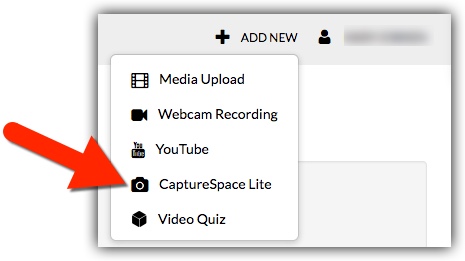
# Select '''CaptureSpace Lite''' from the '''Add New''' menu.<br />'''Note:''' If you have not yet installed CaptureSpace Lite on your laptop, refer to the installation instructions found at [https://learn.winona.edu/Recording_with_CaptureSpace_Lite Recording with CaptureSpace Lite]. | # Select '''CaptureSpace Lite''' from the '''Add New''' menu.<br />'''Note:''' If you have not yet installed CaptureSpace Lite on your laptop, refer to the installation instructions found at [https://learn.winona.edu/Recording_with_CaptureSpace_Lite Recording with CaptureSpace Lite]. | ||
| − | # | + | # Once you have installed the recorder, you will need to restart your browser and log back into MediaSpace and launch the CaptureSpace Lite recording tool. |
| + | |||
| + | |||
| + | ==Recording and Editing in CaptureSpace Lite== | ||
| + | '''1.''' If you have dowloaded CaptureSpace Lite simply go to http://mediaspace.minnstate.edu/ and log in with your STAR ID. | ||
| + | |||
| + | '''2.''' Select '''Add New''' in the top right corner and select '''CaptureSpace Lite''' from the drop-down. This will launch the desktop recorder. ('''NOTE''': If you have not used CaptureSpace Lite before you will have to download the recorder. Select the correct version for your computer and download the application. It may take a few minutes to download. Once downloaded go back to Mediaspace and complete Step # 2 again) | ||
| + | |||
| + | <br />[[File:MS 1.jpg|center]] | ||
| + | |||
| + | '''3.''' The recorder has 4 recording options. Select the '''WEBCAM''' option in the bottom left corner. This will record your webcamera and audio only. | ||
| + | |||
| + | <br />[[File:Capturespace 2.jpg|center]] | ||
| + | |||
| + | '''4.''' Once launched, a small screen will appear and your camera will start. You will have a five-second countdown in the ''bottom left-corner'', once the countdown is done, you are recording. | ||
| + | |||
| + | <br />[[File:RecordingTimer.png|center]] | ||
| + | |||
| + | '''5.''' If during your recording you need to pause, select the '''Pause''' button from the control panel below the video. You can also '''Cancel''' the recording and start over if needed. When you are done recording, select '''Done''' from the control panel | ||
| + | |||
| + | <br />[[File:RecordingPanel.png|center]] | ||
| + | |||
| + | '''6.''' Next, you will see a preview window. You can view your video before saving it. Once you are done watching your video just simply select '''Done''', in the bottom right-hand corner. | ||
| + | |||
| + | <br />[[File:PreviewWindow.png|center]] | ||
| + | |||
| + | |||
| + | |||
| + | <div style="float: center; margin-left:.5cm;">{{#widget:Iframe | ||
| + | |url=https://cdnapisec.kaltura.com/p/812561/sp/81256100/embedIframeJs/uiconf_id/33140371/partner_id/812561?iframeembed=true&playerId=kaltura_player&entry_id=0_17dzb3uw&flashvars[mediaProtocol]=rtmp&flashvars[streamerType]=rtmp&flashvars[streamerUrl]=rtmp://www.kaltura.com:1935&flashvars[rtmpFlavors]=1&flashvars[localizationCode]=en&flashvars[leadWithHTML5]=true&flashvars[sideBarContainer.plugin]=true&flashvars[sideBarContainer.position]=left&flashvars[sideBarContainer.clickToClose]=true&flashvars[chapters.plugin]=true&flashvars[chapters.layout]=vertical&flashvars[chapters.thumbnailRotator]=false&flashvars[streamSelector.plugin]=true&flashvars[EmbedPlayer.SpinnerTarget]=videoHolder&flashvars[dualScreen.plugin]=true&&wid=0_ad89w2lq | ||
| + | |width=600 | ||
| + | |height=538 | ||
| + | |border=0 | ||
| + | }}</div> | ||
| + | |||
| + | <br clear="all"> | ||
| + | |||
| + | '''7.''' Next title your video and select Upload. This will store the video in your MediaSpace account. | ||
| + | |||
| + | <br />[[File:UploadOptions.png|center]] | ||
| + | '''8.''' Once the process is completed, you can optionally select the link within the window and go into MediaSpace to view your recording. '''Do not copy this link to share your video. It is not the link to your recording.''' It may take a few minutes for your video to appear in MediaSpace. (If it has been more than 5 minutes and your video has not appeared in MediaSpace, try refreshing your page or logging back in.) | ||
| − | + | ==Submitting Your Video in Brightspace Assignments== | |
| + | '''1.)''' Login to D2L and go to your course. Select the '''Assessment''' tab from the navigation bar and select '''Assignments''' from the drop-down. Select the name of the assignment you are submitting. | ||
| − | + | '''2.)''' Scroll down the page until you see the '''Comments''' section at the bottom of the window and select the '''Insert Stuff''' icon. | |
| − | |||
| − | |||
| − | |||
| − | |||
| − | |||
| − | + | <br />[[File:Insert_stuff_2.jpg|center]] | |
| − | |||
| − | |||
| − | |||
| − | |||
| − | |||
| − | |||
| − | |||
| − | + | '''3.)''' Select '''My Media''' from the left panel and you will be presented a list of all your recordings in MediaSpace. Select the recording you wish to submit, then select '''Next''' at the bottom of the page. | |
| − | + | <br />[[File:Mediaspace Insert Stuff Option.jpg|center]] | |
| − | |||
| − | |||
| − | |||
| − | |||
| − | |||
| − | + | '''4.)''' The next window will show a preview of the recording. Click the '''Insert''' button. | |
| − | + | ||
| − | + | '''5.)''' You will be returned to the '''Assignments''' window. In order to complete your submission you must also submit a document to the assignment folder. This could be a blank document or another document requested by your instructor. Select '''Add File''' and upload your document. Then select '''Submit''' at the bottom of the page to complete your submission.<br />[[File:Assignment folder 1.jpg|center]] | |
| − | |||
| − | |||
<noinclude> | <noinclude> | ||
| + | ==Posting Your Video in Brightspace Discussions== | ||
| + | '''1.)''' Login to D2L and go to your course. Select the '''Communication''' tab from the navigation bar and select '''Discussions''' from the drop-down. Select the discussion board you would like to post to. | ||
| + | |||
| + | '''2.)''' If your are creating a new thread in the topic, click the '''Start a New Thread''' button. | ||
| + | |||
| + | '''3.)''' Title your post in the subject line and select the '''Insert Stuff''' icon below. | ||
| + | <br />[[File:Discussion Mediaspace video 1.jpg|center]] | ||
| + | |||
| + | '''4.)''' Select '''My Media''' from the left panel and you will be presented a list of all your recordings in MediaSpace. Select the recording you wish to post, then select '''Next''' at the bottom of the page. | ||
| + | |||
| + | <br />[[File:Mediaspace Insert Stuff Option.jpg|center]] | ||
| − | + | '''5.)''' The next window will show a preview of the recording. Click the '''Insert''' button. | |
| − | + | '''6.)''' Add any additional comments to your post and select '''Post''' at the bottom of the page to post your video to the discussion board. | |
| − | |||
| − | |||
| − | |||
| − | |||
| − | |||
| − | |||
| + | <br />[[File:Mediaspace Discussion Post.jpg|center]] | ||
| − | |||
===Recording with CaptureSpace Lite=== | ===Recording with CaptureSpace Lite=== | ||
*[[Adjusting CaptureSpace Lite recording settings|How to adjust your recording settings]] | *[[Adjusting CaptureSpace Lite recording settings|How to adjust your recording settings]] | ||
| Line 71: | Line 101: | ||
| − | [[category: Custom Training]][[Category: DLC Class Projects- | + | [[category: Custom Training]][[Category: DLC Class Projects-Archive]] |
</noinclude> | </noinclude> | ||
Latest revision as of 18:35, 20 February 2020
NOTE
This project used CaptureSpace Lite, which was decommitted by the System Office. CaptureSpace Lite is no longer available through MediaSpace. Kaltura Capture should be used in its place.
Project Details
This project is designed to help students within Professor Jane Morken's EDFD 420 course record lessons conducted as a part of your field placement. The steps involved to complete your recording with CaptureSpace Lite are provided below. Also the directions for editing your videos down to 10 min and uploading the final version to D2L BrightSpace.
Downloading CaptureSpace Lite
To access the CaptureSpace Lite tool:
- Use your favorite web browser to log into your MediaSpace account at mediaspace.minnstate.edu using your Star ID username and password. This will take you to your My Media page.
- Select CaptureSpace Lite from the Add New menu.
Note: If you have not yet installed CaptureSpace Lite on your laptop, refer to the installation instructions found at Recording with CaptureSpace Lite. - Once you have installed the recorder, you will need to restart your browser and log back into MediaSpace and launch the CaptureSpace Lite recording tool.
Recording and Editing in CaptureSpace Lite
1. If you have dowloaded CaptureSpace Lite simply go to http://mediaspace.minnstate.edu/ and log in with your STAR ID.
2. Select Add New in the top right corner and select CaptureSpace Lite from the drop-down. This will launch the desktop recorder. (NOTE: If you have not used CaptureSpace Lite before you will have to download the recorder. Select the correct version for your computer and download the application. It may take a few minutes to download. Once downloaded go back to Mediaspace and complete Step # 2 again)
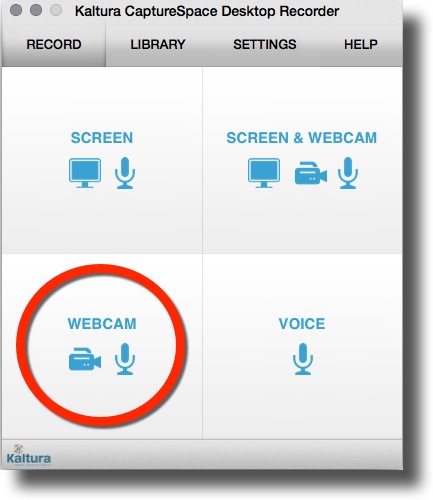
3. The recorder has 4 recording options. Select the WEBCAM option in the bottom left corner. This will record your webcamera and audio only.
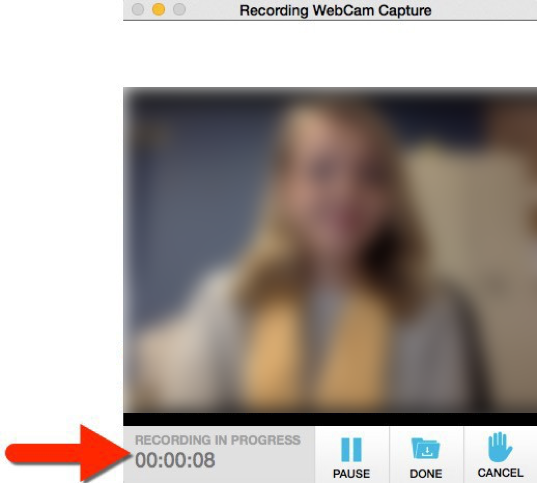
4. Once launched, a small screen will appear and your camera will start. You will have a five-second countdown in the bottom left-corner, once the countdown is done, you are recording.
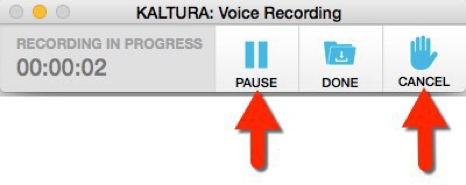
5. If during your recording you need to pause, select the Pause button from the control panel below the video. You can also Cancel the recording and start over if needed. When you are done recording, select Done from the control panel
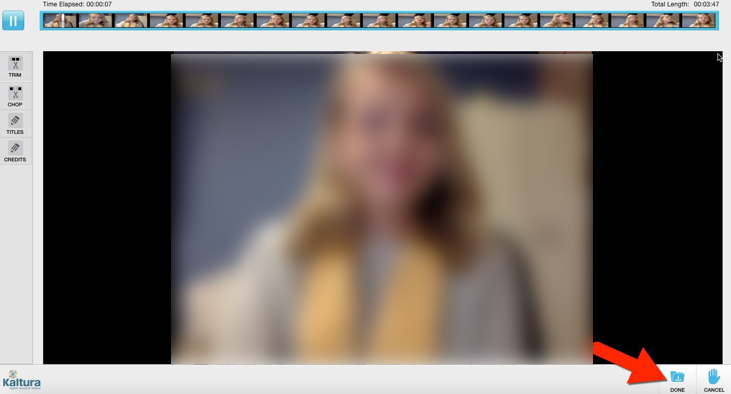
6. Next, you will see a preview window. You can view your video before saving it. Once you are done watching your video just simply select Done, in the bottom right-hand corner.
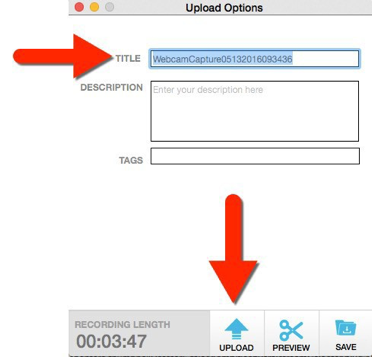
7. Next title your video and select Upload. This will store the video in your MediaSpace account.
8. Once the process is completed, you can optionally select the link within the window and go into MediaSpace to view your recording. Do not copy this link to share your video. It is not the link to your recording. It may take a few minutes for your video to appear in MediaSpace. (If it has been more than 5 minutes and your video has not appeared in MediaSpace, try refreshing your page or logging back in.)
Submitting Your Video in Brightspace Assignments
1.) Login to D2L and go to your course. Select the Assessment tab from the navigation bar and select Assignments from the drop-down. Select the name of the assignment you are submitting.
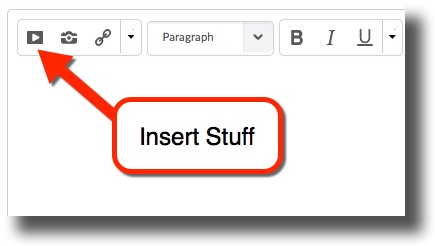
2.) Scroll down the page until you see the Comments section at the bottom of the window and select the Insert Stuff icon.
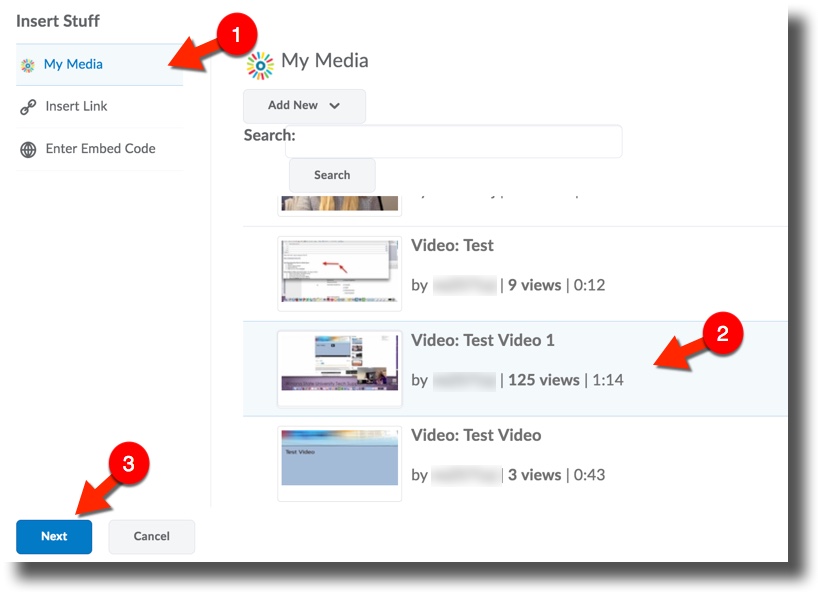
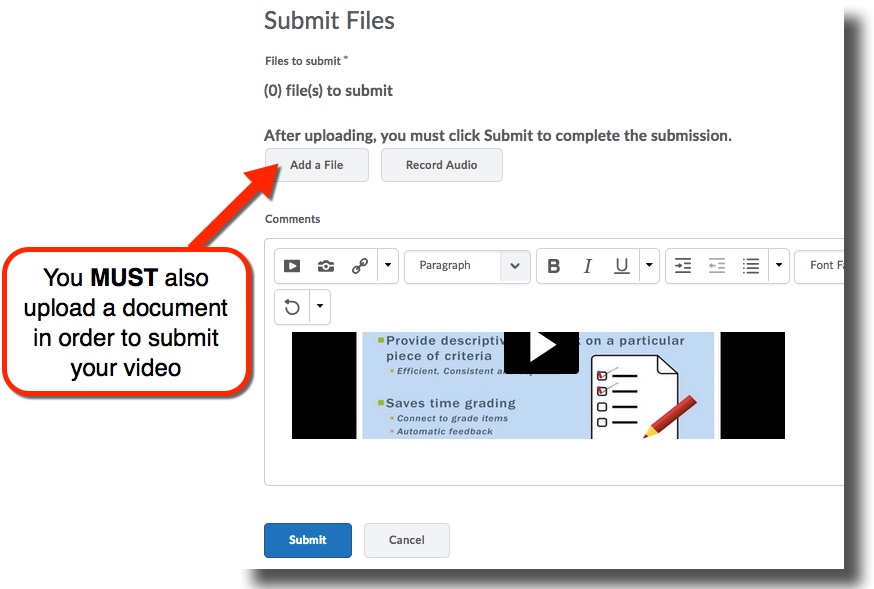
3.) Select My Media from the left panel and you will be presented a list of all your recordings in MediaSpace. Select the recording you wish to submit, then select Next at the bottom of the page.
4.) The next window will show a preview of the recording. Click the Insert button.
5.) You will be returned to the Assignments window. In order to complete your submission you must also submit a document to the assignment folder. This could be a blank document or another document requested by your instructor. Select Add File and upload your document. Then select Submit at the bottom of the page to complete your submission.
Posting Your Video in Brightspace Discussions
1.) Login to D2L and go to your course. Select the Communication tab from the navigation bar and select Discussions from the drop-down. Select the discussion board you would like to post to.
2.) If your are creating a new thread in the topic, click the Start a New Thread button.
3.) Title your post in the subject line and select the Insert Stuff icon below.
4.) Select My Media from the left panel and you will be presented a list of all your recordings in MediaSpace. Select the recording you wish to post, then select Next at the bottom of the page.
5.) The next window will show a preview of the recording. Click the Insert button.
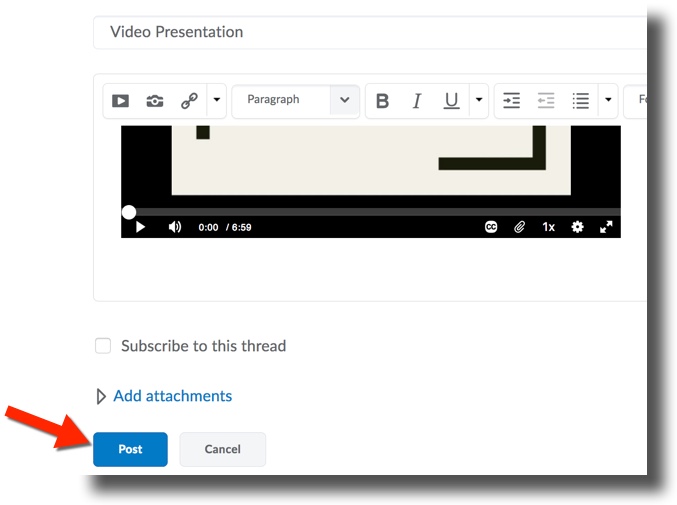
6.) Add any additional comments to your post and select Post at the bottom of the page to post your video to the discussion board.
Recording with CaptureSpace Lite
- How to adjust your recording settings
- How to record your computer screen
- How to record your webcam
- How to record both your computer screen and webcam
- How to record voice only
Other Resources
DLC Support
- Phone: 507-457-2206
- Email: dlc@winona.edu
- 1:1 Support: Krueger Library #105
