Difference between revisions of "Draft:DLC Spring 2012 Class Projects/Nicholas Wysocki (EFRT 308, Section 308-03)"
TJErickson07 (talk | contribs) |
TJErickson07 (talk | contribs) |
||
| Line 63: | Line 63: | ||
==Additional Information== | ==Additional Information== | ||
Another great video that comprehensively covers the You Tube uploading of videos process can be found | Another great video that comprehensively covers the You Tube uploading of videos process can be found | ||
| − | [http://youtu.be/CI9zey7SfQI | + | [http://youtu.be/CI9zey7SfQI here.] |
If there are any questions on any other software the students will have to make 1:1 appointments with the DLC. | If there are any questions on any other software the students will have to make 1:1 appointments with the DLC. | ||
Revision as of 13:28, 31 May 2012
Human Relations and Student Diversity
Class Sections, Location, Days and Times
- 2 sections/32 students per section
- Guildemeister 223
- Tuesdays and Thursdays
- 9:30 am and 2:00 pm
Project Details
- Final Digital Ethnography on Wordpress (project description)
- Note: Aspects of this project and its related description will change going into the Fall 2011 semester.
Training Expectations
Student should know how to:
- Download and add content to WordPress
- Link video content, created on iMovie or MovieMaker and saved to YouTube
- Would like Wiki backup
Software Requested
- WordPress
- iMovie, MovieMaker
- You Tube
Training Schedule
- Will be done using online training resources provided below.
Instructions for Students
Step 1: Developing Your WordPress Page
- If you do not have a WordPress account, start here.
- If you have a WordPress account or when you are done setting up your account, follow the instruction guide provide for creating a static website in WordPress.
- Tasks: Create a secondary page, post a photo, post a pdf and create a link to that document somewhere within the page, and post a link to a You Tube video.
Step 2: Creating Your Video
I will be using a Mac:
I will be using a PC:
Step 3: Uploading Your Video
Here are the steps you will need to follow:
1. Create a YouTube account
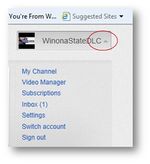
2. Click the drop arrow under your username on the top right corner 
3. Click channel
4. Create channel
5. Upload video from your desktop, iMovie, or Movie Maker. Movie Maker will force you to fill out all of the fields (i.e title, description, and tags) before it will allow you to upload. The Broadcasting and Sharing Options is an important stept to talk about here. You will need to set this to the "Unlisted" setting so that you can share them on your WordPress site and have the connections to your video work correctly. See snipping of this section below.
File:You Tube Broadcasting and Sharing Options.png
Additional Information
Another great video that comprehensively covers the You Tube uploading of videos process can be found here.
If there are any questions on any other software the students will have to make 1:1 appointments with the DLC.