Difference between revisions of "Draft:DLC Spring 2018 Class Projects/Ruth Charles/Mac"
| (21 intermediate revisions by 3 users not shown) | |||
| Line 1: | Line 1: | ||
| − | ==Project Details ( | + | ==Project Details (MAC Users)== |
{{TOC_Float_Right}} | {{TOC_Float_Right}} | ||
[[File:Excel.png|50px|Float_Left]] | [[File:Excel.png|50px|Float_Left]] | ||
| Line 31: | Line 31: | ||
1. Select the cell where you would like the mean value to be output. <br> | 1. Select the cell where you would like the mean value to be output. <br> | ||
2. Navigate to the '''Formulas''' tab in the Menu bar ==> '''More Functions''' ==> '''Statistical''' ==> '''AVERAGE'''. <br> <br> | 2. Navigate to the '''Formulas''' tab in the Menu bar ==> '''More Functions''' ==> '''Statistical''' ==> '''AVERAGE'''. <br> <br> | ||
| − | [[File: | + | [[File:meanStep1Mac.png|800px]] <br> <br> |
| − | 3. The | + | 3. The Formula Builder window below will appear, as seen below. Excel will attempt to guess your data set, but this can be manually selected with the next step. <br><br> |
| − | + | 4. Now, click on the first cell of your data set (behind the Formula Builder window); then, while holding down the shift key, click on the final cell of your data set. Next, click '''Done''' in the Formula Builder window. <br><br> | |
| − | + | [[File:meanStep2Mac.png|800px]] <br><br> | |
| − | + | 5. After clicking '''Done,''' the Mean value will be output into the selected cell. <br><br> | |
| − | + | [[File:meanStep3Mac.png|800px]] <br><br> | |
| − | + | ===Median=== | |
| − | + | 1. Select the cell where you would like the median value to be output. <br> <br> | |
| − | |||
| − | |||
| − | |||
2. Navigate to the '''Formulas''' tab in the Menu bar ==> '''More Functions''' ==> '''Statistical''' ==> '''MEDIAN'''. <br> <br> | 2. Navigate to the '''Formulas''' tab in the Menu bar ==> '''More Functions''' ==> '''Statistical''' ==> '''MEDIAN'''. <br> <br> | ||
| − | |||
| − | |||
| − | [[File: | + | [[File:medianStep1Mac.png|800px]] <br> <br> |
| − | + | 3. The Formula Builder window will appear, as seen below. Excel will attempt to guess your data set, but this can be manually selected with the next step. <br><br> | |
| − | + | 4. Now, click behind the Formula Builder window on the first cell of your data; then, while holding down the shift key, click on the final cell of your data. Next, click '''Done''' in the Formula Builder window. <br><br> | |
| − | + | [[File:medianStep2Mac.png|800px]] <br><br> | |
| − | + | 5. After clicking '''Done,''' the Median value will be output into the selected cell. <br><br> | |
| − | [ | + | [[File:medianStep3Mac.png|800px]] <br><br> |
===Mode=== | ===Mode=== | ||
| Line 69: | Line 64: | ||
2. Navigate to the '''Formulas''' tab in the Menu bar ==> '''More Functions''' ==> '''Statistical''' ==> '''MODE.MULT'''. <br> <br> | 2. Navigate to the '''Formulas''' tab in the Menu bar ==> '''More Functions''' ==> '''Statistical''' ==> '''MODE.MULT'''. <br> <br> | ||
| − | |||
| − | 3. The | + | [[File:modeStep1Mac.png|800px]] <br> <br> |
| + | |||
| + | 3. The Formula Builder window will appear, as seen below. Excel will attempt to guess your data set, but this can be manually selected with the next step. <br><br> | ||
| − | + | 4. Click behind the Formula Builder window on the first cell of your data; then, while holding down the shift key, click on the final cell of your data. <br><br> | |
| − | + | [[File:modeStep2Mac.png|800px]] <br><br> | |
| − | + | 5. CAUTION: after selecting the cells of your data set, do NOT hit enter and do NOT click '''Done'''; instead hit '''Shift+Command+enter'''. This will output<br>the mode(s) of your data set into the cell(s) that you picked. Cells that do not receive a mode value will receive an "#N/A". <br><br> | |
| − | + | [[File:modeStep3Mac.png|800px]] <br><br> | |
| − | + | 6. The mode value(s), if they exist, will be output into the selected output cells. <br><br> | |
| − | [ | + | [[File:modeStep4Mac.png|800px]] |
==Variability== | ==Variability== | ||
===Variance=== | ===Variance=== | ||
| + | 1. Select the output cell for the desired type of variance (either sample variance or population variance).<br><br> | ||
| + | 2. Go to the Formulas tab. <br><br> | ||
| + | 3. For sample variance, navigate to the '''Formulas''' tab in the Menu bar ==> '''More Functions''' ==> '''Statistical''' ==> '''VAR.S'''. <br> <br> | ||
| + | 4. For population variance, navigate to the '''Formulas''' tab in the Menu bar ==> '''More Functions''' ==> '''Statistical''' ==> '''VAR.P'''. <br> <br> | ||
| + | |||
| + | [[File:varianceStep1Mac.png|800px]] <br><br> | ||
| + | |||
| + | 5. Now, click on the first cell of your data set (behind the Formula Builder window); then, while holding down the shift key, click on the final cell of your data set. Then, hit enter or select '''Done'''. <br><br> | ||
| + | |||
| + | [[File:varianceStep2Mac.png|800px]] <br><br> | ||
| + | |||
| + | 6. The selected variance type of your data set will be output into the cell that you picked. <br><br> | ||
| + | |||
| + | [[File:varianceStep3Mac.png|800px]] <br><br> | ||
| + | |||
===Standard Deviation=== | ===Standard Deviation=== | ||
| + | 1. Select the output cell for the desired type of standard deviation (either sample or population standard deviation).<br><br> | ||
| + | 2. Go to the Formulas tab. <br><br> | ||
| + | 3. For sample standard deviation, navigate to the '''Formulas''' tab in the Menu bar ==> '''More Functions''' ==> '''Statistical''' ==> '''STDEV.S'''. <br> <br> | ||
| + | 4. For population standard deviation, navigate to the '''Formulas''' tab in the Menu bar ==> '''More Functions''' ==> '''Statistical''' ==> '''STDEV.P'''. <br> <br> | ||
| + | |||
| + | [[File:standardDeviationStep1Mac.png|800px]] <br><br> | ||
| + | |||
| + | 5. Now, click on the first cell of your data set (to the left of the Formula Builder window); then, while holding down the shift key, click on the final cell of your data set. Then, hit enter or select OK. <br><br> | ||
| + | |||
| + | [[File:standardDeviationStep2Mac.png|800px]] <br><br> | ||
| + | |||
| + | 6. The selected standard deviation type of your data set will be output into the cell that you selected. <br><br> | ||
| + | |||
| + | [[File:standardDeviationStep3Mac.png|800px]] <br><br> | ||
| + | |||
| + | ==Analysis ToolPak== | ||
| + | ===Installation=== | ||
| + | 1. Open Excel. Click on Tools in uppermost Menu Bar <br><br> | ||
| + | |||
| + | 2. Click on the ''Excel Add-ins'' item located on the bottom of the Tools menu. <br><br> | ||
| + | |||
| + | [[File:ToolPakInstallStep1.png|800px]]<br><br> | ||
| + | |||
| + | 3. Select the box for ''Analysis ToolPak'' from the Add-ins Menu, and click OK or hit enter. <br> <br> | ||
| + | |||
| + | [[File:ToolPak4.png|400px]]<br><br> | ||
| + | |||
| + | ===Using the ToolPak=== | ||
| + | 1. Open Excel. Click on the Data tab in the Excel Menu Bar <br><br> | ||
| + | |||
| + | 2. Click on Data Analysis, located in the far right of the Data Tab. <br><br> | ||
| + | |||
| + | [[File:ToolPakUsageStep1.png|800px]]<br><br> | ||
| + | |||
| + | 3. A Data Analysis window will pop-up. For the purposes of this class, you will select Descriptive Statistics from the available options. Hit OK. <br><br> | ||
| + | |||
| + | [[File:ToolPakUsageStep2.png|800px]]<br><br> | ||
| + | |||
| + | 4. A Descriptive Statistics window will pop-up. Select your data, and then check the boxes that you need from the available options. Hit OK.<br><br> | ||
| + | |||
| + | [[File:ToolPakUsageStep3b.png|800px]]<br><br> | ||
| + | |||
| + | 5. A new sheet will be created with your set of descriptive statistics. The screenshot below used Summary Statistics, with ''Label in first row'' checked.<br><br> | ||
| + | |||
| + | [[File:ToolPakUsageStep4.png|800px]] | ||
==DLC STARS/Presenter== | ==DLC STARS/Presenter== | ||
| Line 93: | Line 149: | ||
==Resources/Helpful Links== | ==Resources/Helpful Links== | ||
| − | + | ||
==Other Resources== | ==Other Resources== | ||
| Line 99: | Line 155: | ||
*Phone: 507-457-2206 | *Phone: 507-457-2206 | ||
*Email: dlc@winona.edu | *Email: dlc@winona.edu | ||
| − | *1:1 Support: Krueger Library #105 | + | *1:1 Support: Krueger Library #105 |
| − | |||
| − | + | [[Category: DLC Class Projects-Archive]] | |
Latest revision as of 15:24, 25 March 2020
Project Details (MAC Users)
 Professor Charles is using Microsoft Excel for statistical analyses in her class. This page is a resource for PC users to help you to understand how to use a variety of Excel's basic statistical functionality.
Hardware/Software
- Microsoft Excel for PC
What We Will Cover
- Selecting cells within an Excel file
- Using built-in functions for central tendency and variability
- Using the Analysis ToolPak Add-in
Cell Selection
- Enter: go to row below the current row
- Shift+Enter: go to row above the current row
- Tab: go to the column right of the current column
- Shift+Tab: go to the column left of the current column
- Control+Click: hold down control while clicking new cells to select as many individual cells as desired.
- Shift+Click: selects all cells between the currently selected cell to the desired cell being clicked. Works across rows and columns.
Central Tendency
Mean
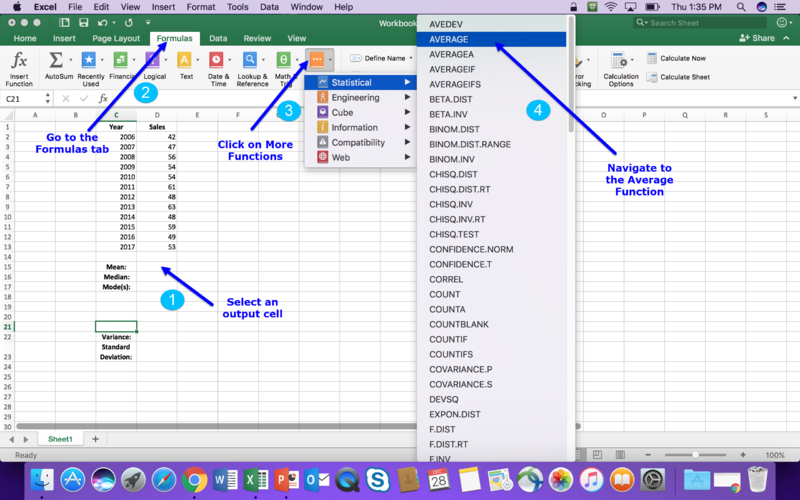
1. Select the cell where you would like the mean value to be output.
2. Navigate to the Formulas tab in the Menu bar ==> More Functions ==> Statistical ==> AVERAGE.
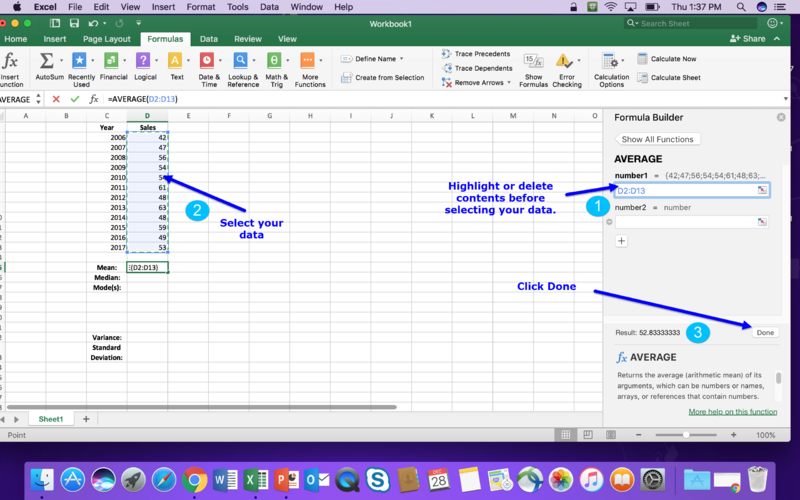
3. The Formula Builder window below will appear, as seen below. Excel will attempt to guess your data set, but this can be manually selected with the next step.
4. Now, click on the first cell of your data set (behind the Formula Builder window); then, while holding down the shift key, click on the final cell of your data set. Next, click Done in the Formula Builder window.
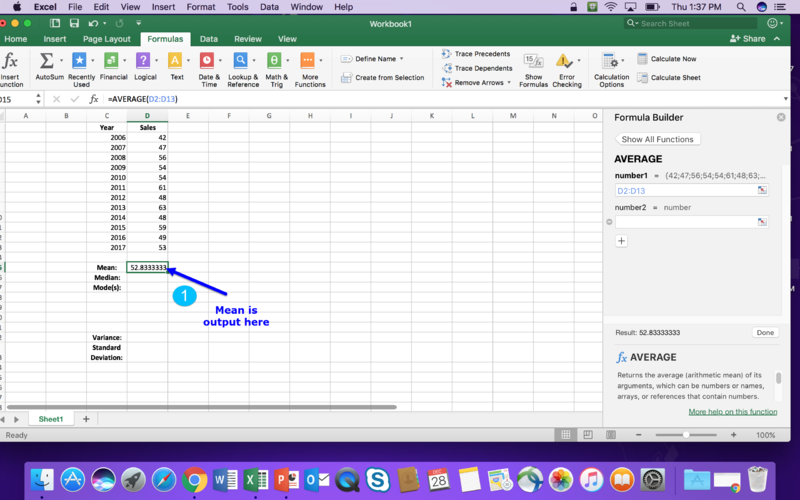
5. After clicking Done, the Mean value will be output into the selected cell.
Median
1. Select the cell where you would like the median value to be output.
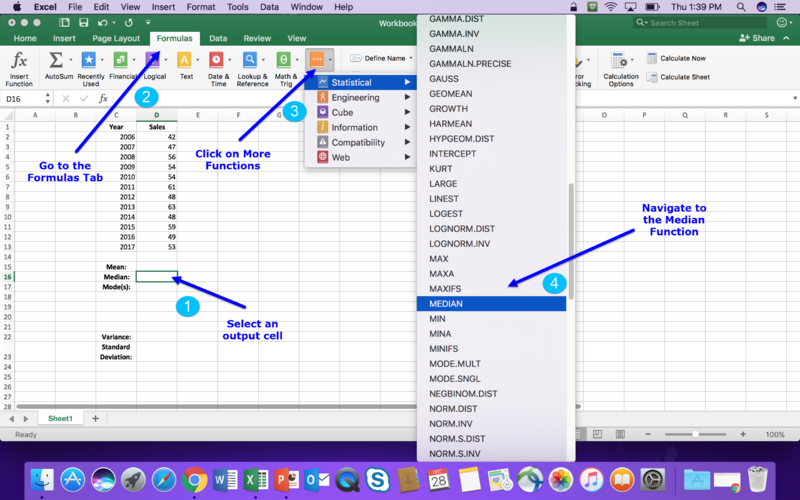
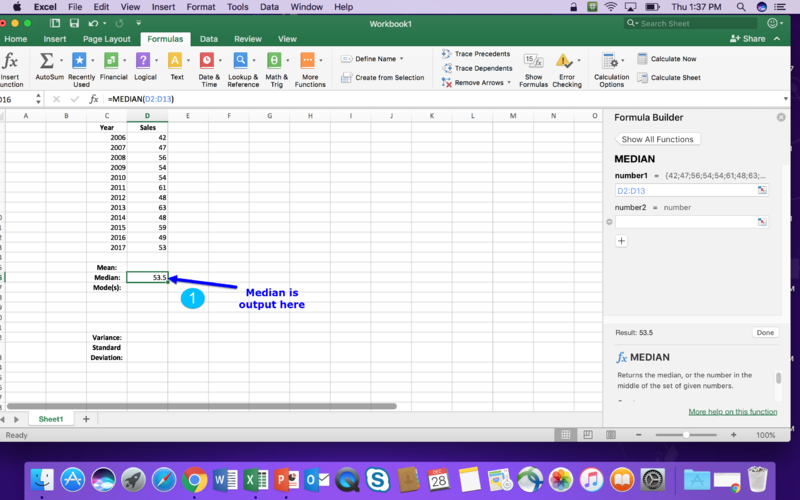
2. Navigate to the Formulas tab in the Menu bar ==> More Functions ==> Statistical ==> MEDIAN.
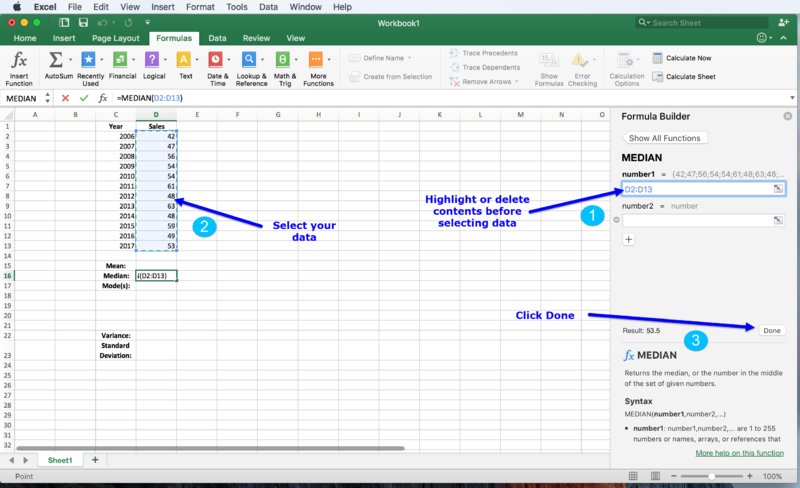
3. The Formula Builder window will appear, as seen below. Excel will attempt to guess your data set, but this can be manually selected with the next step.
4. Now, click behind the Formula Builder window on the first cell of your data; then, while holding down the shift key, click on the final cell of your data. Next, click Done in the Formula Builder window.
5. After clicking Done, the Median value will be output into the selected cell.
Mode
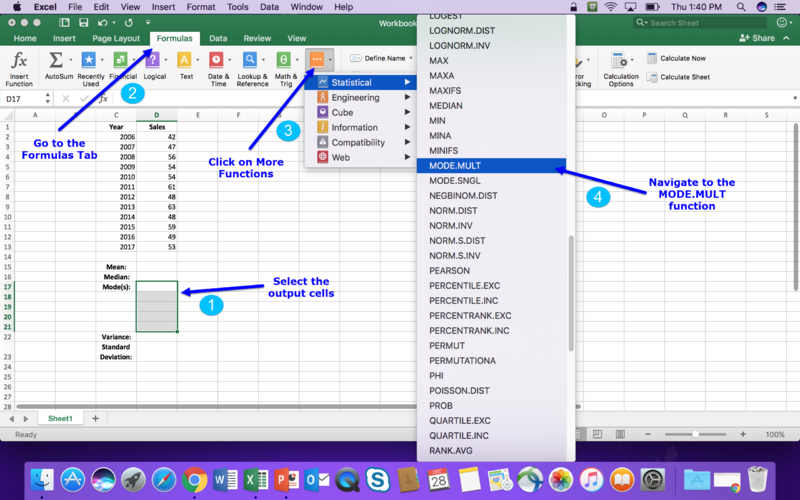
1. Select the cell(s) where you would like the mode value(s) to be output.
Note: It is important to select an excess of output cells, as data sets may have more than one mode value.
Too few output cells will result in receiving only a portion of the mode values for a data set.
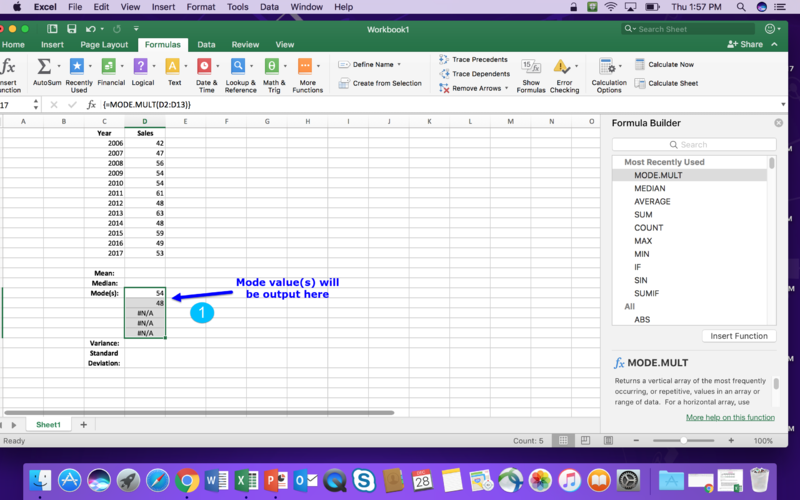
2. Navigate to the Formulas tab in the Menu bar ==> More Functions ==> Statistical ==> MODE.MULT.
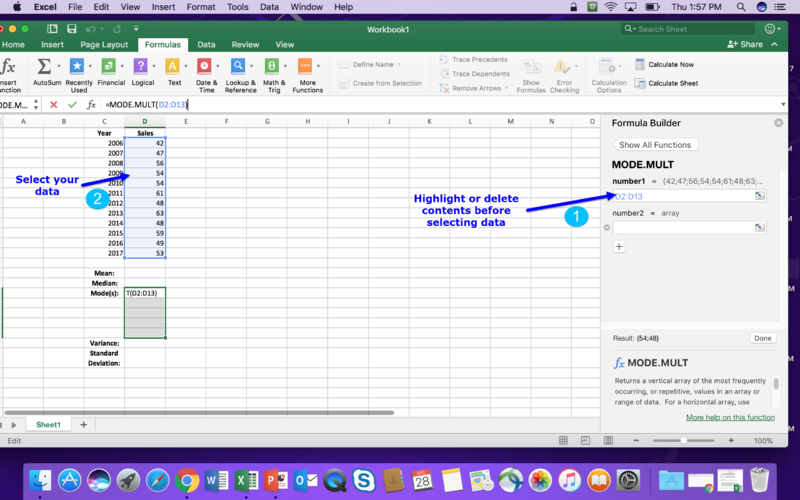
3. The Formula Builder window will appear, as seen below. Excel will attempt to guess your data set, but this can be manually selected with the next step.
4. Click behind the Formula Builder window on the first cell of your data; then, while holding down the shift key, click on the final cell of your data.
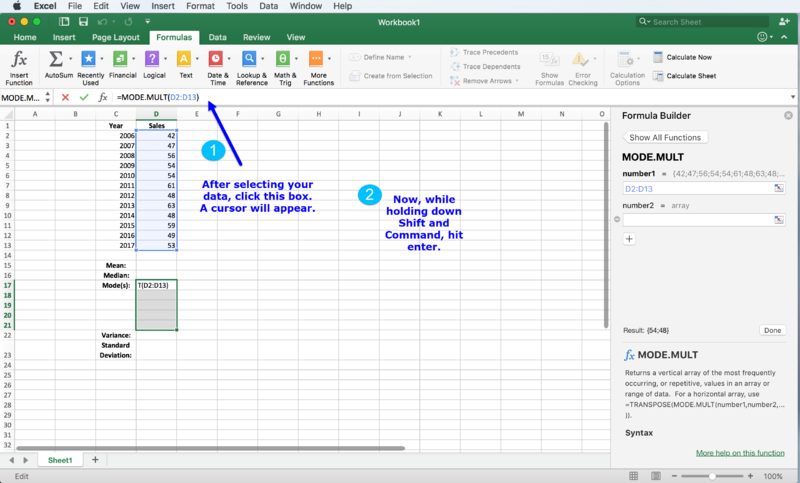
5. CAUTION: after selecting the cells of your data set, do NOT hit enter and do NOT click Done; instead hit Shift+Command+enter. This will output
the mode(s) of your data set into the cell(s) that you picked. Cells that do not receive a mode value will receive an "#N/A".
6. The mode value(s), if they exist, will be output into the selected output cells.
Variability
Variance
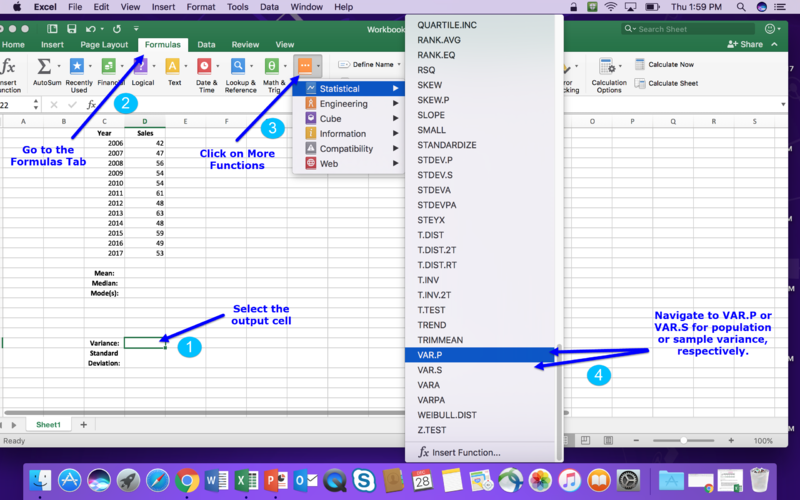
1. Select the output cell for the desired type of variance (either sample variance or population variance).
2. Go to the Formulas tab.
3. For sample variance, navigate to the Formulas tab in the Menu bar ==> More Functions ==> Statistical ==> VAR.S.
4. For population variance, navigate to the Formulas tab in the Menu bar ==> More Functions ==> Statistical ==> VAR.P.
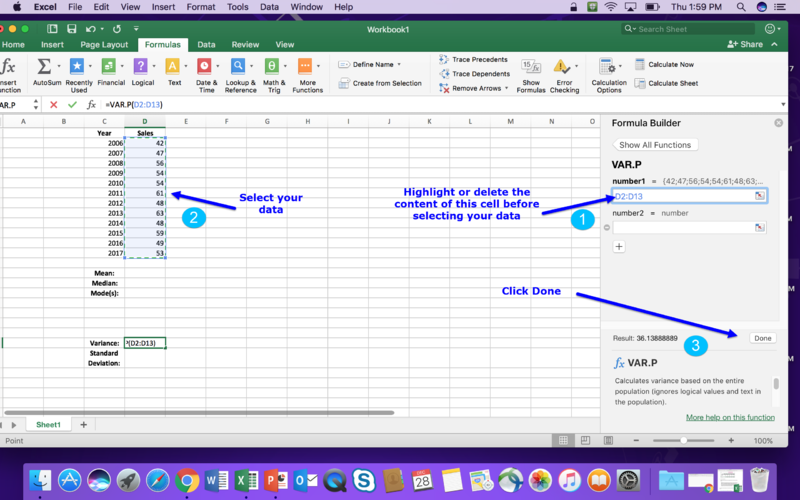
5. Now, click on the first cell of your data set (behind the Formula Builder window); then, while holding down the shift key, click on the final cell of your data set. Then, hit enter or select Done.
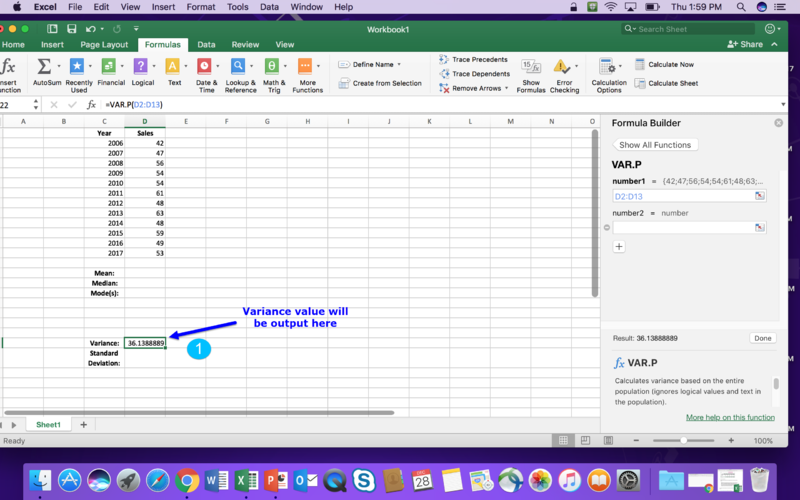
6. The selected variance type of your data set will be output into the cell that you picked.
Standard Deviation
1. Select the output cell for the desired type of standard deviation (either sample or population standard deviation).
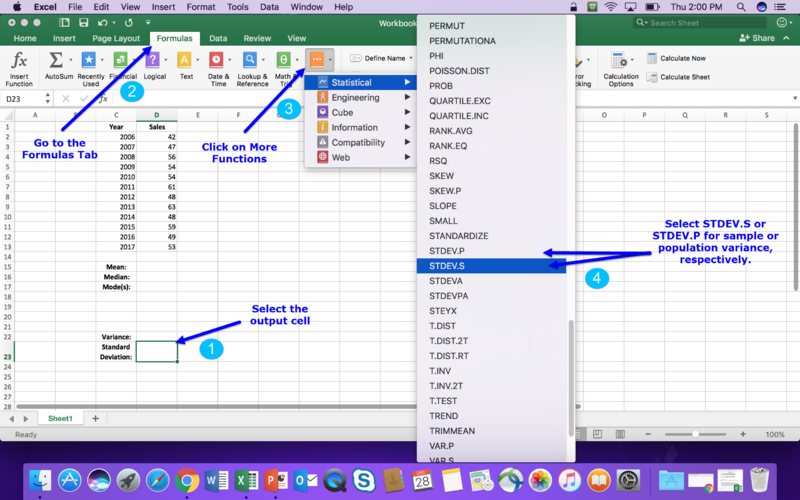
2. Go to the Formulas tab.
3. For sample standard deviation, navigate to the Formulas tab in the Menu bar ==> More Functions ==> Statistical ==> STDEV.S.
4. For population standard deviation, navigate to the Formulas tab in the Menu bar ==> More Functions ==> Statistical ==> STDEV.P.
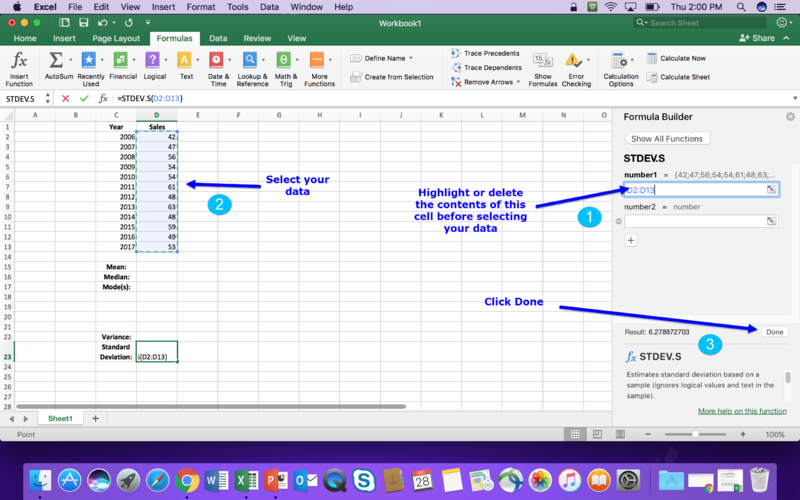
5. Now, click on the first cell of your data set (to the left of the Formula Builder window); then, while holding down the shift key, click on the final cell of your data set. Then, hit enter or select OK.
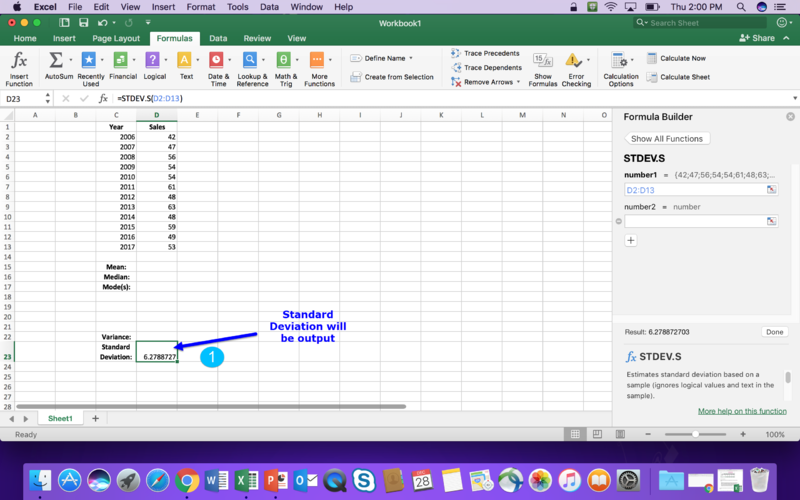
6. The selected standard deviation type of your data set will be output into the cell that you selected.
Analysis ToolPak
Installation
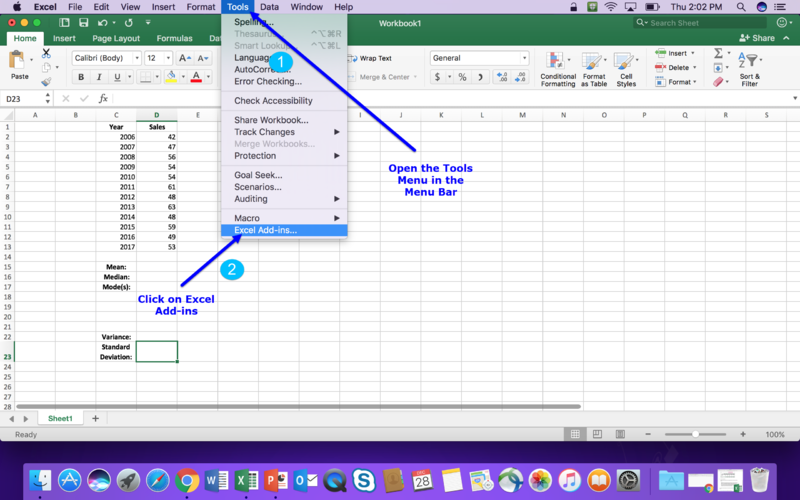
1. Open Excel. Click on Tools in uppermost Menu Bar
2. Click on the Excel Add-ins item located on the bottom of the Tools menu.
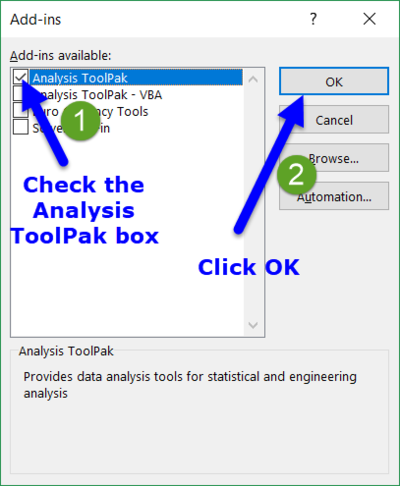
3. Select the box for Analysis ToolPak from the Add-ins Menu, and click OK or hit enter.
Using the ToolPak
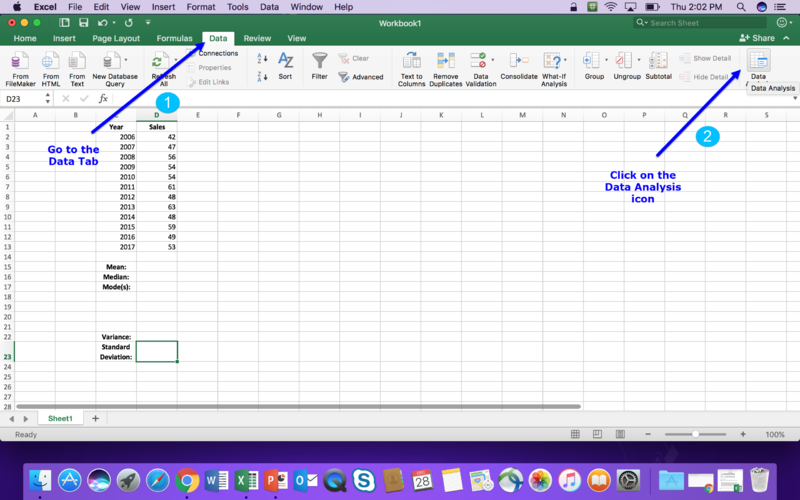
1. Open Excel. Click on the Data tab in the Excel Menu Bar
2. Click on Data Analysis, located in the far right of the Data Tab.
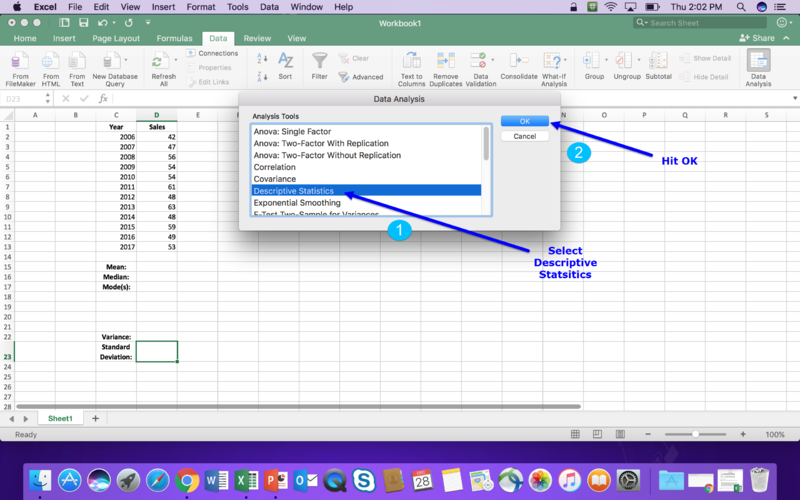
3. A Data Analysis window will pop-up. For the purposes of this class, you will select Descriptive Statistics from the available options. Hit OK.
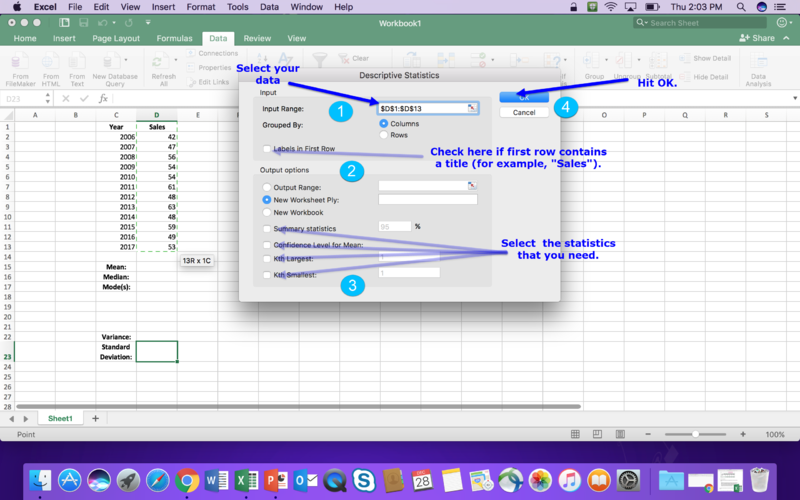
4. A Descriptive Statistics window will pop-up. Select your data, and then check the boxes that you need from the available options. Hit OK.
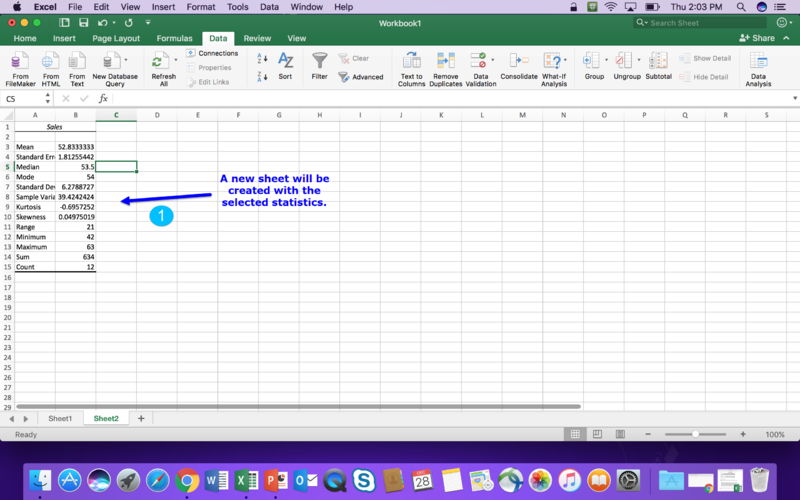
5. A new sheet will be created with your set of descriptive statistics. The screenshot below used Summary Statistics, with Label in first row checked.
DLC STARS/Presenter
- Chad Kjorlien ???
Resources/Helpful Links
Other Resources
DLC Support
- Phone: 507-457-2206
- Email: dlc@winona.edu
- 1:1 Support: Krueger Library #105

