Draft:DLC Summer 2018 Class Projects/Carrie Brouse Adobe Connect
Project Details
Professor Brouse is using Adobe Connect to provide synchronous group discussion experiences at a distance for Module 4 of REDG 640. This Custom Student Support page is designed to give best practices for working within virtual room, tools for testing your connection and device, and instructions for participating in your online discussions. One group member will need to set up an Adobe Connect room and record your meeting. Directions for creating an Adobe Connect meeting room, recording, and sharing meeting recordings are found in the Host Quick Guide section below. Adobe Connect is a full-featured web conferencing tool that can be used on desktops, laptops, and mobile devices. It supports video and audio over the Internet, document and screen sharing, and more. Once your Adobe Connect Host creates the virtual meeting space, everyone will receive an email with the URL to the room you will be meeting in.
Hardware/Software
Before You Begin
When participating in Online Rooms you will want to make sure to take two important steps to make the experience of participating in this meeting a success.
- Have a set of earbuds or headphones to separate the sound from your speakers and microphone so you do not have feedback.

- Before you start using Adobe Connect, use this link Adobe Connect Diagnostic Test to make sure you have a good connection, the Flash media player, and Adobe Connect presenter app installed.


PARTICIPANT QUICK GUIDE
Accessing Adobe Connect
To access the Adobe Connect room you will need to do the following steps.
- From your favorite web browser paste the URL your Adobe Connect Host sent you in the address line and hit enter.
- On the Adobe Connect sign-in page you will need to enter your StarID and password.
- You will be asked to download the Adobe Connect application and should select the Download Now button.
- After downloading is complete you should see the Adobe Connect icon on your Dock or Taskbar.
Audio Setup
Complete the Audio Setup Wizard before each session to configure your audio for the room and technology you are using during your session.
1. The Audio Setup Wizard can be found under Meeting at the top of the screen. The Audio Setup Wizard will prompt you to complete a series of 4 audio tests. At any point, if your audio is not working as expected select the Help button.

2. For the best quality audio use a headset during your meeting. This will improve the audio and will control the echo and feedback experienced when using video conferencing tools.
3. Select a location that is quiet and does have distracting background noise (pets, construction, talking etc.). Adobe Connect will pick up any noise present and this can be very disruptive during a meeting.
4. To open your microphone select the microphone icon at the top of the screen. When the icon is green, your microphone is connected.
5. When you are not speaking mute your microphone. To mute your microphone select the microphone icon and a slash will appear on the icon. To open your microphone select the icon again.

Activing the WebCam
To turn on your camera so the rest of the meeting can see you select the dropdown next to WebCam icon and select "Start Sharing".

Raise Your Hand
Adobe Connect is designed to allow the user to actively participate in a meeting. However, it can be distracting when multiple individuals are using their microphone to ask questions. It is important to communicate you have a question without interrupting the speaker. One way to do this is to use the Raise Your Hand feature by selecting the icon at the top of the page. Once you have selected this icon an image of a figure raising its hand will appear next to your name on the Participant List indicating to the participants you have something to say. Make sure your microphone is unmuted before you ask your question. There are also a variety of other icons you can select from this list.

Chat Pod
Another way to avoid interrupting the speaker is to use the chat feature located in the lower right corner of the screen. Use the chat to type your questions or comments for all participants to see.

By default, the Chat box will send your messages to all, but if you choose from the Attendees pod a specific person by hovering over their name you can select the Start Private Chat and a new Tab will appear in the Chatbox (see clip below) and you can start a private conversation with this person.

Presenting You Screen
You may be asked to present your screen when using your Online Room. Sharing your screen requires you to have the Adobe Connect Add-in that the Adobe Connect Diagnostic Test (see Before You Begin above) checks for this add-in and automatically downloads it if you are missing this file on your laptop.
Once you give Present or Host status, you will see in the Share pod a Share My Screen button. Select this and choose the screen you wish to share and you will see a smaller Connect menu appear and your screen will be viewed by all participants in the Online Room. 
HOST QUICK GUIDE
Activating your Connect account and creating a virtual room
In order for you to create a Connect Room you will need to have an active Minnesota State StarID and password (i.e. the same ID you use for accessing email and D2L BrightSapce). You can then activate your Connect account by logging into the Connect Manager site using the steps below:
1. Use your favorite web browser to go to https://webmeeting.minnstate.edu/.
2. Enter your StarID and password. The Connect Manager page will open.
3. Occasionally, users will get a "Not Authorized" message. If this happens, click "OK", wait 5 minutes, then log in again.

4. To create your virtual meeting room, follow the screenshots below. You will end up with a web address or URL for the room, which you can pass along to anyone you want to attend the meeting.


5. Your meeting will now appear under the section “Custom Meetings”. To enter your room, select “Join” on the right side of the screen. To share your link, copy and paste the URL next to the title of your room and send this to every group members before your meeting.

Recording Meetings
Host's will also need to record your group meetings and this is done once you access the Adobe Connect room. After you have configured your audio the meeting Host should perform the following steps to record:
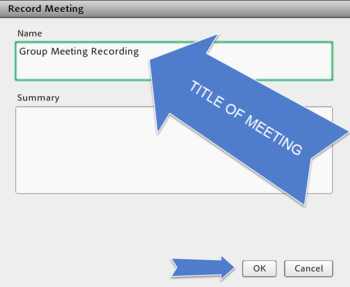
- Select the Meetings menu and select the Record Meeting... option.
- Title the meeting and select the OK button (see clip below).
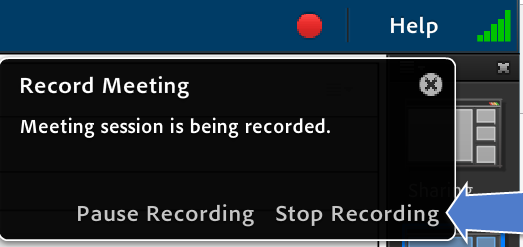
- Once recording has started a red dot will appear in the top right corner of Adobe Connect to let everyone know that the meeting is being recorded. It is always a good practice to also announce that the recording has begun.

- After your meeting has concluded click on the red dot again and you will see the following menu to Stop Recording.


Sharing Link to Adobe Connect Recordings
A Host will also need to share meeting recordings. To obtain the recording(s) from your virtual meeting you will need to perform the following steps:
- Use your favorite web browser to go to https://webmeeting.minnstate.edu/.
- Enter your StarID and password. The Connect Manager page will open and select the Recordings link.

- Select from the Actions menu to the right of your recording choose Share from Actions button.
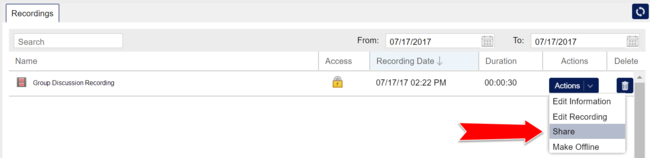
- The URL will appear as shown in the clip below. Copy this URL and share it with your group members in the designated D2L BrightSpace Discussion within the body of a Thread message.


DLC STARS/Presenter
- Chad Kjorlien
Resources/Helpful Links
The Lynda course Adobe Connect Essential Training is the definitive resources on Connect that you will want to check out to learn all about this tool. If you have not already created a Lynda account you can learn how here.
Other Resources
DLC Support
- Phone: 507-457-2206
- Email: dlc@winona.edu
- 1:1 Support: Krueger Library #105