Draft:Installing Software From The Network (PC)
Note: You must be on campus and it is best to be plugged in with an ethernet cable to install programs. Some programs, such as all the Adobe products, require you to be connected to the network to use. This can be done by either being on campus, or by using the VPN client to connect to the network. Some programs may take up to 25 minutes to install, so plan accordingly.
Installing programs on a PC can be done in a few short steps:
Windows 7
- Click on the Start Menu
- Type in "install a program" in the search bar near the bottom
- Click on "Install a program from the network" near the top of the menu
- Select the program you wish to install and click "Install" at the top of the window
Windows 8.1
If you are starting from the desktop:
1. Click on the Start Icon in the bottom left of the screen
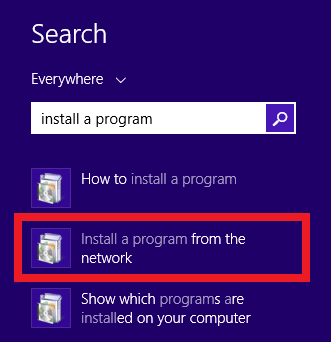
2. From anywhere on the Start Screen type in "install a program"
3. The Search Menu Screen will appear on the right side of screen with options for you to choose from. Choose "Install a program from the network".
4. Highlight the application you wish to install.
5. Click on "Install".
6. Follow the directions from there.
If you are starting from the Start Menu Screen
- From anywhere on the Start Screen type in "install"
- The Search Menu Screen will appear on the right side of screen with options for you to choose from. Choose "Install a program from the network".
- Highlight the application you wish to install.
- Click on "Install".
- Follow the directions from there.
