Difference between revisions of "How to connect your Mac laptop to a classroom projector"
| Line 2: | Line 2: | ||
This is a '''Thunderbolt-to-VGA Dongle''': | This is a '''Thunderbolt-to-VGA Dongle''': | ||
| − | [[File:VGA_Dongle.jpg | | + | [[File:VGA_Dongle.jpg | 300px |]] |
Once you get to the classroom, turn on the projector, and wake up the laptop. | Once you get to the classroom, turn on the projector, and wake up the laptop. | ||
| Line 11: | Line 11: | ||
This is what the '''VGA Cable''' looks like: | This is what the '''VGA Cable''' looks like: | ||
| − | [[File: VGAMale.jpg | | + | [[File: VGAMale.jpg | 300px |]] |
This is what the '''audio cable''' looks like: | This is what the '''audio cable''' looks like: | ||
| − | [[File: AudioCable.jpg | | + | [[File: AudioCable.jpg | 300px |]] |
The '''Thunderbolt port''' on the MacBook Air is located on the right side of the laptop. It looks like this: | The '''Thunderbolt port''' on the MacBook Air is located on the right side of the laptop. It looks like this: | ||
| Line 33: | Line 33: | ||
To set up a mirrored display, make sure your laptop is connected to the projector and open '''System Preferences''', then go to '''Displays'''. | To set up a mirrored display, make sure your laptop is connected to the projector and open '''System Preferences''', then go to '''Displays'''. | ||
| − | [[File: MirrorDisplay1.jpg| | + | [[File: MirrorDisplay1.jpg| 400px |]] |
*Click on the tab titled '''Arrangement''' then check '''Mirror Displays''' | *Click on the tab titled '''Arrangement''' then check '''Mirror Displays''' | ||
| − | [[File: MirrorDisplay2.jpg| | + | [[File: MirrorDisplay2.jpg| 400px |]] |
*When your displays are mirrored, the window will change to this: | *When your displays are mirrored, the window will change to this: | ||
| − | [[File: MirrorDisplay3.png| | + | [[File: MirrorDisplay3.png| 400px |]] |
| Line 49: | Line 49: | ||
*Go back to the Display menu by click the '''Display''' tab. | *Go back to the Display menu by click the '''Display''' tab. | ||
| − | [[File: MirrorDisplay4.jpg| | + | [[File: MirrorDisplay4.jpg| 400px |]] |
*In the drop down menu for '''Optimize for''', select '''Built-in Display'''. This will adjust your display ratio to your regular laptop display ratio. | *In the drop down menu for '''Optimize for''', select '''Built-in Display'''. This will adjust your display ratio to your regular laptop display ratio. | ||
Revision as of 22:10, 16 December 2015
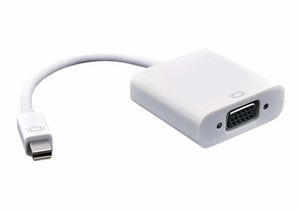
In order for you to be able to use a Mac with a classroom projector, you will need to have a Thunderbolt-to-VGA dongle. If you don't own this dongle, you can check one out from the Tech Support front desk.
This is a Thunderbolt-to-VGA Dongle:
Once you get to the classroom, turn on the projector, and wake up the laptop. Connect the VGA cable to the VGA port on the dongle and then plug the dongle into the thunderbolt port on the laptop.
Always plug the VGA cable into the dongle before connecting the dongle to the laptop.
This is what the VGA Cable looks like:

This is what the audio cable looks like:

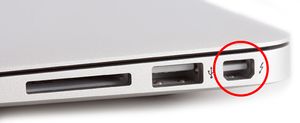
The Thunderbolt port on the MacBook Air is located on the right side of the laptop. It looks like this:
Once the dongle is connected to the laptop, the screen should flash black then reappear. If nothing happens or nothing is being projected unplug the dongle from the laptop, check the connection to the VGA cable, and plug the dongle back into the laptop.
Display Options
When the laptop is being projected, you have two different options for projection: extended desktop or mirrored display.
Press the Command and F1 keys at the same time to quickly switch between the two projection modes.
- The first mode is an extended desktop. The extended desktop allows you to drag windows into each display. This works if you want to be able to show a window on the projector but also be able to work on another window without it being displayed. To project with an extended desktop, click and drag windows to the right to project them.
- The second option is a mirrored display. The mirror display duplicates the laptop display on the projector.
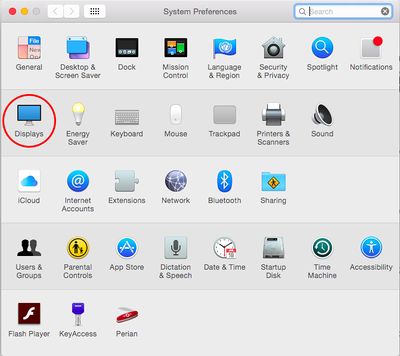
To set up a mirrored display, make sure your laptop is connected to the projector and open System Preferences, then go to Displays.
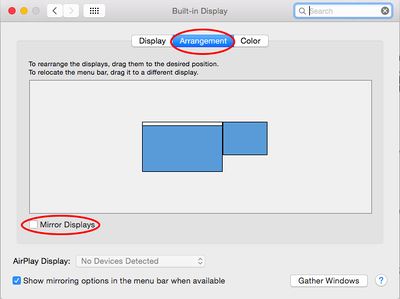
- Click on the tab titled Arrangement then check Mirror Displays
- When your displays are mirrored, the window will change to this:
You can also change your display ratio to make it easier to work from your laptop.
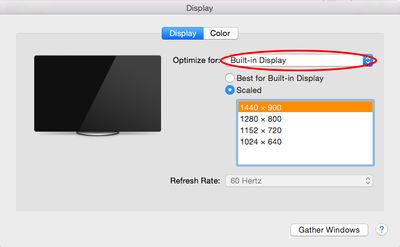
- Go back to the Display menu by click the Display tab.
- In the drop down menu for Optimize for, select Built-in Display. This will adjust your display ratio to your regular laptop display ratio.
More Help
If you continue to have trouble getting your Mac laptop to project correctly in the classroom, please call Classroom Support at 507-457-2900 or dial x2900 from the classroom phone.
