IMovie (Mac)
iMovie is a proprietary video editing software application which allows Mac users to edit their own movies. iMovie has been a Mac OS X only application bundled in the iLife suite of Macintosh applications.
The basics of using iMovie are covered in this link: Basic iMovie Overview
iMovie imports video footage to the Mac using either the FireWire interface on most MiniDV format digital video cameras, the USB port, or by importing the files from a hard drive. From there, the user can edit the video clips, add titles, and add music. Effects include basic color correction and video enhancement tools, and transitions such as fade-in, fade-out, and slides.
iMovie is part of the iLife suite of software products that comes free with every Mac.
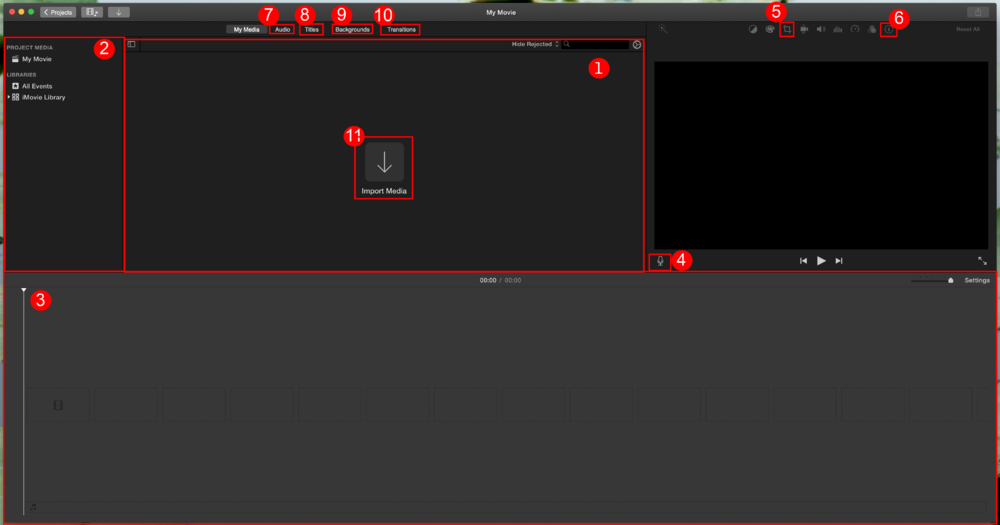
iMovie Basic Interface
Before you begin working with iMovie, take some time to familiarize yourself with the basic interface of the program.
(If your interface looks different from this one, you will need to update your version of iMovie. To do so, go to the App Store, select the Updates tab and iMovie should appear as an available update. Click Update and wait for it to finish)
- 1 (Project): This window is where you will build your project. To add clips to your project, drag them to this window from the Event Library.
- 2 (Event Library): This window contains all video files that have been imported to your computer.
- 3 (Project Timeline): This is where you will be editing the videos you drag from the Project into this window.
- 4 (Voiceover): Allows you to add narration to a video.
- 5 (Crop Options): Allows you to crop a clip and/or add a Ken Burns effect.
- 6 (Inspector): Allows you to change options associated with a video or audio clip. Double clicking on a clip will also display this box.
- 7 (Audio): Allows you to add audio from your iTunes library or an iLife sound effect.
- 8 (Titles): Allows you to add a text overlay, opening title, or credits to a still frame or video.
- 9 (Backgrounds): Allows you to add an animated map or background to your project.
- 10 (Transitions): Allows you to add transitions between video clips and still frames. This option also allows you to choose a theme for your project.
- 11 (Import):Takes you to the Import window where you can import videos from your computer or directly from the camera or iPad.

