Difference between revisions of "IMovie (Mac) / Basic iMovie Overview"
UGhazanfar14 (talk | contribs) |
UGhazanfar14 (talk | contribs) |
||
| Line 59: | Line 59: | ||
* Windows Live Movie Maker 2011, however, can work with the FlipCam's exported files with no modification or conversion | * Windows Live Movie Maker 2011, however, can work with the FlipCam's exported files with no modification or conversion | ||
** [http://explore.live.com/windows-live-movie-maker?os=other Download] and [[Windows Live Movie Maker (PC)#Installing Only Select Features | installation instructions]] for Windows Live Movie Maker 2011 | ** [http://explore.live.com/windows-live-movie-maker?os=other Download] and [[Windows Live Movie Maker (PC)#Installing Only Select Features | installation instructions]] for Windows Live Movie Maker 2011 | ||
| + | |||
=iMovie General Overview= | =iMovie General Overview= | ||
| Line 85: | Line 86: | ||
*'''11 (Import):'''Takes you to the Import window where you can import videos from your computer or directly from the camera or iPad. | *'''11 (Import):'''Takes you to the Import window where you can import videos from your computer or directly from the camera or iPad. | ||
| − | |||
==Importing videos into iMovie== | ==Importing videos into iMovie== | ||
| Line 100: | Line 100: | ||
# On the top right there is a drop-down allowing you to choose the types of clips to display. Select All Clips so you can import videos, photos and music from the same window. | # On the top right there is a drop-down allowing you to choose the types of clips to display. Select All Clips so you can import videos, photos and music from the same window. | ||
# Then click on Import Selected. | # Then click on Import Selected. | ||
| − | |||
==Adding, cutting & rearranging clips== | ==Adding, cutting & rearranging clips== | ||
| Line 111: | Line 110: | ||
** You CANNOT move a segment in the editing pane without moving the entire clip. | ** You CANNOT move a segment in the editing pane without moving the entire clip. | ||
** This can be solved by secondary-clicking where you'd like to cut a clip apart, then selecting "Split Clip." Now the clip is two independent parts; this can be done as many times as you'd like. | ** This can be solved by secondary-clicking where you'd like to cut a clip apart, then selecting "Split Clip." Now the clip is two independent parts; this can be done as many times as you'd like. | ||
| − | |||
==Adding PowerPoint slides/photos== | ==Adding PowerPoint slides/photos== | ||
| Line 119: | Line 117: | ||
* PowerPoint presentations (or specific slides) can be saved as JPEGs and imported into iMovie the same way. | * PowerPoint presentations (or specific slides) can be saved as JPEGs and imported into iMovie the same way. | ||
* An image can be created from any frame of video in the editing area by right-clicking that frame and selecting "Add Freeze Frame" | * An image can be created from any frame of video in the editing area by right-clicking that frame and selecting "Add Freeze Frame" | ||
| − | |||
==Cropping== | ==Cropping== | ||
| Line 129: | Line 126: | ||
* Rotate-Rotates a clip at 90 degree intervals | * Rotate-Rotates a clip at 90 degree intervals | ||
* Click the Crop button again to leave the options pane. | * Click the Crop button again to leave the options pane. | ||
| − | |||
==Adding title screens/subtitles/name introductions/credits== | ==Adding title screens/subtitles/name introductions/credits== | ||
| Line 142: | Line 138: | ||
** Can be inserted before/between/after clips and then a background is chosen for the text. | ** Can be inserted before/between/after clips and then a background is chosen for the text. | ||
** All text may be personalized and added to. | ** All text may be personalized and added to. | ||
| − | |||
==Transitions== | ==Transitions== | ||
| Line 152: | Line 147: | ||
* Transitions are dragged into the timeline like everything else. | * Transitions are dragged into the timeline like everything else. | ||
* You can choose the length of time and how much the transition actually overlaps your clips through the settings. | * You can choose the length of time and how much the transition actually overlaps your clips through the settings. | ||
| − | |||
==Effects== | ==Effects== | ||
| Line 165: | Line 159: | ||
** Splitting the clip will allow you to add different effects to different segments. | ** Splitting the clip will allow you to add different effects to different segments. | ||
* Many preset effects, such as romantic (softens the picture and adds a glow around the perimeter) and old film (grainy, sepia toned effect that also adds occasional black flecks and lines) are available by default. | * Many preset effects, such as romantic (softens the picture and adds a glow around the perimeter) and old film (grainy, sepia toned effect that also adds occasional black flecks and lines) are available by default. | ||
| − | |||
==Audio-background audio/music== | ==Audio-background audio/music== | ||
| Line 176: | Line 169: | ||
* Basic audio controls, such as fading and ducking are available in the settings menu. | * Basic audio controls, such as fading and ducking are available in the settings menu. | ||
** More advanced manipulation will require another program, such as GarageBand. | ** More advanced manipulation will require another program, such as GarageBand. | ||
| − | |||
==Exporting a movie== | ==Exporting a movie== | ||
| Line 191: | Line 183: | ||
Click on the options and select whatever options you want, and iMovie will guide you through the rest of the process. | Click on the options and select whatever options you want, and iMovie will guide you through the rest of the process. | ||
| − | |||
==Saving Your Videos== | ==Saving Your Videos== | ||
| Line 208: | Line 199: | ||
* [[Copyright & Fair Use]] | * [[Copyright & Fair Use]] | ||
* [[Copyright Infringement]] | * [[Copyright Infringement]] | ||
| + | |||
= Other Resources = | = Other Resources = | ||
Revision as of 16:24, 24 September 2015
Necessary pre-editing information
- Our Helpful Filming Techniques wiki page is full of information to teach you about some simple ways to optimize the filming of the raw videos, which will improve the overall quality of the final product, as well as add ease to the editing process.
FlipCam information
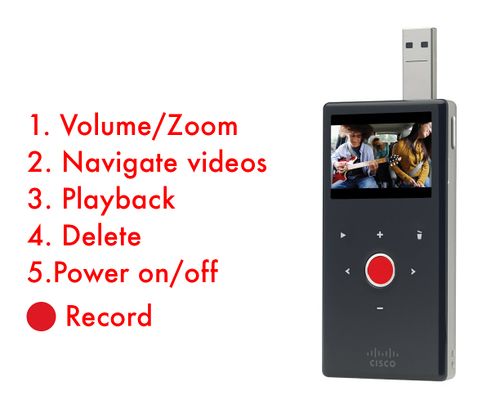
- The FlipCams have very basic functionality.
- The adjustable settings are: language, date, time, camera sounds (on/off), & recording light (on/off).
- To change any of these settings, press and hold the "Record" button immediately after turning the camera on until the options appear.
- While recording: you can zoom in and out.
- While reviewing: you can play videos, change the volume, and delete clips from the camera.
- The adjustable settings are: language, date, time, camera sounds (on/off), & recording light (on/off).
- What the Flip lacks:
- Microphone port
- Manual focus
- Different modes (for filming at night, sporting events, etc.)
- Auto-steady (to help counteract shaky filming)
- Zoom
- Not all FlipCams have a zoom function, but most do. To zoom in and out, use the + and - buttons on the left and right sides of the record button while filming.
- FlipShare Software Setup
- If the application is deleted from the camera, you can download it here; the Windows and Mac download links are about halfway down the page in the right column.
- Importing files onto your machine using FlipShare
Backup
- Once you've imported the raw video files onto your computer, BACK THEM UP. Keeping extra copies of your video files is good insurance against accidental deletion. If a file is deleted, you can just make a copy of the backup and begin working with it, instead of having to re-shoot your videos.
- If a video file is deleted in iMovie, the file WILL BE deleted from the computer, so backing up data is even more important on the Macs.
- Several options are available:
Saving each step in editing
- During the editing process, it's a good idea to save the project with a new file name each time you edit, instead of just saving over past work. If a mistake is made or a file is corrupted/lost, you can revert to the last copy without losing all your work up to that point.
- Every time you open the project to edit it, select File>Save As and rename the file; that way you can save several times during each editing session, and you won't accidentally write over the older files.
- Some common ways people successively name their files include:
- Numbering up: Example1.imovieproj, Example2.imovieproj, Example3.imovieproj, etc.
- Dates edited: Example3-10-11.imovieproj, Example3-13-11.imovieproj, Example3-20-11.imovieproj, etc.
File formats
- The FlipCams automatically save the raw video as one of two file formats:
- The original Flips save the files as .avi
- The HD versions of the Flip save files as .mp4
- iMovie supports these files types
- Older versions of Windows Movie Maker cannot work with these file types, so the videos must be converted (preferably to .wmv)
- Windows Live Movie Maker 2011, however, can work with the FlipCam's exported files with no modification or conversion
- Download and installation instructions for Windows Live Movie Maker 2011
iMovie General Overview
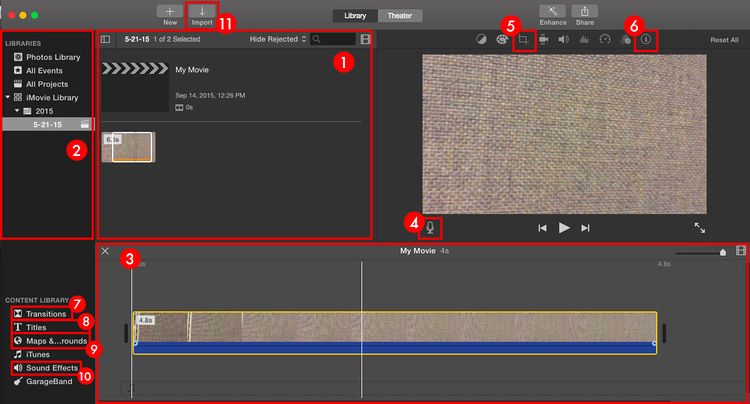
- 1 (Project): This window is where you will build your project. To add clips to your project, drag them to this window from the Event Library.
- 2 (Event Library): This window contains all video files that have been imported to your computer.
- 3 (Project Timeline): This is where you will be editing the videos you drag from the Project into this window.
- 4 (Voiceover): Allows you to add narration to a video.
- 5 (Crop Options): Allows you to crop a clip and/or add a Ken Burns effect.
- 6 (Inspector): Allows you to change options associated with a video or audio clip. Double clicking on a clip will also display this box.
- 7 (Transitions): Allows you to add transitions between video clips and still frames. This option also allows you to choose a theme for your project.
- 8 (Titles): Allows you to add a text overlay, opening title, or credits to a still frame or video.
- 9 (Maps & Backgrounds): Allows you to add an animated map or background to your project.
- 10 (Sound Effects): Allows you to add transitions between video clips and still frames. This option also allows you to choose a theme for your project.
- 11 (Import):Takes you to the Import window where you can import videos from your computer or directly from the camera or iPad.
Importing videos into iMovie
- Before you edit any video using iMovie, you must first create an Event, and import the files into the program.
- An Event is essentially a set of files, grouped together by the user, which may be used in the current project to add to the ease of finding all the relevant videos while editing.
- The "Import" button can be found on the top bar next to, or by right-clicking in the Events area.
- Select the appropriate Import option (Cameras, Devices or Favorites), and simply select the files you'd like to add to the Event.
- Holding Command while clicking allows you to select multiple files one at a time.
- Selecting one file, holding Shift, then clicking another file down the list will allow you to select those two files as well as every one in between.
- On the top right there is a drop-down allowing you to choose the types of clips to display. Select All Clips so you can import videos, photos and music from the same window.
- Then click on Import Selected.
Adding, cutting & rearranging clips
- You probably won't want to use every bit of video you recorded, and the files will not be in the proper order, so knowing how to cut and rearrange is crucial.
- Hover over any of the newly imported files in the Project Library, and a preview of that moment will appear in the window next to it, the Viewer.
- Click and drag to select any of the video you'd like to work with in the Project Library, and then drag those clips to the bottom window – the Project timeline window, one at a time.
- It's a better idea to add too much footage to the editing pane – the Project timeline - than not enough, because more can always be cut out during the rest of the process.
- Once all your desired video is added, the clips can be moved around one another in the same way they were added.
- You CANNOT move a segment in the editing pane without moving the entire clip.
- This can be solved by secondary-clicking where you'd like to cut a clip apart, then selecting "Split Clip." Now the clip is two independent parts; this can be done as many times as you'd like.
Adding PowerPoint slides/photos
- Photos are added to the time line/editing window the same way as videos, and may be moved and manipulated in the same manner.
- All photos may either be added to Photos Library before they can be imported into iMovie or they can be imported the way video files were imported- directly into the iMovie library.
- PowerPoint presentations (or specific slides) can be saved as JPEGs and imported into iMovie the same way.
- An image can be created from any frame of video in the editing area by right-clicking that frame and selecting "Add Freeze Frame"
Cropping
- The cropping screen can be accessed by double-clicking the crop icon in the corner of a clip, or by hitting the crop button near the center of the screen.
- Fit - Proportionally fits a clip (typically a still image) fully in the frame of your video, instead of cropping it.
- Crop to fill - Cuts down a clip to show a specific part of the image/video of your choosing.
- Ken Burns-Begins and ends a clip at different parts of the image/video to create a panning effect through the duration
- Rotate-Rotates a clip at 90 degree intervals
- Click the Crop button again to leave the options pane.
Adding title screens/subtitles/name introductions/credits
- All four of these functions can be executed in the same way.
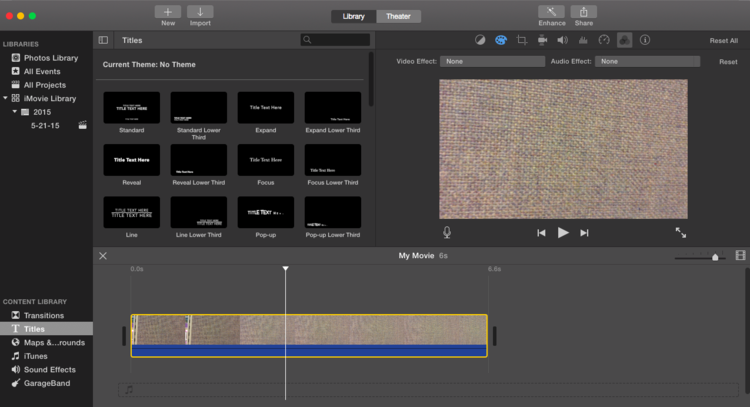
- The panel may be found underneath the Libraries pane, in the Content Library section.
- Select the Title tab to activate the Titles pane. Notice the Project Library pane changes to show a whole set of Title templates.
- Each of the options can be dragged into the timeline.
- Can be inserted over existing video/images to show text over the scene.
- Can be inserted before/between/after clips and then a background is chosen for the text.
- All text may be personalized and added to.
Transitions
- The transitions button is above the Title button in the section called Content Library (right under the Libraries).
- Once you select the Transitions button, the Project Library disappears and is replaced by the Transition templates.
- Transitions are dragged into the timeline like everything else.
- You can choose the length of time and how much the transition actually overlaps your clips through the settings.
Effects
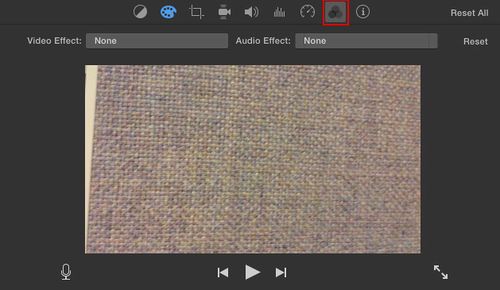
- Effects are all found through the settings option of each clip (above the Viewing panel).
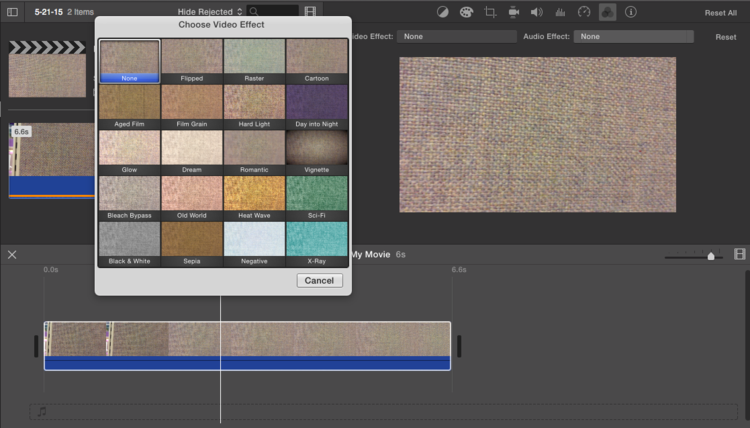
- Clicking on Video Effects will open another short window with thumbnails of all the Effects available. Hovering the mouse over a clip will play the video in the Viewing Panel with the effect applied, in real time.
- The overall color and appearance can be manipulated, but the effect will apply to the entire clip.
- Splitting the clip will allow you to add different effects to different segments.
- Many preset effects, such as romantic (softens the picture and adds a glow around the perimeter) and old film (grainy, sepia toned effect that also adds occasional black flecks and lines) are available by default.
Audio-background audio/music
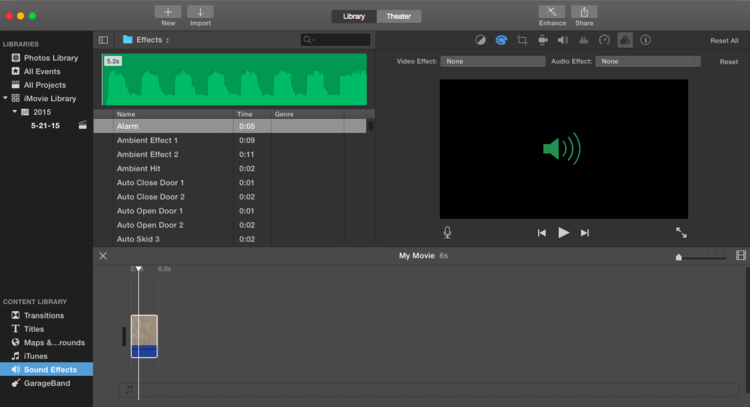
- iMovie comes with an assortment of sound effects and music clips.
- iTunes songs may be added from your library into a video.
- Once you click on the Sound Effects button, the Project Library is replaced with the list of Sound Effects available through iMovie. Select and drag whatever effect you want to use, onto your Project Timeline to work with it.
- Basic audio controls, such as fading and ducking are available in the settings menu.
- More advanced manipulation will require another program, such as GarageBand.
Exporting a movie
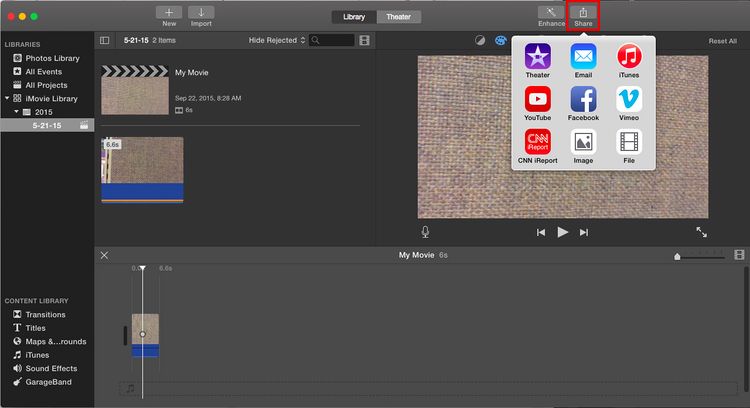
In iMovie, you have the choice of exporting a movie for use on a digital source (such as YouTube) or exporting a movie that can be played on your computer or played in iTunes. To share your video through any medium, select the Share button:
Export to YouTube
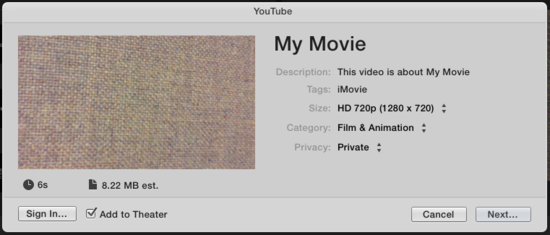
iMovie offers a easy way for you to upload your movies to YouTube. To upload a movie to YouTube, from the Share dropdown click on "YouTube." The dialog box below appears:
Click on the options and select whatever options you want, and iMovie will guide you through the rest of the process.
Saving Your Videos
Export to iTunes
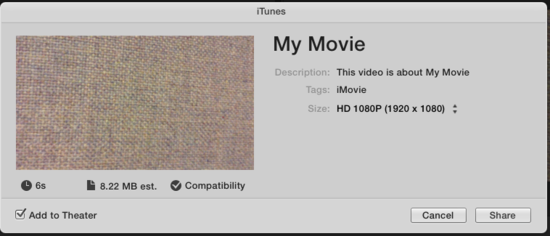
You can also export your iMovie project into a digital file that can be played on computers, mobile phones, and other devices. To do this, click on the "Share" menu, then click on "iTunes." Select the size of the movie (depending on how the movie will be viewed), and click "Publish." iMovie will create a digital movie file and automatically add it to your iTunes library.
Save File to Disk
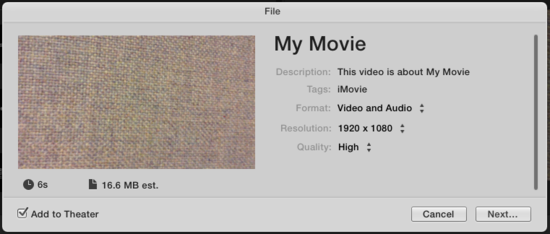
- To save your movie to the hard disk, click on the "Share" menu, then click on "File." This will prompt you to change settings for your movie and once you click Next, will ask for the destination for the exported video. Once you set the destination and click Save, your video will be exported into the destination folder.
Copyright information

