Difference between revisions of "IMovie (iPad) / Basic IMovie Overview"
Jump to navigation
Jump to search
SEnzenauer10 (talk | contribs) |
SEnzenauer10 (talk | contribs) |
||
| Line 27: | Line 27: | ||
| − | [[File: | + | [[File: iMovie.PNG | 750px]] |
==Importing media to your iPad== | ==Importing media to your iPad== | ||
Revision as of 15:25, 25 March 2015
Why use iPad for Videos?
- WSU has provided students with free access to download and use iMovie with WSU supported devices like the Apple Mini iPad.
- The answer is mobility.
- If you do not have a video camera to record your project (you can rent out Flipcams from Walk-in Tech Support) you or your partner may use the iPad to record and quickly edit the movie/rough draft for class.
- Also, Our goal at WSU is to have students become comfortable with all kinds of technology and all the ways you can use them. Enjoy!
iMovie General Overview
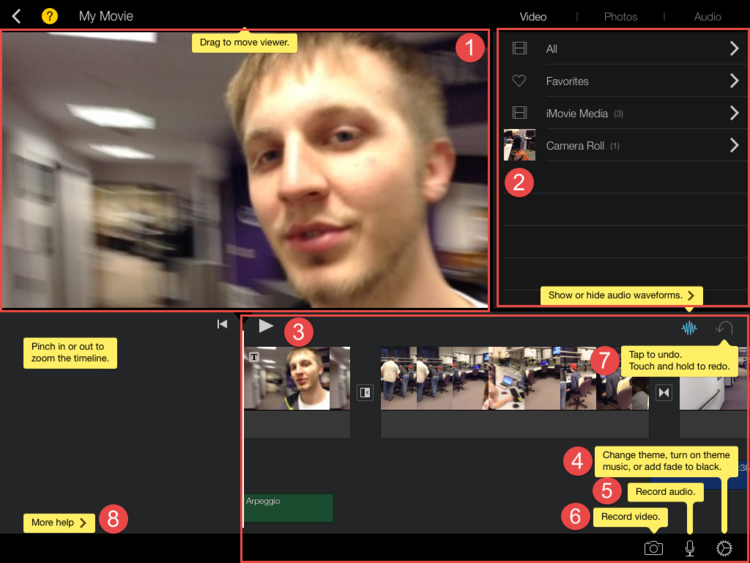
- 1 (Project Preview): Plays the current progress of your movie including any edits or added effects.
- 2 (Event Library): This window contains all video, audio and image files that are located in your iPad. iMovie also has audio files that come with the app which you may use.
- 3 (Project Workbench): Video clips and images you use for your project will be displayed here. Shows all clips and any special effects added to your movie.
- 4 (Project Settings): Allows you to integrate a built-in theme that iMovie has provided you with.
- 5 (Narration): Allows you to add in narration over images and or video clips.
- 6 (Video Recorder): Allows you to record a video and automatically integrate it into your project workbench
- 7 (Undo & Redo): Quick and easy way to undo an edit. To revert or redo simply touch and hold the icon.
- 8 (Help): Clicking on this will open the iMovie's Help Wizard which will attempt to answer your questions.
Importing media to your iPad
Importing any other content like photos, apps, and music follows the same process shown below.
- 1 Connect your iPad to your computer. If this is the first time connecting your devices ITunes will ask you to activate your iPad by plugging in your passcode.
- Your passcode is the 4 digit key to log into your iPad.
- iTunes will also ask you if you want to trust the computer the iPad is connected to, confirm that you do trust it.
- 2 Locate where you have saved your movie file on your computer and remember the location. Make sure the movie file is in a format that is compatible with Apple products. .MP4 is the most common video format for Apple products.
- If you need to convert your video to a file format that is compatible with Apple products use HandBrake. Make sure it is in .MP4 format.
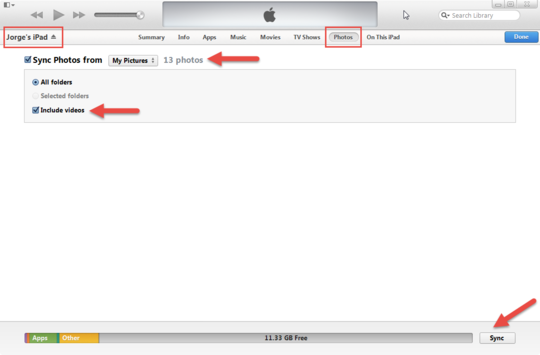
- 3 Make sure that you have selected your iPad in the iTunes window so that your videos transfer to the correct location.
- Most important!!! Make sure that you select 'Photos' and check mark 'Include Videos' as well. As of right now this is the only way to import videos that will be recognized by iMovie.
- 4 Make sure to log in to your iPad to double check that the videos are there. Open up your iMovie app and any pictures and videos should be there.
Exporting your project
- You will click on your project when you open up the iMovie app. There will be four options displayed:
- 1 Play
- 2 Share
- 3 Trash
- 4 Edit
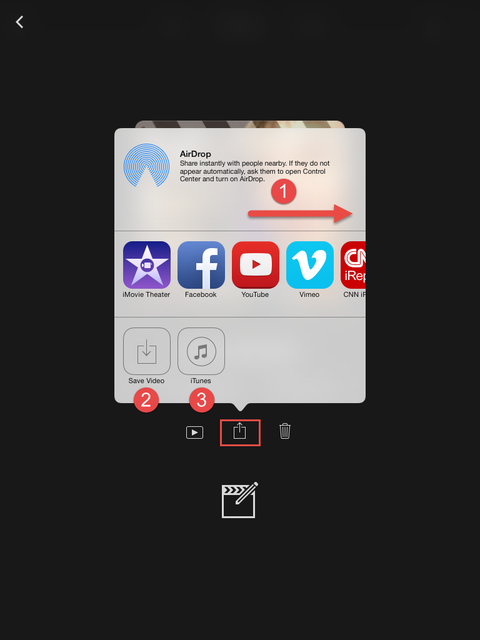
- When you click on the Share button a window will appear displaying multiple options to export to.
- 1 A list of media services that will allow you to export your project. If you swipe to the right the Mail icon is there.
- 2 Save Video will export your project to your iPad in the Photos app. You would think that videos would be sent to the Videos app but that is just how Apple designed it.
- Currently the most reliable way to get your media from your iPad to your computer is to plug in the iPad to your computer. For PCs it will show up in your Computer application as a device which will allow you to open the device and manually drag and drop your media content to the desired location on your computer.
- For Macs you have to trust your iPad with the computer first. Make sure your iTunes is up to date or else your iPad will not be recognized. Since your projects are saved in your Photos app the project will appear in iPhoto. Iphoto will open up and ask if you would like to import your iPad's content.
- 3 iTunes uploads your video to the File Sharing tab on your iTunes application on your computer. Currently there seems to be a problem where the video won't actually export this way.


