Difference between revisions of "Integrating publisher-provided content into Brightspace"
| Line 49: | Line 49: | ||
*[[Copying D2L courses|Copying content modules and topics from other D2L courses]] | *[[Copying D2L courses|Copying content modules and topics from other D2L courses]] | ||
| − | [[Category: Content]][[Category: | + | [[Category: Content]][[Category: Content Organization]][[Category: D2L]][[Category:Faculty]][[Category:Integrations]][[Category:KG]] |
Revision as of 21:25, 24 February 2020
About this article
This article demonstrates how to upload a publisher-provided course pack or cartridge into a Brightspace course and reviews publisher-specific methods for content access and integration. It is intended for instructors.
Categories of publisher-provided online content
Course packs and cartridges
Historically, the most common way for a publisher to provide an instructor with supplemental materials that could be added to a campus instructional management system (IMS) like Brightspace was to actually give instructors the files and let them upload those files to Brightspace themselves. Typically, these files are gathered together into a zip file that is either provided to the instructor on external media (e.g., CD), emailed to the instructor, or placed online where the instructor can download it using a link provided by the publisher. These zip files are often called course packs or course cartridges. The instructor then takes the course pack and uploads it to Brightspace, extracting all of the individual files. Many publishers still use this method for providing course components like test banks, question libraries, and lecture slides (e.g., PowerPoint files). In most cases, the import process allows instructors to decide which supplemental materials to add, uploads any required files to the course, and adds modules and topics to the course's table of contents (TOC) automatically. Because there are so many instructional management systems and publishers do not want to create different course packs for each one, many publishers and IMS vendors adhere to a common cartridge standard. This means that course packs labeled for use with another IMS like Blackboard, will often work with Brightspace.
eBooks
Many publishers are now selling electronic versions of their printed textbooks. In some cases, these ebooks are available through resellers like Amazon, Apple, or CourseSmart, where buyers must use proprietary software to read the ebook (e.g., Kindle Reader, iBook). In other cases, publishers make the ebook available through their course website in a format that can be downloaded and read in a free and common application like Adobe Acrobat Reader, assuming they paid for the book and have access to the protected site. Finally, some textbooks are developed for free and open access by anyone with an Internet connection. Typically, instructors refer to ebooks in their syllabi and reading assignment schedule just as they would a printed book, telling students what to read and when. One interesting wrinkle is that page numbers are often not fixed in ebooks and depend on font size, screen resolution, and other factors under the reader's control. Telling students to read pages 20-35 in an ebook will often result in great confusion. In cases where the ebook is online as part of a publisher's course site, instructors can link to the readings from Brightspace as they would link to any external website.
Course sites
As publishers try to stay competitive in the rapidly changing world of ebooks, open educational resources, and mobile learning, they are packaging increasingly elaborate online resources and services with their textbooks. Some publishers are even offering what might be considered an IMS, with a grade book, discussion forums, and online quizzes. In some cases, instructors simply link to the publisher's course site from Brightspace. Other vendors have developed interesting ways to integrate their sites with Brightspace such that the student experience is relatively seamless.
Importing publisher course packs
Instructions for acquiring the proper .zip file will vary by publisher. However, once an instructor has the file, the process for importing it to Brightspace is usually the same. First, navigate to the Brightspace course into which you want to import the course pack. Then:
- Select the Edit Course link
- Select the Import/Export/Copy Components link (Figure 1)
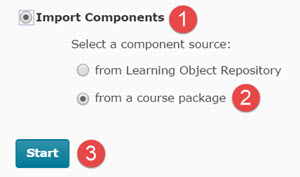
- Select Import Components and from a course package. Select the Start button (Figure 2).
- Select the Upload
- Find the .zip file on your device, select it, and then select Open. D2L will then pre-process the file. When this completes, select the Import All Components or the Advanced Options... button.
- If you selected Import All Components, the course package will be imported in a series of steps and you will get a visual indicator of its progress. Select View Contents to go to your course's table of contents.
- Set the desired import options (Figure 3).
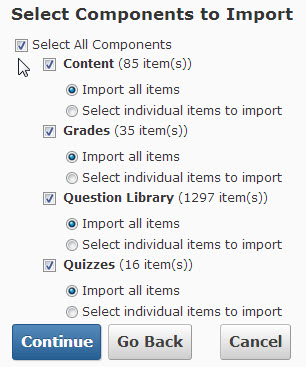
- Under Select Components to Import, check the check boxes for the components you want to import. If you want to select all components, check the topmost check box labeled Select All Components and this will put a check in all the boxes below it (Figure 4). By default, all of the items in a component will be imported. If you only want to import individual items, select the "Select individual items to import" button.
- Click the Continue button
- If you elected to select individual items to import for any of the components, you will be presented with a list of items for each component. Select the items you want to import and click the Continue button to advance to the next component. Note that you may need to select the "+" icon next to the different categories that are listed to expand the list.
- The final screen asks you to confirm the material you are going to import. Select the Modify link if you want to make any changes.
- You will see an Import Summary page that will show the progress of the import process. Wait until everything is imported. Successful imports will be indicated with a green check mark.
- Click the Done button
Additional information
- A good practice is to specify a destination folder for the course pack files (e.g., /coursepack, Figure 3) when setting the import options. This will allow instructors to delete the entire course pack through the Manage Files Tool if needed. It will also make it easier to prevent the import process from overwriting any of the instructor's existing course files with the same name.
- Sometimes it's necessary to import a course pack multiple times (e.g., if a mistake is made in a previous import). Enabling the overwrite setting will prevent duplicate copies of imported files, as well as duplicate modules and topics.
- Metadata refers to descriptive information about a piece of content that can be used to facilitate searches and other content-related tasks. Some publisher-provided course packs include a lot of metadata and some don't. Enabling this setting should have no effect on the import process. If you think you might use that descriptive information, enable the setting.
Related articles
- Content in Brightspace
- Adding an overview to a D2L course
- Adding a content module to a D2L course
- Adding a content topic to a D2L course
- Moving and reordering content in a D2L course
- Editing D2L content topics
- Deleting D2L content modules and topics
- Copying content modules and topics from other D2L courses


