Difference between revisions of "Kaltura Capture Quick Guide"
| (22 intermediate revisions by the same user not shown) | |||
| Line 1: | Line 1: | ||
==Recording with Kaltura Capture and Uploading to MediaSpace== | ==Recording with Kaltura Capture and Uploading to MediaSpace== | ||
| + | ===Overview=== | ||
| + | Below are step by step directions for creating a recorded lecture using Kaltura Capture. In this process you will capture a screen recording of your desktop displaying your PowerPoint slides. The steps outline how to launch Kaltura Capture, capture a screen recording of a PowerPoint, save the recording and upload it into your personal Mediaspace account. | ||
| + | |||
| + | ===Steps=== | ||
| + | |||
'''1.)''' Go to http://mediaspace.minnstate.edu/ and login with your STAR ID. | '''1.)''' Go to http://mediaspace.minnstate.edu/ and login with your STAR ID. | ||
| − | '''2.)''' Select '''Add New''' in the top right corner and select '''Kaltura Capture''' from the dropdown. This will launch the desktop recorder. ('''NOTE''': If you have not used Kaltura Capture before you will have to download the recorder. Select the correct version for your computer and download the application. It may take a few minutes to download. Once downloaded go back to Mediaspace and complete Step # 2 again) | + | '''2.)''' Select '''Add New''' in the top right corner and select '''Kaltura Capture''' from the dropdown. This will launch the desktop recorder. ('''''NOTE''': If you have not used Kaltura Capture before you will have to download the recorder. Select the correct version for your computer and download the application. It may take a few minutes to download. Once downloaded go back to Mediaspace and complete Step # 2 again) |
| − | + | '' | |
<br />[[File:Kaltura 1.jpg|center]] | <br />[[File:Kaltura 1.jpg|center]] | ||
| − | '''3.)''' The recorder | + | '''3.)''' The recorder displays 3 icons for recording options. To record your screen,web camera and audio all icons will be blue. If you would like to turn off your web camera select the camera icon and a slash will be put through the camera icon. Select the '''Red Record Button''' to start the recording. |
| − | |||
| − | |||
| − | |||
| − | |||
| − | |||
| − | |||
| − | |||
| − | |||
| − | + | <br />[[File:Kaltura 7.jpg|center]] | |
| − | ''' | + | '''4.)''' A countdown will appear on the screen. Once it disappears you are recording. |
| − | <br />[[File: | + | <br />[[File:Kaltura 13.jpg|600px|center]] |
| + | '''5.)''' Next select your PowerPoint and put the PowerPoint into slideshow. This will have the slides fill your entire screen. Once your slides are fully displayed you can start presenting. (''NOTE: You can edit your video in post production to delete the beginning section of your recording with the initial set up. Your final video can begin when you start presenting)'' | ||
| + | <br />[[File:Kaltura 14.jpg|600px|center]] | ||
| − | ''' | + | '''5.)''' In the corner will be the recorder. The recording panel helps you control the recording process.<br />[[File:Kaltura 9.jpg|center]] |
| − | * If during your recording you need to pause, select the ''' | + | * If during your recording you need to pause, select the '''Pause''' button from the control panel below the video. |
| − | * If you would like to start your recording over, select ''' | + | * If you would like to start your recording over, select '''X''' from the control panel. Selecting '''Yes, Discard''' on the next screen will permanently delete your recording. |
| − | * If you would like to draw on your slides, use the ''' | + | * If you would like to draw on your slides, use the '''Pencil''' icon to bring up the annotation tools. |
| − | ''' | + | '''6.)''' When you are done, select the '''Stop''' button on the control panel to save a copy of the video on your computer and present a preview screen. It will prompt you to ask if you are sure. Select '''Yes, Stop It''' to stop the recording. |
| − | <br />[[File: | + | <br />[[File:Kaltura 10.jpg|center]] |
| − | ''' | + | '''7.)''' This will bring up a preview of your recording. You can enter a title for your recording. Select '''Save & Upload''' to upload your video into your Mediaspace account. |
| − | <br />[[File: | + | <br />[[File:Kaltura 11.jpg|600px|center]] |
| − | ''' | + | '''8.)''' Your video will start processing. Once your video is uploaded you will receive an email notification. Select the link below your video. This will bring you to the recording in Mediaspace where you can edit and view your video. |
| − | + | <br />[[File:Kaltura 12.jpg|600px|center]] | |
| − | + | ==Editing Kaltura Capture Recording in MediaSpace== | |
| + | ===Overview=== | ||
| + | Below are step by step directions for editing your recorded lecture. In this process you will cut off the ends of the recording to create a final version that only displays the presentation portion of the recording and removes the unwanted setup. The steps outline how to access the video editor, how to remove the beginning of the recording, how to remove the end of the recording, and how to save the edited video. | ||
| − | + | ===Steps=== | |
| − | <br />[[File: | + | '''10.)''' When in Mediaspace, select the '''Actions''' dropdown below your video and select '''Edit'''. |
| + | <br />[[File:Kaltura 15.jpg|600px|center]] | ||
| − | ''' | + | '''11.)''' Select the '''Launch Editor''' button beside the video. This will bring up the editor where you can cut the ends off your video. |
| + | <br />[[File:Kaltura 16.jpg|600px|center]] | ||
| + | '''12.)''' Select the '''Play''' button below your video to start playing the recording. Select '''Pause''' when you get to the point in your recording where you would like the recording to start. ''(NOTE: This is when your PowerPoint is in slideshow and you have started presenting)'' | ||
| + | <br />[[File:Kaltura 17.jpg|600px|center]] | ||
| − | ''' | + | '''13.)''' Then while the video is paused, below in timeline select the '''Set In''' icon which is the first bracket. This will cut out everything in front of the playhead and have the recording start where the playhead is. |
| + | <br />[[File:Kaltura 18.jpg|600px|center]] | ||
| + | '''14.)''' Then select '''Play''' again and then '''Pause''' when the video is where you would like your presentation to stop. Then while the video is paused, below in the timeline select the '''Set out''' icon which is the second bracket and this will cut out everything behind the playhead and have the recording end where the playhead is. You now have the ends of your video edited. ''(NOTE: If your recording does not have extra footage you would like to remove you can skip this step.)'' | ||
| + | <br />[[File:Kaltura 19.jpg|600px|center]] | ||
| + | '''15.)''' You have two options to save your edited video. If you select '''Save''' this will permanently save the edits you made to your original recording. Your original recording will not be saved. If you select '''Save Copy''' this will create a new recording with your edits but also save your original. If you would like to retain a copy of the original recording select option B. If you select this option it will prompt you to enter a new title for your video. | ||
| + | <br />[[File:Kaltura 20.jpg|600px|center]] | ||
| + | '''16.)''' When you are done and have saved your edited recording select '''Exit Arrow''' in the bottom left corner. This will bring you out of the video editor. | ||
| + | <br />[[File:Kaltura 21.jpg|600px|center]] | ||
| − | + | '''17.)''' To post your video to D2L follow '''[[Posting from MediaSpace to D2L Assignments]]''' or '''[[Posting from MediaSpace to D2L Discussions]]'''. | |
Revision as of 17:35, 2 July 2019
Recording with Kaltura Capture and Uploading to MediaSpace
Overview
Below are step by step directions for creating a recorded lecture using Kaltura Capture. In this process you will capture a screen recording of your desktop displaying your PowerPoint slides. The steps outline how to launch Kaltura Capture, capture a screen recording of a PowerPoint, save the recording and upload it into your personal Mediaspace account.
Steps
1.) Go to http://mediaspace.minnstate.edu/ and login with your STAR ID.
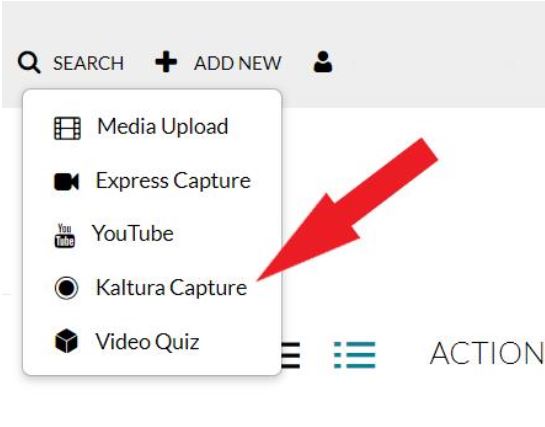
2.) Select Add New in the top right corner and select Kaltura Capture from the dropdown. This will launch the desktop recorder. (NOTE: If you have not used Kaltura Capture before you will have to download the recorder. Select the correct version for your computer and download the application. It may take a few minutes to download. Once downloaded go back to Mediaspace and complete Step # 2 again)
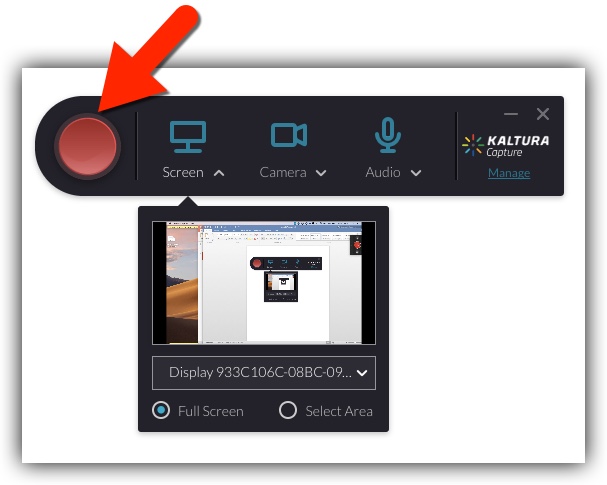
3.) The recorder displays 3 icons for recording options. To record your screen,web camera and audio all icons will be blue. If you would like to turn off your web camera select the camera icon and a slash will be put through the camera icon. Select the Red Record Button to start the recording.
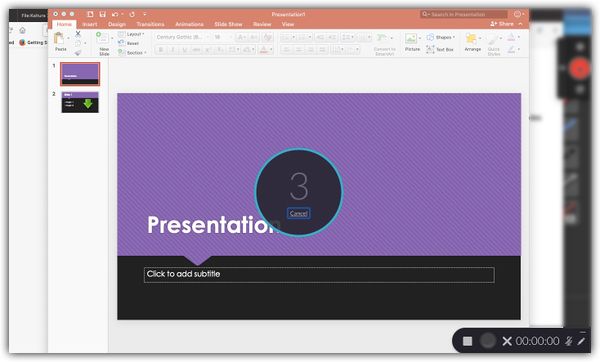
4.) A countdown will appear on the screen. Once it disappears you are recording.
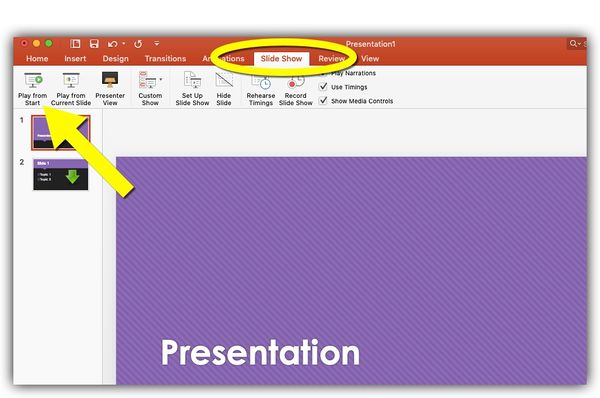
5.) Next select your PowerPoint and put the PowerPoint into slideshow. This will have the slides fill your entire screen. Once your slides are fully displayed you can start presenting. (NOTE: You can edit your video in post production to delete the beginning section of your recording with the initial set up. Your final video can begin when you start presenting)
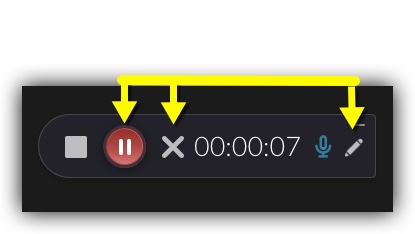
5.) In the corner will be the recorder. The recording panel helps you control the recording process.
- If during your recording you need to pause, select the Pause button from the control panel below the video.
- If you would like to start your recording over, select X from the control panel. Selecting Yes, Discard on the next screen will permanently delete your recording.
- If you would like to draw on your slides, use the Pencil icon to bring up the annotation tools.
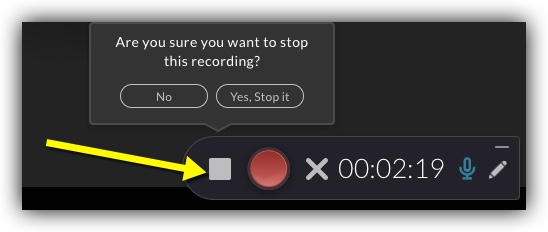
6.) When you are done, select the Stop button on the control panel to save a copy of the video on your computer and present a preview screen. It will prompt you to ask if you are sure. Select Yes, Stop It to stop the recording.
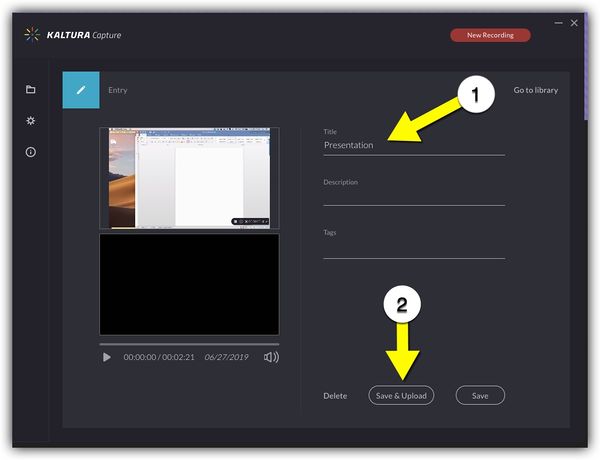
7.) This will bring up a preview of your recording. You can enter a title for your recording. Select Save & Upload to upload your video into your Mediaspace account.
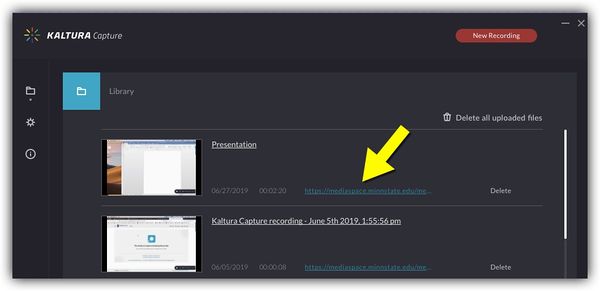
8.) Your video will start processing. Once your video is uploaded you will receive an email notification. Select the link below your video. This will bring you to the recording in Mediaspace where you can edit and view your video.
Editing Kaltura Capture Recording in MediaSpace
Overview
Below are step by step directions for editing your recorded lecture. In this process you will cut off the ends of the recording to create a final version that only displays the presentation portion of the recording and removes the unwanted setup. The steps outline how to access the video editor, how to remove the beginning of the recording, how to remove the end of the recording, and how to save the edited video.
Steps
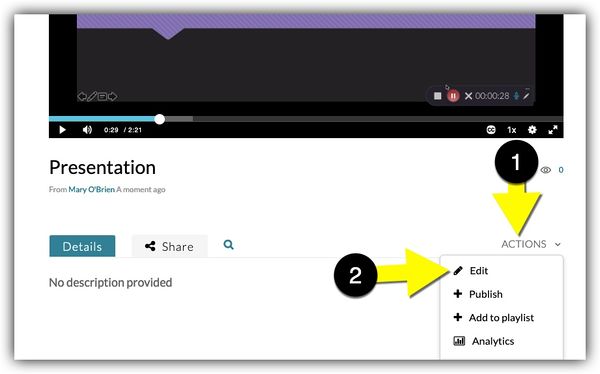
10.) When in Mediaspace, select the Actions dropdown below your video and select Edit.
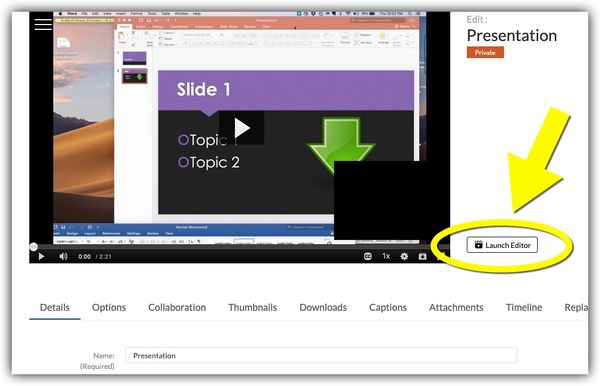
11.) Select the Launch Editor button beside the video. This will bring up the editor where you can cut the ends off your video.
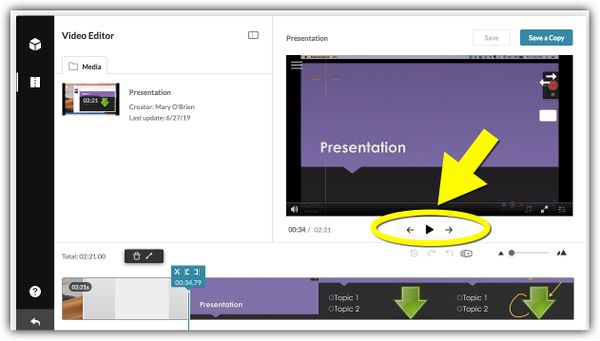
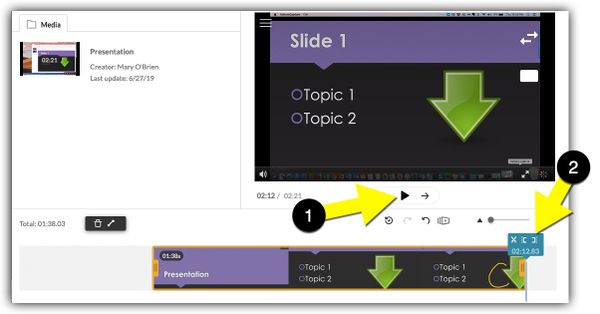
12.) Select the Play button below your video to start playing the recording. Select Pause when you get to the point in your recording where you would like the recording to start. (NOTE: This is when your PowerPoint is in slideshow and you have started presenting)
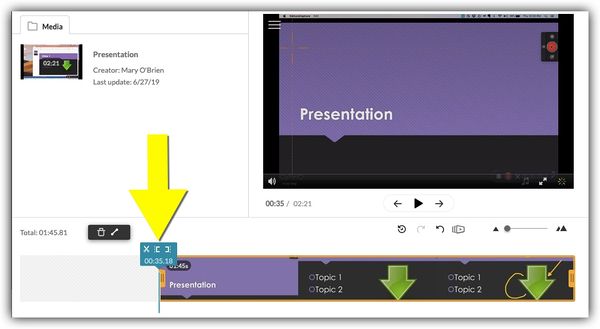
13.) Then while the video is paused, below in timeline select the Set In icon which is the first bracket. This will cut out everything in front of the playhead and have the recording start where the playhead is.
14.) Then select Play again and then Pause when the video is where you would like your presentation to stop. Then while the video is paused, below in the timeline select the Set out icon which is the second bracket and this will cut out everything behind the playhead and have the recording end where the playhead is. You now have the ends of your video edited. (NOTE: If your recording does not have extra footage you would like to remove you can skip this step.)
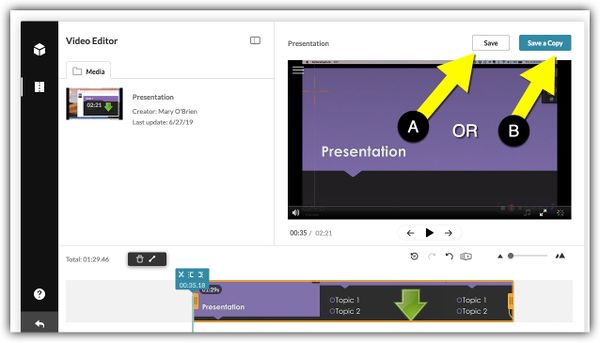
15.) You have two options to save your edited video. If you select Save this will permanently save the edits you made to your original recording. Your original recording will not be saved. If you select Save Copy this will create a new recording with your edits but also save your original. If you would like to retain a copy of the original recording select option B. If you select this option it will prompt you to enter a new title for your video.
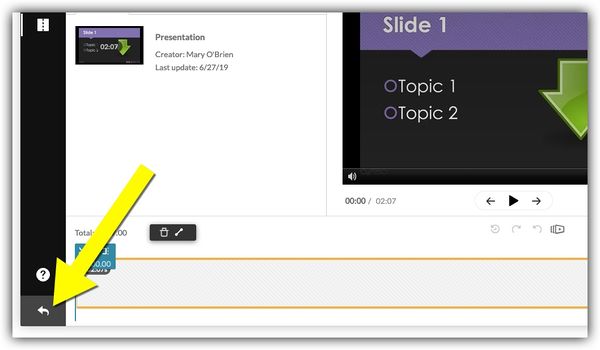
16.) When you are done and have saved your edited recording select Exit Arrow in the bottom left corner. This will bring you out of the video editor.
17.) To post your video to D2L follow Posting from MediaSpace to D2L Assignments or Posting from MediaSpace to D2L Discussions.
