Difference between revisions of "Microsoft Outlook"
| (24 intermediate revisions by 3 users not shown) | |||
| Line 5: | Line 5: | ||
[[File:Microsoft_Logo.jpg|200px|left]] | [[File:Microsoft_Logo.jpg|200px|left]] | ||
| − | '''Outlook''' is an [[email]] application that you can access online through [[Microsoft Office 365]]. | + | '''Outlook''' is an [[email]] application that you can access online through [[Microsoft Office 365]]. Outlook can also be setup on your mobile device. |
The Microsoft [[Outlook App]] is available on both the Apple App Store and the Android Play Store and is a great app for checking your email on a mobile device. | The Microsoft [[Outlook App]] is available on both the Apple App Store and the Android Play Store and is a great app for checking your email on a mobile device. | ||
'''NOTE:''' There have been documented issues with Outlook Calendars for users with multiple iOS devices, including events that do not display in the calendar or events that repeat within the same time slot. Unconfiguring your email and calendar from the default iOS apps (Mail and Calendar) and using the Outlook application seems to solve this problem. | '''NOTE:''' There have been documented issues with Outlook Calendars for users with multiple iOS devices, including events that do not display in the calendar or events that repeat within the same time slot. Unconfiguring your email and calendar from the default iOS apps (Mail and Calendar) and using the Outlook application seems to solve this problem. | ||
| − | |||
| − | |||
| − | |||
==Setting-Up Outlook== | ==Setting-Up Outlook== | ||
| Line 19: | Line 16: | ||
All WSU laptops are now running Outlook 365. | All WSU laptops are now running Outlook 365. | ||
| + | ====Macbook==== | ||
'''Click on the Outlook icon''' | '''Click on the Outlook icon''' | ||
#Use your StarID@go.minnstate.edu (students) or StarID@minnstate.edu (employees) to log in to your account. | #Use your StarID@go.minnstate.edu (students) or StarID@minnstate.edu (employees) to log in to your account. | ||
| − | #It will ask you to | + | #It will ask you to '''add an account'''. Click on "Exchange or Office 365" |
| − | #Enter your StarID@go.minnstate.edu (students) or StarID@minnstate.edu (employees) where it asks for your E-mail address. | + | #Enter your '''StarID@go.minnstate.edu (students)''' or '''StarID@minnstate.edu (employees)''' where it asks for your E-mail address. |
| − | #Method: Keep the default | + | #Method: Keep the default '''User Name and Password''' |
| − | #Username: StarID@go.minnstate.edu (students) or StarID@minnstate.edu (employees) | + | #Username: '''StarID@go.minnstate.edu (students)''' or '''StarID@minnstate.edu (employees)''' |
| − | #Password: Enter your password | + | #Password: '''Enter your password''' |
| − | #Make sure | + | #Make sure '''Configure Automatically''' is checked. |
| − | #Click on | + | #Click on '''Add Account'''. |
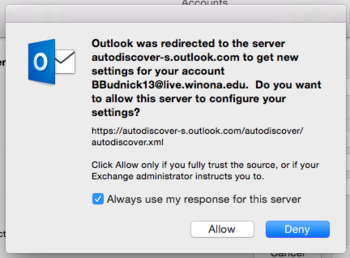
| − | #Click on | + | #Click on '''Allow''' when it tells you that it is being redirected |
| + | |||
| + | ====PC==== | ||
| + | From the Start Menu | ||
| + | '''Click on the Outlook icon''' | ||
| + | #Use your '''StarID@go.minnstate.edu (students)''' or '''StarID@minnstate.edu (employees)''' to login to your account and Click '''Connect'''. | ||
| + | #A window will then pop up. Type in your StarID Password and Click '''OK'''. | ||
| + | #Click '''OK''' when you see a window which says Account Setup is complete. | ||
| + | #Use your '''StarID@go.minnstate.edu (students)''' or '''StarID@minnstate.edu (employees)''' to Activate Office 365 and Click '''Next'''. | ||
| + | #In the next window, type in your StarID Password and Click '''Sign in'''. | ||
| + | #Click '''Skip''' for now when you see '''Add this account to windows'''. | ||
| + | #Click '''Done''' when you see '''You’re All Set'''. | ||
| + | #Click '''OK''' when you see '''Account Updated'''. (If you don’t see this, ignore it) | ||
| + | #Click '''Accept''' when you see '''First things first'''. | ||
| + | #You have now successfully setup your outlook account. | ||
===WSU PC Desktops=== | ===WSU PC Desktops=== | ||
*[[Setting Up Microsoft Outlook 2016]] | *[[Setting Up Microsoft Outlook 2016]] | ||
| − | |||
| − | |||
===Iphone And Android Devices=== | ===Iphone And Android Devices=== | ||
*Setting Up [[Outlook App]] on your Android or iPhone | *Setting Up [[Outlook App]] on your Android or iPhone | ||
| − | |||
| − | |||
| − | |||
| − | |||
| − | |||
| − | |||
| − | |||
| − | |||
| − | |||
| − | |||
| − | |||
| − | |||
| − | |||
| − | |||
| − | |||
| − | |||
| − | |||
| − | |||
| − | |||
| − | |||
| − | |||
| − | |||
| − | |||
| − | |||
| − | |||
| − | |||
| − | |||
| − | |||
| − | |||
| − | |||
| − | |||
| − | |||
| − | |||
| − | |||
| − | |||
| − | |||
| − | |||
===Backup Templates=== | ===Backup Templates=== | ||
Copy the templates that you have stored in the '''c:\users\''username''\appdata\roaming\microsoft\templates | Copy the templates that you have stored in the '''c:\users\''username''\appdata\roaming\microsoft\templates | ||
''' | ''' | ||
| − | to your file back up location. | + | to your file back up location. |
| − | |||
== Accessing a shared mailbox via Outlook for Windows == | == Accessing a shared mailbox via Outlook for Windows == | ||
| Line 91: | Line 63: | ||
*On the '''Email''' tab in the list, highlight the Exchange account you want to work with. You might only have one listed. Click '''Change''', and then click '''More Settings'''. | *On the '''Email''' tab in the list, highlight the Exchange account you want to work with. You might only have one listed. Click '''Change''', and then click '''More Settings'''. | ||
| − | *On the Advanced tab, under Open these additional mailboxes, click Add, and then enter the shared mailbox name that you want to add to your user profile. | + | *On the Advanced tab, under Open these additional mailboxes, click '''Add''', and then enter the shared mailbox name that you want to add to your user profile. |
== Accessing a shared mailbox via Outlook for Mac == | == Accessing a shared mailbox via Outlook for Mac == | ||
| Line 123: | Line 95: | ||
Step 7: You will now see the mailbox under inbox. | Step 7: You will now see the mailbox under inbox. | ||
| − | == | + | ==Related Articles== |
| − | [https://learn.winona.edu/ | + | *[https://learn.winona.edu/Backing_up_Outlook_signatures,_rules,_blocked_senders,_and_junk_settings Backing up Signature files, rules, blocked senders and junk settings] |
| + | *[[Outlook App]] - new and easy to download and use | ||
| + | *[[Outlook Web App]] - OWA | ||
| + | *[https://learn.winona.edu/Office_attachments_in_Outlook Saving Office Attachments in Outlook] | ||
| + | |||
| + | |||
[[Category:Microsoft Office 365]][[Category:Outlook 365]][[Category:Email]][[Category:Software]][[Category:Definition]] | [[Category:Microsoft Office 365]][[Category:Outlook 365]][[Category:Email]][[Category:Software]][[Category:Definition]] | ||
Revision as of 18:25, 17 March 2020
Outlook is an email application that you can access online through Microsoft Office 365. Outlook can also be setup on your mobile device.
The Microsoft Outlook App is available on both the Apple App Store and the Android Play Store and is a great app for checking your email on a mobile device.
NOTE: There have been documented issues with Outlook Calendars for users with multiple iOS devices, including events that do not display in the calendar or events that repeat within the same time slot. Unconfiguring your email and calendar from the default iOS apps (Mail and Calendar) and using the Outlook application seems to solve this problem.
Setting-Up Outlook
WSU Laptops
All WSU laptops are now running Outlook 365.
Macbook
Click on the Outlook icon
- Use your StarID@go.minnstate.edu (students) or StarID@minnstate.edu (employees) to log in to your account.
- It will ask you to add an account. Click on "Exchange or Office 365"
- Enter your StarID@go.minnstate.edu (students) or StarID@minnstate.edu (employees) where it asks for your E-mail address.
- Method: Keep the default User Name and Password
- Username: StarID@go.minnstate.edu (students) or StarID@minnstate.edu (employees)
- Password: Enter your password
- Make sure Configure Automatically is checked.
- Click on Add Account.
- Click on Allow when it tells you that it is being redirected
PC
From the Start Menu Click on the Outlook icon
- Use your StarID@go.minnstate.edu (students) or StarID@minnstate.edu (employees) to login to your account and Click Connect.
- A window will then pop up. Type in your StarID Password and Click OK.
- Click OK when you see a window which says Account Setup is complete.
- Use your StarID@go.minnstate.edu (students) or StarID@minnstate.edu (employees) to Activate Office 365 and Click Next.
- In the next window, type in your StarID Password and Click Sign in.
- Click Skip for now when you see Add this account to windows.
- Click Done when you see You’re All Set.
- Click OK when you see Account Updated. (If you don’t see this, ignore it)
- Click Accept when you see First things first.
- You have now successfully setup your outlook account.
WSU PC Desktops
Iphone And Android Devices
- Setting Up Outlook App on your Android or iPhone
Backup Templates
Copy the templates that you have stored in the c:\users\username\appdata\roaming\microsoft\templates to your file back up location.
- Click File > Account Settings > Account Settings.
- Account Settings in the Backstage view
- On the Email tab in the list, highlight the Exchange account you want to work with. You might only have one listed. Click Change, and then click More Settings.
- On the Advanced tab, under Open these additional mailboxes, click Add, and then enter the shared mailbox name that you want to add to your user profile.
1. First click the Outlook icon on your dock.
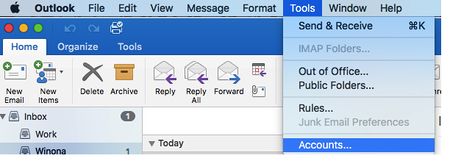
2.Click on the Tools and select Accounts.
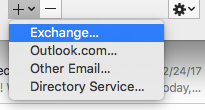
3. Click the Plus sign and select Exchange to add another mailbox.
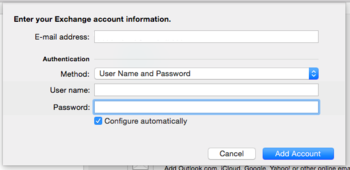
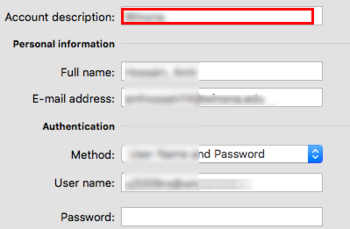
4.Type in the email address for the shared mailbox on the email address field.
Then type your full StarID@go.minnstate.edu for the user name field.
5.If this screen shows up then Click Always use my response to this server And click Allow (Else skip this Step)
Step 6: Change the account description from Winona1 to the name of the share mailbox. And close the account window.
Step 7: You will now see the mailbox under inbox.
Related Articles
- Backing up Signature files, rules, blocked senders and junk settings
- Outlook App - new and easy to download and use
- Outlook Web App - OWA
- Saving Office Attachments in Outlook
