My Courses widget
About this articleThis article describes how to use the My Courses widget in Brightspace 10.7 and later. It is intended for instructors and students. In this article...In this article, we will look at the functions of My Courses:
|
|
|
My Courses widget
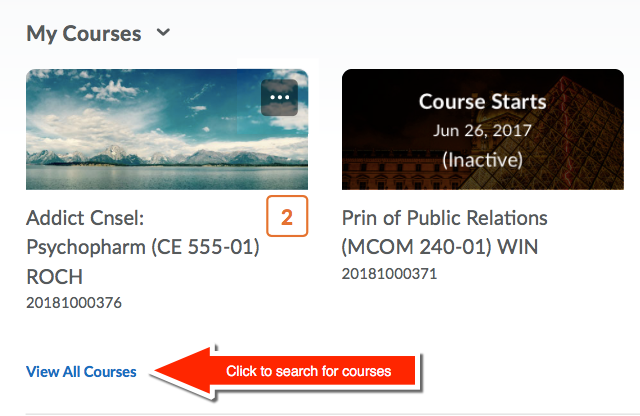
The My Courses widget appears at the top of the D2L Brightspace homepage. It contains a list of pinned courses that work as shortcuts to frequently-viewed courses. If your My Courses widget does not list any courses, refer to Pinning and unpinning below.
To enter a course, click on the name of the course or the image above the name. You will be taken to the course homepage.
Note to instructors: The box under the image with the number in it (see the 2 under the image for the course on the left) appears when there are new enrollments, new assignment submissions, or other types of activities in your course. Refer to the Updates widget on the course homepage for additional information on the exact updates made.
Pinning and unpinning
When you enter Brightspace 10.7 for the first time, there my not be any courses listed in your My Courses widget. This does not necessarily mean you do not have access to any courses, My Courses only lists the courses you select and pin to the widget.
To pin a course to your My Courses widget, follow these steps:
- Click the View All Courses link at the bottom of the My Courses widget. (See the image at right.)
- Find a course you wish to pin. This is done in one of two ways:
- Scroll through the list of courses until you find the course you want, or
- Use the search mechanism for find the course you wish to pin. (For more information, see Searching for courses.)
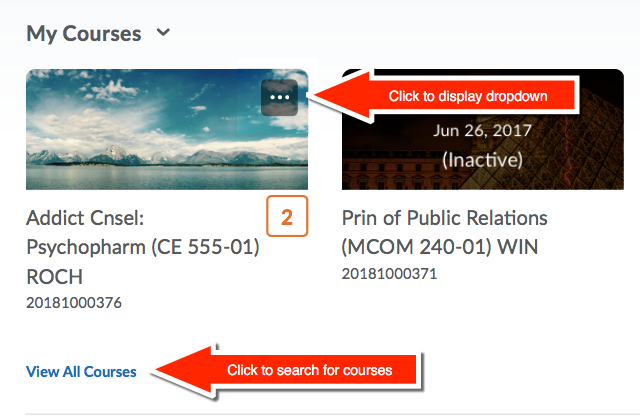
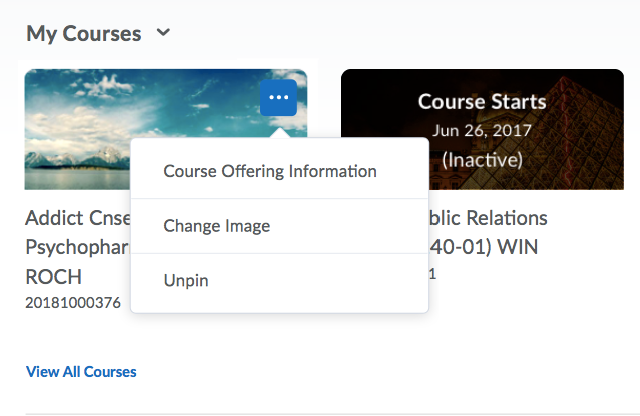
- Point at the course you wish to pin with your mouse. A ellipsis appears in the top right corner of the course. Click the ellipsis to view the dropdown menu. The ellipsis will not appear if you are using Chrome. Switch to Firefox, Safari, or Edge to pin or unpin courses.
- Select Pin from the menu.
- Click the X in the top right corner of the search window to return to the homepage.
Courses can be unpinned by clicking the ellipsis in the top right corner of a course in the My Courses widget and selecting Unpin.
For additional information on pinning and unpinning courses, refer to the video at the top of this article.
Searching for courses
Clicking View All Courses in the My Courses widget (see above) will take you to the search window. The search window consists of a search field, a list of pinned courses, and a list of all courses you have access to that are currently unpinned.
You can always scroll through the list to look for the courses you want to pin. If the list is too long, you can enter the name of the course, the course number, or any other information that will narrow the search list in the Find a course box and hit Enter.
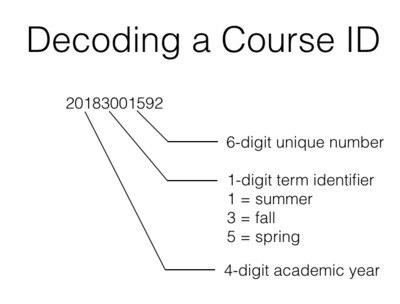
One quick way to narrow the list is to search by course ID for a given term. The diagram at right shows the makeup of a typical course ID.
- The first four digits of the course ID refer to the academic year in which the course is being offered. Academic years begin in May. The year number used for the academic year corresponds to the calendar year on January 1 during the academic year. For example, academic year 2018 runs from May, 2017 through April, 2018.
- The fifth digit defines the term in which the course was offered. '1' refers to the summer terms, '3' for fall courses, and '5' means spring.
- The final six digits make the course ID unique for each section in the term.
So, if you want to limit your search list to only courses from the Fall 2017 term, you would enter 20183 in the search field and hit enter. (Remember, Fall 2017 is part of academic year 2018 and the fall term is designated with a 3 in the fifth digit.)
Note: If you are enrolled for a course and you do not see it listed, it may be that the instructor has not "Activated" the course yet. If they are still working on the course it may not be available to the class yet. Contact your instructor to make sure that the course is activated.
Activating courses
Instructors can activate their courses through the My Courses widget.
- Click the ellipsis to display the dropdown menu. The ellipsis will not appear if you are using Chrome. Switch to Firefox, Safari, or Edge to activate courses.
- Select Course Offering Information from the menu. This will take you directly to the Course Offering Information screen within the course.
- Set the Start Date (if desired), End Date (if desired), and check the box for Course is active.
- Click Save.
You will notice that as soon as the course is active, the dark gray mask over the course image disappears and the color image is now visible in My Courses.
Setting the course image
Courses are assigned a random image from the Brightspace image library. The instructor can change the image to any of the thousands of images in the library or upload an image of their own to use instead.
Instructors can change the image used in the My Courses widget and on the course homepage.
- Click the ellipsis in the top right corner of the course image to display the dropdown menu. The ellipsis will not appear if you are using Chrome. Switch to Firefox, Safari, or Edge to change the course image.
- Select Change Image from the menu. This will take you to the Change Image screen. (See below.) Brightspace selects images from the library that it thinks might relate to your course but you have the ability to search again using the keywords of your choice.
- Select the image you wish to use.
- Scroll through the images until you find one you like. Mouse over the center of the image and click Use this image to select it, or
- If you do not want the suggested images from Brightspace, enter keywords in the search field and search again, or
- If you still don't see what you want, click Upload in the top right and upload your custom image. D2L suggest images be 2400x980.
- Click the X in the top right corner to return to the homepage.
Note: The image will be masked until the course is made active. See Activating courses.
More Information
Related Wiki TopicsNo pages meet these criteria. |
D2L Overview Topics |
For a complete listing of topics, select from the category list below.


