Difference between revisions of "Personalize Brightspace announcements using replacement strings"
| Line 27: | Line 27: | ||
</DynamicPageList> | </DynamicPageList> | ||
==External links== | ==External links== | ||
| − | *[https://documentation.brightspace.com/EN/le/replace_stings/instructor/replace_strings.htm Automatically customize course content using | + | *[https://documentation.brightspace.com/EN/le/replace_stings/instructor/replace_strings.htm Automatically customize course content using replacement strings] |
[[Category: Communication]][[Category: Brightspace]][[Category:Faculty]][[Category:Brightspace Announcements Tool]][[Category:Replacement Strings]][[Category: Brightspace Course Homepage]][[Category:Keep Teaching]] | [[Category: Communication]][[Category: Brightspace]][[Category:Faculty]][[Category:Brightspace Announcements Tool]][[Category:Replacement Strings]][[Category: Brightspace Course Homepage]][[Category:Keep Teaching]] | ||
{{CC}} | {{CC}} | ||
Latest revision as of 03:32, 20 April 2020
Instructors can personalize Brightspace announcements using replacement strings, inserting students' names and other individuating information into the announcements displayed on the course homepage automatically.
What are replacement strings
Instructors use replacement strings in Brightspace courses to customize and personalize the text displayed to students within the Brightspace course. When instructors enter a predefined code (e.g., {FirstName}) in the appropriate location in the text, Brightspace displays the text with that student's value inserted. For example, "Nice job {FirstName}!" would be displayed as "Nice job Ken!" for Ken and "Nice job Susan!" for Susan.
Announcement examples
- Use the {FirstName} replacement string to personalize your welcome and weekly greeting announcements.
- Use the {UserName} replacement string to display a student's StarID in an announcement that includes instructions for signing in to an application that requires it.
Add a replacement string
- Choose your replacement string
- Open the announcement in edit mode
- Enter the replacement string in the appropriate location in the Content text
- Select the Publish, Save as Draft, or Update button to save your work
- Check your work. The value will be displayed for you when you read the announcement.
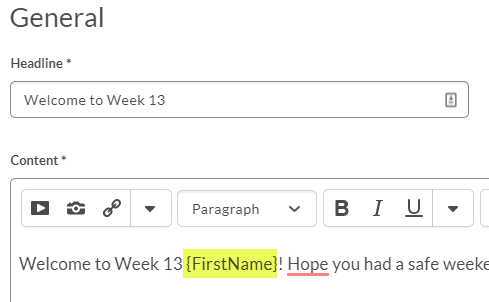
Fig 1. Type the replacement string in to the text.

More wiki articles
- Delete Brightspace announcements
- Personalize Brightspace announcements using replacement strings
- Dismiss and restore Brightspace announcements
- Schedule Brightspace announcements
- Post and update Brightspace announcements
External links
Except where otherwise noted, text is available under the Creative Commons Attribution-NonCommercial-ShareAlike 4.0 International License.