Prevent Zoom-bombing
There are several ways you can prevent Zoom-bombing, or uninvited participants joining your meetings and behaving badly. Uncommon normally, expect to see more of it as more people use Zoom to telework during the COVID-19 pandemic. Restricting access to Zoom meetings is easy. Adding a meeting password, allowing only attendees with StarID credentials to join, using a waiting room to screen attendees, locking the meeting after all your attendees arrive, and removing troublemakers are all effective preventative measures. Configure specific meeting options and change global defaults to secure your meetings and protect your attendees.
The typical incident
Zoom-bombing begins when someone joins your meeting as a guest (i.e., without using StarID credentials) in an attempt to remain anonymous. The person typically uses a fake name, which is often offensive and easy to spot. The person then says something offensive and/or tries to screen share offensive material. The person may also type something offensive in the Chat panel.
What if it happens?
End the meeting
If your meeting is disrupted, just end it before the troublemaker can do more damage. Reconvene in minutes, after securing the meeting. Warn your attendees in advance that you may need to end the meeting abruptly and instruct them what to do if that happens. To end a meeting:
- Select End Meeting (Fig 1.1)
- Select End Meeting for All (Fig 1.2)
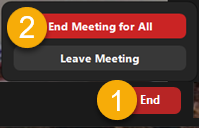
Fig 1. End the meeting for all

Remove the troublemaker
Although it's easy to remove a participant from a meeting, the person may keep returning until you secure your meeting permanently. Locking the live meeting is a good way to prevent a kicked participant from returning in the short term. You can remove someone while they are screen sharing.
- Select Manage Participants at the bottom of the meeting window
- Mouse over the name of the participant in the Participants panel
- Select the More button to the right of the person's name (Fig 2.1)
- Select Remove (Fig 2.2)
- Select OK

Fig 2. Remove an attendee

Stop screen sharing
Screen sharing without host permission is prohibited across all meetings by default. If you change this global setting or give all participants permission to share and someone starts sharing objectionable material, stop them and change your screen sharing permissions back to hosts only.
From the live meeting window displaying the shared screen:
- Select View Options at the top of the window (Fig 3.1)
- Select Stop Participant's Sharing (Fig 3.2)

Fig 3. Stop a screen share

Disable sharing
You can toggle screen sharing permission off and on for all participants at once in a live meeting:
- Select the up arrow to the right of the Share Screen button at the bottom of the meeting window (Fig 3.1)
- Select Advanced Sharing Options... (Fig 3.2)
- Select Host Only under Who can share? (Fig 3)
- Close the Advance Sharing Options window

Fig 3. Open advanced sharing options
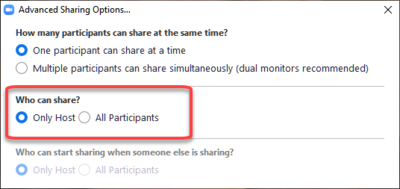
Fig 4. Set sharing to Host only


Lock the meeting
If you lock the meeting after kicking the troublemaker, that person will be unable to return. To lock a live meeting:
- Select Manage Participants at the bottom of the meeting window
- Select the More button at the bottom of the list of attendees in the Participants panel
- Select Lock Meeting

Fig 5. Lock the meetings

Top four preventative measures
Don't publish your meeting link
Only share your meeting link, Meeting ID, or personal link name with your meeting participants. Do not publish them on public social media or anywhere on the open Web. Posting the meeting information to a protected location (e.g., Brightspace course, private Teams site) and emailing it to your meeting attendees are good ways to share it.
Set a meeting password
- Log in to the Zoom host web portal at http://minnstate.zoom.us and open your meeting in edit mode.
- Check the Require a meeting password setting.
- Enter a password.
- Select Save.
- Share the password with your attendees.
Enable meeting authentication
- Log in to the Zoom host web portal at http://minnstate.zoom.us and open your meeting in edit mode.
- Check the Only authenticated users can join setting.
- Select Save.
- Make sure your participants know how to how to sign in to a Zoom meeting using StarID credentials. On the plus side, if they sign in this way once, they will remain signed in to their Zoom account with their StarID credentials and will not need to authenticate again for any subsequent meeting.
Enable the waiting room
- Log in to the Zoom host web portal at http://minnstate.zoom.us and open your meeting in edit mode.
- Check the Enable waiting room setting.
- Select Save.
- Review the waiting room instructions for managing attendees as they arrive.
Adjust your global settings
All of the options below can be set by hosts as global settings that will apply to all their meetings by default. Note that some of these changes will only apply to new meetings and you can also override some of these global settings on a meet-by-meeting basis, so check your personal meeting and any existing meeting options to be sure they are configured as needed. To make changes to your global settings, log in to the Zoom host web portal at http://minnstate.zoom.us and select Settings. Then adjust the following as needed:
Disable join before host
- Slide the Join before host slider Off
Enable authentication
- Slide the Only authenticated users can join meetings slider On
Require a password
- Slide the Require a password when scheduling new meetings slider On
- Slide the Require a password for instant meetings slider On
- Slide the Require a password for Personal Meeting ID (PMI) slider On
- Slide the Require password for participants joining by phone slider On
Mute participants
- Slide the Mute participants upon entry slider On
Disable file transfer
- Slide the File transfer slider Off
Control screen sharing
With the Screen sharing slider On
- Select Host Only under Who can share?
- Select Save (Fig 1)

Fig 1. Select Host only and Save

Permaban
- Slide Allow removed participants to rejoin slider Off
Enable waiting room
- Slide the Waiting room slider On
- Select either All participants or Guest participants only to decide who is directed to the waiting room
More wiki articles
- Get Zoom meeting assistance
- Solve Zoom meeting technical problems
- Activate your Minnesota State Zoom Pro account
- Use your Zoom personal meeting
- Scheduling a Zoom meeting
- Edit a Zoom meeting
- Invite people to a Zoom meeting
- Hosting a Zoom meeting
- Joining a Zoom meeting
- Video conferencing tips and tricks
- Keep Teaching Manual
External links
- FBI Warns of Teleconferencing and Online Classroom Hijacking During COVID-19 Pandemic
- Beware of ‘ZoomBombing’: screensharing filth to video calls
- Zoom-bombing: How to keep trolls out of your Zoom meetings
Except where otherwise noted, text is available under the Creative Commons Attribution-NonCommercial-ShareAlike 4.0 International License.