Difference between revisions of "Draft:Printing/Setup Printers on a Mac"
| (17 intermediate revisions by 6 users not shown) | |||
| Line 1: | Line 1: | ||
__NOTOC__ | __NOTOC__ | ||
| − | + | ==Adding a WSU network printer== | |
| − | + | ====Watch the Video==== | |
| + | |||
| + | {{#widget:YouTube|id=aOGOVGzwJP8}} | ||
| + | |||
| + | To install printers for a [[Mac]] on the WSU network, do NOT use the normal procedure (under System Preferences). To install printers on the [[WSU]] [[network]], you MUST use the application PrintingAdditions found in your “Applications” folder, inside the “WSU_Additions” folder. When adding a printer, you should be on campus and use your [[ethernet cable]] or be logged into [[wireless]]. | ||
| − | |||
| − | |||
====NOTE: You may experience difficulties printing if your password contains one or more of the following special characters: \ / | @ < > ! # % ==== | ====NOTE: You may experience difficulties printing if your password contains one or more of the following special characters: \ / | @ < > ! # % ==== | ||
| − | === | + | ===Steps to add a WSU network printer)=== |
| + | [[File:Printing_Additions.png|thumb|400px]] | ||
[[File:WSU_Printing_Additions.png|thumb|WSU Printing Additions Application| 230 px]] | [[File:WSU_Printing_Additions.png|thumb|WSU Printing Additions Application| 230 px]] | ||
| − | + | #Open your Applications Folder | |
| − | # | + | #Scroll down to and open “WSU Additions" and then "Printing Additions" |
#Find the WSU printer in the list that you wish to print to. Use Show All if it is not seen on the list. | #Find the WSU printer in the list that you wish to print to. Use Show All if it is not seen on the list. | ||
#Place a check in the box to the left of the printer name. | #Place a check in the box to the left of the printer name. | ||
| Line 24: | Line 27: | ||
Printers can now be selected from your Print dialog box as you normally do. | Printers can now be selected from your Print dialog box as you normally do. | ||
| + | |||
| + | When first using the printer you may notice that the printer has been paused. It is on hold for authentication. Open the printer by clicking the icon on your dock and just push the refresh button. You will then be prompted to enter your information, including your username and password. Don't forget to check the box "Remember this password in my keychain" so that you don't need to enter your information every time you use this printer. | ||
===Setting up a Home Printer (Normal Installation)=== | ===Setting up a Home Printer (Normal Installation)=== | ||
| Line 49: | Line 54: | ||
====NOTE: You may experience difficulties printing if your password contains one or more of the following special characters: \ / | @ < > ! # % ==== | ====NOTE: You may experience difficulties printing if your password contains one or more of the following special characters: \ / | @ < > ! # % ==== | ||
| + | |||
| + | ==Related Information== | ||
| + | *[[Receiving your laptop]] | ||
| + | *[[Mac laptop backup|Backing up your Mac laptop]] | ||
| + | *[[Mac laptop backup FAQ]] | ||
| + | *[[E-Warrior Digital Life and Learning Program]] | ||
| − | + | [[category:Mac]][[category:Printing]][[category:Instructions]][[Category: Laptop Exchange]][[Category: Backup]] | |
| − | [[category:Mac]][[category:Printing]][[category:Instructions]][[Category: | ||
| − | |||
Revision as of 20:00, 19 April 2018
Adding a WSU network printer
Watch the Video
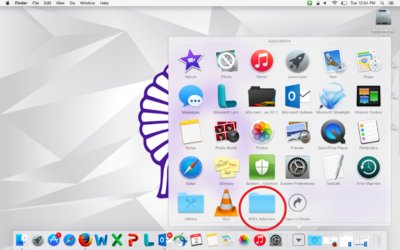
To install printers for a Mac on the WSU network, do NOT use the normal procedure (under System Preferences). To install printers on the WSU network, you MUST use the application PrintingAdditions found in your “Applications” folder, inside the “WSU_Additions” folder. When adding a printer, you should be on campus and use your ethernet cable or be logged into wireless.
NOTE: You may experience difficulties printing if your password contains one or more of the following special characters: \ / | @ < > ! # %
Steps to add a WSU network printer)
- Open your Applications Folder
- Scroll down to and open “WSU Additions" and then "Printing Additions"
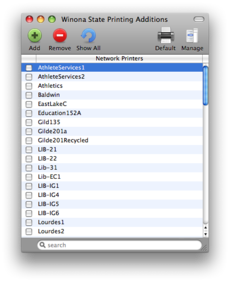
- Find the WSU printer in the list that you wish to print to. Use Show All if it is not seen on the list.
- Place a check in the box to the left of the printer name.
- Click the add printers button.
The application will prompt you to click “OK” after the printer successfully installs on your computer.
The “Manage” button on the top right corner will list the printers you have installed for your Mac.
Added printers will now show up in your printer list in the “print” window of all your applications.
Printers can now be selected from your Print dialog box as you normally do.
When first using the printer you may notice that the printer has been paused. It is on hold for authentication. Open the printer by clicking the icon on your dock and just push the refresh button. You will then be prompted to enter your information, including your username and password. Don't forget to check the box "Remember this password in my keychain" so that you don't need to enter your information every time you use this printer.
Setting up a Home Printer (Normal Installation)
Begin by connecting your printer and installing any software according to the instructions that came with your printer.
Next, open System Preferences and click the Print & Fax icon.
Use the Print & Fax pane to configure your MacBook to access the printer.
To set up a printer by normal installation. DO NOT USE THIS to set up a printer in the WSU network.
- Open System Preferences and click the Print & Fax icon.
- Click Printing and then click the Add (+) button to add a printer.
- Select the printer you want to use, and then click Add.
- Use the Add (+) and Remove (–) buttons to choose the printers that appear in the printer list.
You’ll find lots of information about setting up printers in Mac Help (choose Help > Mac Help from the menu bar and search for “printer”).
If your printer isn’t working as expected, check the manufacturer’s website for updated print drivers. Often the latest printer software is available for downloading. If you sent a print job to your printer but it’s not printing, check to see if the print job is stopped or on hold by clicking the printer icon in the Dock.
If no icon appears in the Dock, open Printer Setup Utility in the /Applications/Utilities/ folder and double-click the printer’s name.)
If the window for the printer says “Job Stopped,” click the Start Jobs button. If “Hold” appears beside the job name, resume printing by selecting the job name and clicking Resume. If a print job has stopped printing because of a technical error, you can delete the faulty job by selecting the job and clicking Delete. You can then try printing the job again.

