Difference between revisions of "Draft:Printing/Setup Printers on a PC"
Jump to navigation
Jump to search
| (3 intermediate revisions by the same user not shown) | |||
| Line 13: | Line 13: | ||
[[File:1st.JPG|400px]] | [[File:1st.JPG|400px]] | ||
| − | : | + | ::(This brings up a window with a list of all available printers on campus that you can use. You can narrow the list by typing the building in the “Location” field. For example, if you are in Somsen Hall, type “Somsen” in that field and click “Find Now”.) |
[[File:3rd.jpg|450px]] | [[File:3rd.jpg|450px]] | ||
:*3. Double click the printer you want to add, and it will start installing. | :*3. Double click the printer you want to add, and it will start installing. | ||
| − | ::( | + | ::(Install the printer driver if it prompts you to) |
:*4. Once completed, you can print to that printer with any program by typically going to '''File''' > '''Print'''. | :*4. Once completed, you can print to that printer with any program by typically going to '''File''' > '''Print'''. | ||
| Line 28: | Line 28: | ||
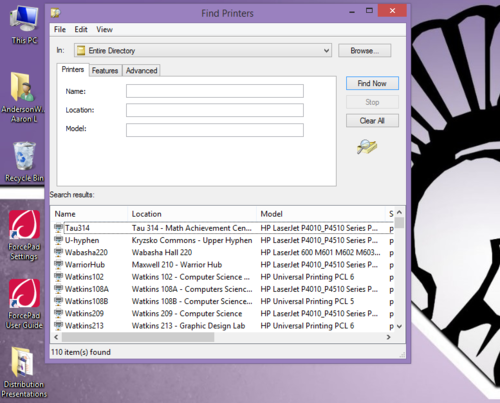
[[File:Find Printers.png|500px]] | [[File:Find Printers.png|500px]] | ||
:*2. Double click the printer you want to add, and it will start installing. | :*2. Double click the printer you want to add, and it will start installing. | ||
| − | :: | + | ::(It might ask you to install a driver. You want to install this driver.) |
:*3. Once completed, you can print to that printer with any program by typically going to '''File''' > '''Print'''. | :*3. Once completed, you can print to that printer with any program by typically going to '''File''' > '''Print'''. | ||
Revision as of 12:16, 28 June 2016
Instructions
All of the printers have a name which is usually the name of the building and room number that printer is located in, also some printers will have a label on the printer to identify it. To add a printer on a PC, follow these instructions:
Video Tutorial
Video on Adding a WSU Printer to Your PC Laptop - Windows 8.1
Windows 10
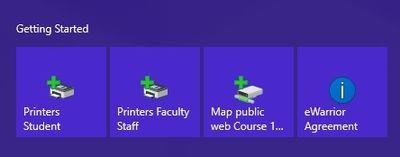
- 2. Click on or select “Printers Student” or "Printers Faculty Staff " from the Getting Started on the start/metro screen.
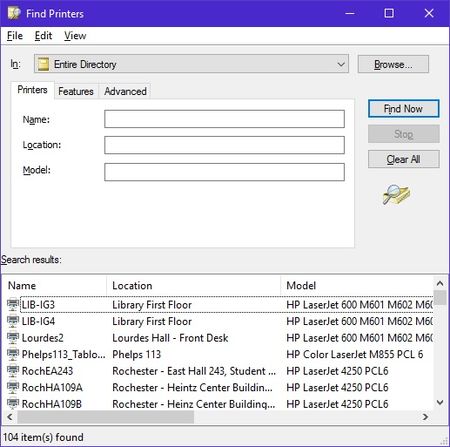
- (This brings up a window with a list of all available printers on campus that you can use. You can narrow the list by typing the building in the “Location” field. For example, if you are in Somsen Hall, type “Somsen” in that field and click “Find Now”.)
- 3. Double click the printer you want to add, and it will start installing.
- (Install the printer driver if it prompts you to)
- 4. Once completed, you can print to that printer with any program by typically going to File > Print.
Windows 8.1
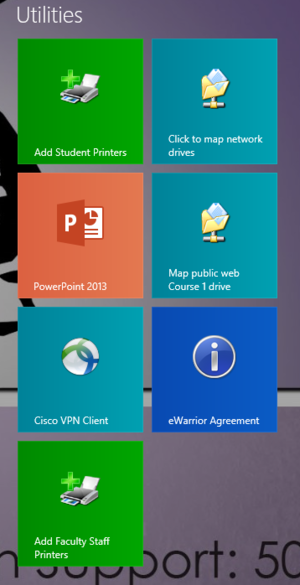
- 1. Click on or select “Add Student Printers” or "Add Faculty Staff Printers" from the utilities section on the start/metro screen.
- (This brings up a window with a list of all available printers on campus that you can use. You can narrow the list by typing the building in the “Location” field. For example, if you are in Somsen Hall, type “Somsen” in that field and click “Find Now”.)
- 2. Double click the printer you want to add, and it will start installing.
- (It might ask you to install a driver. You want to install this driver.)
- 3. Once completed, you can print to that printer with any program by typically going to File > Print.
Windows 7
Note: Library is abbreviated to Lib in the printer listings.
