Difference between revisions of "Printing your Brightspace quiz"
| (21 intermediate revisions by the same user not shown) | |||
| Line 10: | Line 10: | ||
==Preparing before you print== | ==Preparing before you print== | ||
| − | + | If you have set up your quiz to present multiple pages of questions, you will want to temporarily override the '''Questions per page''' setting so all questions are displayed at once. Be sure to remember the original number of questions per page because you will want to reset the parameter once you have printed the quiz. | |
| + | |||
| + | # Click '''Assessment''' from the main navigation and choose '''Quizzes''' from the pop-up menu. | ||
| + | # Click the little arrow behind the name of the quiz you want to print and select '''Edit''' from the pop-up. | ||
| + | # Set the '''Questions per page''' to a number high enough to include all of the questions in a single page. See the figure below. | ||
| + | # Click '''Save and Close'''. | ||
| + | |||
| + | [[File:QuizQuestions.png]] | ||
| + | |||
| + | If you needed to change the number of questions per page to print your quiz, be sure to set it back to the original value after you complete your print job. | ||
==Printing a quiz without answers== | ==Printing a quiz without answers== | ||
| − | + | # Click '''Assessment''' from the main navigation and choose '''Quizzes''' from the pop-up menu. | |
| − | + | # Click the little arrow behind the name of the quiz you want to print and select '''Edit''' from the pop-up. | |
| − | + | # Select the '''Submission Views''' tab from the tabs just below the '''Edit Quiz''' header. | |
| − | + | # Click on the active Submission View. If you have not created any additional views for this course, the current view will be the '''Default View''' at the top of the page. If you have created additional views, click the name of the topmost entry in the list of '''Additional Views''' toward the bottom of the page. | |
| − | + | # If they are not set already, set '''Yes''' under the '''View Details''' heading as well as '''Show all questions with user responses''' a bit further down the page. See the figure below.<br clear="all" />[[File:ViewDetails.png]] | |
| − | + | # Click the little arrow behind the name of the quiz you want to print and select '''Preview''' from the pop-up. | |
| − | + | # Click '''Start Quiz!''' at the bottom of the page. | |
| − | + | # Depending on your browser, either... | |
| − | + | ## Mouse over the preview, right-click and '''Select All''', right-click '''Print''', or | |
| + | ## Mouse over the preview, right-click and '''Select All''', right-click '''Copy''', paste to a blank Word document, print the Word doc, or | ||
| + | ## Go to '''File''' in the main menu and select '''Print'''. | ||
| + | # Click the '''Exit Preview''' button at the top left of the page. | ||
| + | # Go back to the current Submission View and clear '''Show all questions with user responses''' if you set it before you printed. | ||
==Printing an answer key== | ==Printing an answer key== | ||
| − | + | # Click '''Assessment''' from the main navigation and choose '''Quizzes''' from the pop-up menu. | |
| − | + | # Click the little arrow behind the name of the quiz you want to print and select '''Edit''' from the pop-up. | |
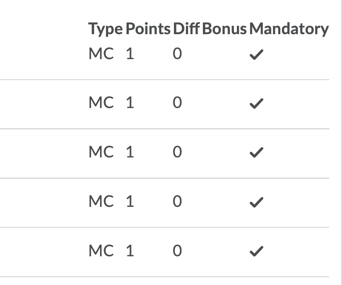
| − | + | # Scroll down the page until you see the list of quiz questions. In order to print an answer key, none of the questions in the quiz can be set to '''Mandatory'''. You will be able to tell which questions are set to mandatory by looking at the rightmost column of the table. Mandatory questions have a checkmark in the '''Mandatory''' column. See below. [[File:MandatoryQuestions.png]] | |
| − | + | # If you have questions that are flagged as '''Mandatory''', follow these steps to clear the mandatory requirement: | |
| − | + | ## Click the '''Edit Values''' button at the top of the question list. | |
| − | + | ## Record which questions are flagged as '''Mandatory''' so you can restore your settings later. | |
| − | + | ## Clear the checkboxes in the '''Mandatory''' column. | |
| − | + | ## Click '''Save and Close'''. | |
| − | + | ## Click the little arrow behind the name of the quiz you want to print and select '''Edit''' from the pop-up to return to edit mode. | |
| − | + | # Click on the '''Submission Views''' tab just below the '''Edit Quiz''' heading at the top of the page. | |
| − | + | # Click on the active Submission View. If you have not created any additional views for this course, the current view will be the '''Default View''' at the top of the page. If you have created additional views, click the name of the topmost entry in the list of '''Additional Views''' toward the bottom of the page. | |
| − | + | # If they are not set already, set '''Yes''' under the '''View Details''' heading as well as '''Show all questions with user responses''' and '''Show question answers''' a bit further down the page. Click '''Save'''. See the figure below.<br clear="all" />[[File:ViewDetails2.png]] | |
| + | # Click the little arrow after the quiz name and select '''Preview''' from the pop-up. | ||
| + | # Click the '''Start Quiz!''' button at the bottom of the window. | ||
| + | # Scroll to bottom of quiz and click '''Submit Quiz'''. Scroll to the bottom of the next page and click '''Submit Quiz''' again. | ||
| + | # Depending on your browser, either... | ||
| + | ## Mouse over the preview, right-click and '''Select All''', right-click '''Print''', or | ||
| + | ## Mouse over the preview, right-click and '''Select All''', right-click '''Copy''', paste to a blank Word document, print the Word doc, or | ||
| + | ## Go to '''File''' in the main menu and select '''Print'''. | ||
| + | # Click the '''Exit Preview''' button at the top right of the window. | ||
| + | # Restore any '''Mandatory''' questions, if needed. | ||
| + | # Reset the values in your current submission view to what they were before you printed your answer key. | ||
==More Information== | ==More Information== | ||
Revision as of 14:02, 6 November 2019
Intended Audience
This article is intended for instructors interested in using Brightspace Quiz tool for online assessments in their courses.
Overview
From time to time, teachers want to print copies of their quizzes for use in special accommodations or as an archive of past testing materials. The Quiz tool in Brightspace does not include a direct mechanism for printing quizzes. This article shows options for printing quizzes by simulating a print command within Brightspace.
Preparing before you print
If you have set up your quiz to present multiple pages of questions, you will want to temporarily override the Questions per page setting so all questions are displayed at once. Be sure to remember the original number of questions per page because you will want to reset the parameter once you have printed the quiz.
- Click Assessment from the main navigation and choose Quizzes from the pop-up menu.
- Click the little arrow behind the name of the quiz you want to print and select Edit from the pop-up.
- Set the Questions per page to a number high enough to include all of the questions in a single page. See the figure below.
- Click Save and Close.

If you needed to change the number of questions per page to print your quiz, be sure to set it back to the original value after you complete your print job.
Printing a quiz without answers
- Click Assessment from the main navigation and choose Quizzes from the pop-up menu.
- Click the little arrow behind the name of the quiz you want to print and select Edit from the pop-up.
- Select the Submission Views tab from the tabs just below the Edit Quiz header.
- Click on the active Submission View. If you have not created any additional views for this course, the current view will be the Default View at the top of the page. If you have created additional views, click the name of the topmost entry in the list of Additional Views toward the bottom of the page.
- If they are not set already, set Yes under the View Details heading as well as Show all questions with user responses a bit further down the page. See the figure below.

- Click the little arrow behind the name of the quiz you want to print and select Preview from the pop-up.
- Click Start Quiz! at the bottom of the page.
- Depending on your browser, either...
- Mouse over the preview, right-click and Select All, right-click Print, or
- Mouse over the preview, right-click and Select All, right-click Copy, paste to a blank Word document, print the Word doc, or
- Go to File in the main menu and select Print.
- Click the Exit Preview button at the top left of the page.
- Go back to the current Submission View and clear Show all questions with user responses if you set it before you printed.

Printing an answer key
- Click Assessment from the main navigation and choose Quizzes from the pop-up menu.
- Click the little arrow behind the name of the quiz you want to print and select Edit from the pop-up.
- Scroll down the page until you see the list of quiz questions. In order to print an answer key, none of the questions in the quiz can be set to Mandatory. You will be able to tell which questions are set to mandatory by looking at the rightmost column of the table. Mandatory questions have a checkmark in the Mandatory column. See below.
- If you have questions that are flagged as Mandatory, follow these steps to clear the mandatory requirement:
- Click the Edit Values button at the top of the question list.
- Record which questions are flagged as Mandatory so you can restore your settings later.
- Clear the checkboxes in the Mandatory column.
- Click Save and Close.
- Click the little arrow behind the name of the quiz you want to print and select Edit from the pop-up to return to edit mode.
- Click on the Submission Views tab just below the Edit Quiz heading at the top of the page.
- Click on the active Submission View. If you have not created any additional views for this course, the current view will be the Default View at the top of the page. If you have created additional views, click the name of the topmost entry in the list of Additional Views toward the bottom of the page.
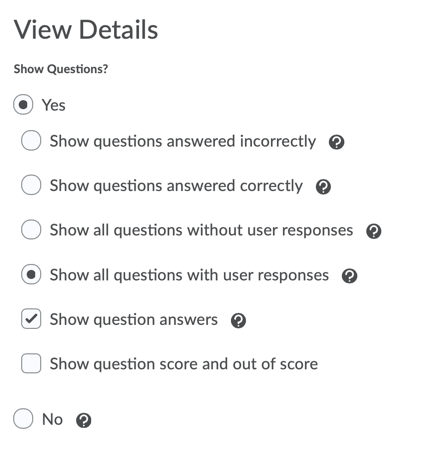
- If they are not set already, set Yes under the View Details heading as well as Show all questions with user responses and Show question answers a bit further down the page. Click Save. See the figure below.
- Click the little arrow after the quiz name and select Preview from the pop-up.
- Click the Start Quiz! button at the bottom of the window.
- Scroll to bottom of quiz and click Submit Quiz. Scroll to the bottom of the next page and click Submit Quiz again.
- Depending on your browser, either...
- Mouse over the preview, right-click and Select All, right-click Print, or
- Mouse over the preview, right-click and Select All, right-click Copy, paste to a blank Word document, print the Word doc, or
- Go to File in the main menu and select Print.
- Click the Exit Preview button at the top right of the window.
- Restore any Mandatory questions, if needed.
- Reset the values in your current submission view to what they were before you printed your answer key.


More Information
Related Wiki TopicsNo pages meet these criteria. D2L Overview Topics |
For a complete listing of topics, select from the category list below.