Difference between pages "Record a demonstration or performance" and "Saving files to OneDrive for Business from a PC"
| Line 1: | Line 1: | ||
| − | {{ | + | <div style="float:right; margin-left:.5cm;">{{#widget:YouTube|id=uMZ4n1c2Cbk}}</div> |
| + | ==About this article== | ||
| + | This article includes instructions for saving files to your Microsoft [[OneDrive for Business]] [[Cloud Storage]] account from a [[PC]]. It is intended for '''students''' and '''employees'''. | ||
| − | ' | + | ==What's OneDrive for Business?== |
| + | Microsoft OneDrive for Business is our "cloud storage" solution at [[WSU]], which is a fancy way of saying that you all have 1 [[TB]] of storage on off-campus servers owned by [[Microsoft]]. You can upload files from your WSU desktop, laptop, or tablet to your OneDrive for Business account and work on those files directly using Microsoft Office applications. This is a great option for safeguarding your files if your device(s) should ever fail or need to be exchanged. By default, any file you upload to your OneDrive for Business cannot be accessed by any other user unless you have shared it with them. Since you can now share files using OneDrive for Business, you should never store private data here [[Data_sensitivity_and_file_storage|(more on data security).]] OneDrive for Business is much more than just cloud storage and we encourage you to [[OneDrive for Business|learn more about this powerful tool]]. | ||
| − | == | + | ==How to save files to your OneDrive for Business== |
| − | === | + | *[[Accessing_OneDrive_for_Business_using_a_web_browser|Login to your OneDrive for Business account]]. |
| − | + | **'''NOTE:''' When uploading files to OneDrive, the date created/modified date will change for all files to the date that you are uploading the file(s). This is because OneDrive creates new files instead of moving them to OneDrive. | |
| + | **'''NOTE:''' You cannot save or upload files with file names that contain special characters. These characters include " * : < > ? / \ |. You will have to rename existing files before you upload to OneDrive. | ||
| + | |||
| + | ===Save files directly from an Office app to OneDrive=== | ||
| + | Select File > Save As > OneDrive-MNSCU to save files to OneDrive. | ||
| − | + | [[File:SaveAsToOD.png|300px]] | |
| − | |||
| − | |||
| − | |||
| − | == | + | ===Drag and Drop method=== |
| − | + | This is shown in the video at the top of this page. | |
| − | + | Open OneDrive in a browser window and File Explorer in another window. You can now drag-and-drop files between windows. | |
| − | + | [[File:ODsave2.png|500px]] | |
| − | |||
| − | |||
| − | |||
| − | == | + | ===Upload Method=== |
| − | + | *Create and/or open the folder into which you want to upload your files. To create a folder, select '''New''' then '''Folder'''. Give the folder a name like 'Backup 062618' and select '''Create'''. Open that folder. | |
| + | [[File:NewFolder.png|500px]] | ||
| − | == | + | *Select '''Upload''', browse to the file or folder on your computer that you want to upload, and then select '''Ok.''' You can only select one folder at a time but all the sub-folders will also be uploaded. When doing a full back up, you will probably want to select all the folders under '''This PC'''. Open the listing under your name to see if there are any other folders you need to upload. The most common folders to backup: Desktop, Documents, Downloads, Music, Pictures, Videos. Under your name you will find Favorites (your Internet Explorer bookmarks) and Outlook (where your outlook archive files are located) folder. [[Where_on_your_PC_laptop_are_your_files|Review full article on where your files are located]]. |
| − | *[[ | + | [[File:Browsethefolder.png|500px]] |
| + | *It is important to watch the top right corner for the status of the upload. If there are errors while uploading files, some files may not get uploaded. Open the status to see why a file was not uploaded. Most likely it will be because there is an invalid character in the filename. [https://support.office.com/en-us/article/invalid-file-names-and-file-types-in-onedrive-onedrive-for-business-and-sharepoint-64883a5d-228e-48f5-b3d2-eb39e07630fa?ui=en-US&rs=en-US&ad=US|Review the list of invalid characters or file types]. | ||
| + | [[File:UploadFileFolder.png|800px]] | ||
| + | *If you are prompted that files were not uploaded, select '''View All'''. You will see why each file did not upload. If you have several files listed that were not uploaded, you might want to write down the names of the file(s) because once you click off the Progress window, the list of files that were not uploaded will disappear. | ||
| + | [[File:Itemsnotuploaded.png|400px]] | ||
| + | [[File:Progress.png|500px]] | ||
| − | == | + | ==Related information== |
| − | [[Category:Keep | + | |
| + | *[[Backing up files on your PC]] | ||
| + | *[[E-Warrior Digital Life and Learning Program]] | ||
| + | *[[Receiving your laptop]] | ||
| + | |||
| + | [[Category:PC]][[Category:Laptop Exchange]][[Category:Backup]][[Category:Keep Working]] | ||
| + | __NOTOC__ | ||
Revision as of 17:41, 5 August 2020
About this article
This article includes instructions for saving files to your Microsoft OneDrive for Business Cloud Storage account from a PC. It is intended for students and employees.
What's OneDrive for Business?
Microsoft OneDrive for Business is our "cloud storage" solution at WSU, which is a fancy way of saying that you all have 1 TB of storage on off-campus servers owned by Microsoft. You can upload files from your WSU desktop, laptop, or tablet to your OneDrive for Business account and work on those files directly using Microsoft Office applications. This is a great option for safeguarding your files if your device(s) should ever fail or need to be exchanged. By default, any file you upload to your OneDrive for Business cannot be accessed by any other user unless you have shared it with them. Since you can now share files using OneDrive for Business, you should never store private data here (more on data security). OneDrive for Business is much more than just cloud storage and we encourage you to learn more about this powerful tool.
How to save files to your OneDrive for Business
- Login to your OneDrive for Business account.
- NOTE: When uploading files to OneDrive, the date created/modified date will change for all files to the date that you are uploading the file(s). This is because OneDrive creates new files instead of moving them to OneDrive.
- NOTE: You cannot save or upload files with file names that contain special characters. These characters include " * : < > ? / \ |. You will have to rename existing files before you upload to OneDrive.
Save files directly from an Office app to OneDrive
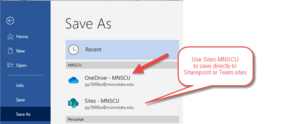
Select File > Save As > OneDrive-MNSCU to save files to OneDrive.
Drag and Drop method
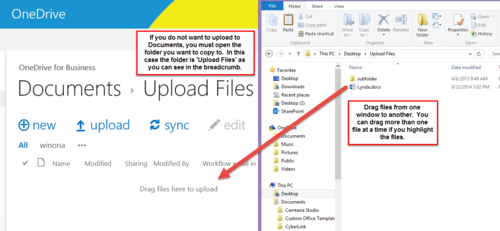
This is shown in the video at the top of this page. Open OneDrive in a browser window and File Explorer in another window. You can now drag-and-drop files between windows.
Upload Method
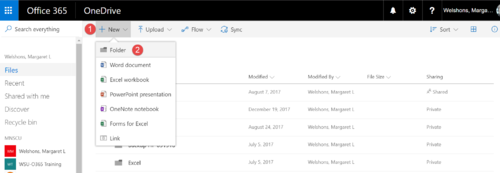
- Create and/or open the folder into which you want to upload your files. To create a folder, select New then Folder. Give the folder a name like 'Backup 062618' and select Create. Open that folder.
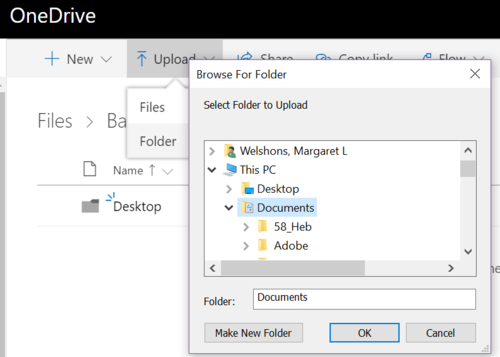
- Select Upload, browse to the file or folder on your computer that you want to upload, and then select Ok. You can only select one folder at a time but all the sub-folders will also be uploaded. When doing a full back up, you will probably want to select all the folders under This PC. Open the listing under your name to see if there are any other folders you need to upload. The most common folders to backup: Desktop, Documents, Downloads, Music, Pictures, Videos. Under your name you will find Favorites (your Internet Explorer bookmarks) and Outlook (where your outlook archive files are located) folder. Review full article on where your files are located.
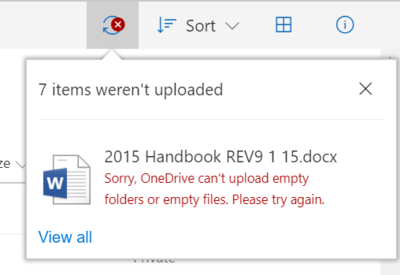
- It is important to watch the top right corner for the status of the upload. If there are errors while uploading files, some files may not get uploaded. Open the status to see why a file was not uploaded. Most likely it will be because there is an invalid character in the filename. the list of invalid characters or file types.
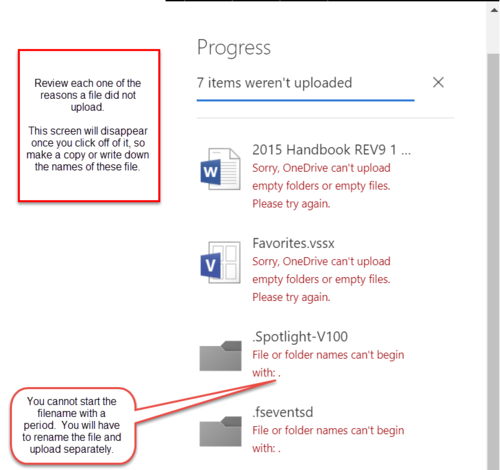
- If you are prompted that files were not uploaded, select View All. You will see why each file did not upload. If you have several files listed that were not uploaded, you might want to write down the names of the file(s) because once you click off the Progress window, the list of files that were not uploaded will disappear.
