Difference between revisions of "Recording in CaptureSpace Lite and posting to Brightspace"
Jump to navigation
Jump to search

| Line 6: | Line 6: | ||
==Access CaptureSpace Lite== | ==Access CaptureSpace Lite== | ||
To access the CaptureSpace Lite tool: | To access the CaptureSpace Lite tool: | ||
| − | # Use your favorite web browser to login to your MediaSpace account at [https://mediaspace. | + | # Use your favorite web browser to login to your MediaSpace account at [https://mediaspace.minnstate.edu '''mediaspace.minnstate.edu'''] using your Star ID username and password. This will take you to your '''My Media''' page. |
# Select '''CaptureSpace Lite''' from the '''Add New''' menu.<br />'''Note:''' If you have not yet installed CaptureSpace Lite on your laptop, refer to the installation instructions found at [https://learn.winona.edu/Recording_with_CaptureSpace_Lite Recording with CaptureSpace Lite]. | # Select '''CaptureSpace Lite''' from the '''Add New''' menu.<br />'''Note:''' If you have not yet installed CaptureSpace Lite on your laptop, refer to the installation instructions found at [https://learn.winona.edu/Recording_with_CaptureSpace_Lite Recording with CaptureSpace Lite]. | ||
# In the Kaltura CaptureSpace Desktop Recorder window, select what you would like to record from the four options provided: Screen, Webcam, Screen & Webcam, and Voice. Watch the '''Getting Started''' video to review this process. | # In the Kaltura CaptureSpace Desktop Recorder window, select what you would like to record from the four options provided: Screen, Webcam, Screen & Webcam, and Voice. Watch the '''Getting Started''' video to review this process. | ||
[[File:Mediaspace csl screen.jpg|right|frame|Fig 1. Select the type of recording]] | [[File:Mediaspace csl screen.jpg|right|frame|Fig 1. Select the type of recording]] | ||
| + | |||
==Select the type of recording== | ==Select the type of recording== | ||
From the '''Record''' pane, select the type of recording you wish to make. (See Fig.1) | From the '''Record''' pane, select the type of recording you wish to make. (See Fig.1) | ||
Latest revision as of 17:09, 15 December 2017
About This Article
This article provides a quick overview of the steps involved in recording with CaptureSpace Lite. It is intended for anyone using CaptureSpace Lite to make audio and video recordings.
Access CaptureSpace Lite
To access the CaptureSpace Lite tool:
- Use your favorite web browser to login to your MediaSpace account at mediaspace.minnstate.edu using your Star ID username and password. This will take you to your My Media page.
- Select CaptureSpace Lite from the Add New menu.
Note: If you have not yet installed CaptureSpace Lite on your laptop, refer to the installation instructions found at Recording with CaptureSpace Lite. - In the Kaltura CaptureSpace Desktop Recorder window, select what you would like to record from the four options provided: Screen, Webcam, Screen & Webcam, and Voice. Watch the Getting Started video to review this process.

Fig 1. Select the type of recording
Select the type of recording
From the Record pane, select the type of recording you wish to make. (See Fig.1)
- SCREEN records all of the action on your computer screen as well as your voice.
You will need to select the area of the screen to record, either the full screen or a portion you select. Press Record and you will see the countdown to recording begin. - SCREEN & WEBCAM records all of the screen action, your face from your webcam, and your voice.
You will see yourself in the webcam-preview window and the countdown to recording will begin. Drag the webcam video around the screen to place it where you want it in the recording. - WEBCAM records your face from your webcam and your voice.
You will see yourself in the webcam-preview window. The countdown to the start of the recording will be displayed. - VOICE records only your voice.
The countdown to recording begins immediately.
For more information, refer to Recording with CaptureSpace Lite below.

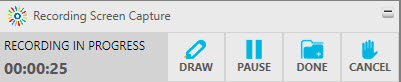
Fig 2. The recording control panel
Create your recording
CaptureSpace Lite is now recording your content. Use the record panel to control the recording process.
- DRAW appears in the record panel when the screen is being recorded. It holds the settings and selections for the Draw tool.
- PAUSE pauses the recording. When the recording is paused, the button changes to RESUME.
- DONE stops the recording, CaptureSpace saves a copy of the recording on your computer and presents a preview screen. At this point, you can perform simple edits to the recording. Select DONE in the editor and a window appears in which you enter the title and description of the recording. After you are done, click the UPLOAD button and your video is loaded into MY MEDIA in your MediaSpace account. When the upload in complete, click the MediaSpace link in the window to go to you account.
- CANCEL stops the recording without saving the file.
For more information, refer to Recording with CaptureSpace Lite below.
From the My Media screen in MediaSpace,
- Click on the video you wish to post to Brightspace.
- Click the Share button directly under the video preview.
- Click Embed just above the highlighted URL.
- Copy the contents in the highlighted frame below the Embed link.

Post your recording to Brightspace
In Brightspace,
- Go to the area in which you want to post your recording. (For example, Assignments under Assessment.)