Draft:Recording your voice only with CaptureSpace Lite
About this article
This article includes an overview of the Voice recording option in CaptureSpace Lite. It is intended for all WSU students and employees.
What's the Webcam recording option?
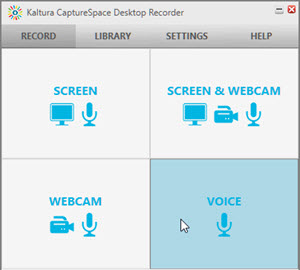
Selecting the Voice recording option (Fig 1) in CaptureSpace Lite will allow you to record audio only from the microphone you selected in your recording settings. While you are recording, you can cancel, pause, and end the recording. When you end the recording, CaptureSpace Lite allows you to trim the start and finish of the recording. Finally, you can save the recording to the location on your computer that you specified in your recording settings and you can upload the video to your MediaSpace account. Watch the Audio Recording video for an overview of this process.
Canceling, pausing, resuming, saving, and uploading a recording session
During a live recording session, use the buttons on the Recording Voice Recording window (Fig 2) to:
- Cancel: Selecting the Cancel button during a live recording session will bring up another window asking whether you really want to cancel the recording without saving it to your computer. Select OK to erase the recording and start over. Select Cancel to resume recording.
- Pause: Selecting the Pause button during a live recording session will stop the recording and change the button label to Resume . Select Resume to continue recording. You can also press Alt+P on your keyboard to pause and resume a recording.
- Done: Selecting the Done button during a live recording session saves the recording to the location on your computer that you specified in your recording settings. It assigns a default name to the file which you can change later. It then opens the saved recording in the CaptureSpace Lite editor. In the editor, you can preview your recording and trim and chop the recording. You can then select Done or Cancel. Selecting Cancel returns you to the Record tab of the Kaltura CaptureSpace Desktop Recorder window. Selecting Done opens an Upload Options window (Fig 4) that lets you add a title, description, and tags to your recording. Select Preview to return to the editor. Select Save to save those changes to the copy of the recording stored on your computer. Select Upload to begin copying the recording to your MediaSpace account.
Using the CaptureSpace Lite editor
Selecting sharing permissions
When you upload media to your MediaSpace account, you will need to select one of three file sharing permission settings. This setting can be changed later, so pick the setting that best applies at the moment:
- Private: Only you will be able to access the file. If you are embedding the video into Desire2Learn, you can leave this setting as private.
- Unlisted: Only those with a link to the file that you provide will be able to access it. Select this option if you want to share your video using a direct link to the video that you might share via email.
- Published: File will be visible to individuals if it's published in channels where they have viewing rights.
Tips on effective voice recording
- Avoid speaking directly into the mic and test the quality of the playback before your start your actual recording.
- The better quality mic use use, the better the recording will sound.
- Rather than capturing a lengthy recording, consider chunking it up into shorter segments.

