Difference between revisions of "Email in Brightspace courses"
| (7 intermediate revisions by one other user not shown) | |||
| Line 8: | Line 8: | ||
=={{D2L}} versus Outlook== | =={{D2L}} versus Outlook== | ||
Microsoft Outlook, both the online and installed version, is our [[WSU Email|primary campus email application]]. It is a full-featured email tool. Although instructors can certainly email their students using Outlook, they would need to create distribution lists manually to send messages to the entire class or to specific groups of students. Classlists and student email address are uploaded to {{D2L}} automatically and any groups created in {{D2L}} courses for other purposes (e.g., project teams) can be selected as email recipients in the {{D2L}} email tool. This may save instructors some time. | Microsoft Outlook, both the online and installed version, is our [[WSU Email|primary campus email application]]. It is a full-featured email tool. Although instructors can certainly email their students using Outlook, they would need to create distribution lists manually to send messages to the entire class or to specific groups of students. Classlists and student email address are uploaded to {{D2L}} automatically and any groups created in {{D2L}} courses for other purposes (e.g., project teams) can be selected as email recipients in the {{D2L}} email tool. This may save instructors some time. | ||
| − | |||
| − | |||
| − | |||
==Instructions== | ==Instructions== | ||
| Line 25: | Line 22: | ||
#Select '''Classlist''' from the '''Communication''' menu at the top of the page. | #Select '''Classlist''' from the '''Communication''' menu at the top of the page. | ||
#Select the recipients by selecting the checkbox to the left of their names. Select the uppermost checkbox to select all the names listed on that page. Adjust the number of students displayed per page using the menu at the bottom of the list. | #Select the recipients by selecting the checkbox to the left of their names. Select the uppermost checkbox to select all the names listed on that page. Adjust the number of students displayed per page using the menu at the bottom of the list. | ||
| − | #Select the '''Email''' icon at the top of the list (Fig 3). This will open the Compose New Message window and add all the selected email addresses to the | + | #Select the '''Email''' icon at the top of the list (Fig 3). This will open the Compose New Message window and add all the selected email addresses to the Bcc: field of the message. |
#Finish your message, adding a Subject, Body, and any Attachments. | #Finish your message, adding a Subject, Body, and any Attachments. | ||
#Select the '''Send''' button. | #Select the '''Send''' button. | ||
| + | |||
==Screenshot gallery== | ==Screenshot gallery== | ||
<gallery widths=400px heights=400px> | <gallery widths=400px heights=400px> | ||
| Line 35: | Line 33: | ||
</gallery> | </gallery> | ||
| − | ==More | + | ==More wiki articles== |
*[[Preparing for the first week of class]] | *[[Preparing for the first week of class]] | ||
| − | *[[ | + | *[[Setting Brightspace course start and end dates|Activate a Brightspace course]] |
| − | [[category: Communication]][[category: | + | *[[Keep Teaching Manual]] |
| + | [[category: Communication]][[category: Brightspace]][[Category:Email]][[Category:Faculty]][[Category:Primer]][[Category:Keep Teaching]] | ||
Latest revision as of 20:42, 11 August 2022
About this article
This article includes an overview of the Brightspace Email Tool and links to additional articles related to sending email in Brightspace courses. It is intended for instructors.
Overivew
Brightspace includes a simple email messaging tool that allows instructors to compose and send messages to individual students, sections, groups, and classlists. These messages are sent to students' WSU email addresses. Brightspace does not receive email. If students reply to messages sent from Brightspace, the reply is sent to the instructor's WSU email mailbox.
Brightspace versus Outlook
Microsoft Outlook, both the online and installed version, is our primary campus email application. It is a full-featured email tool. Although instructors can certainly email their students using Outlook, they would need to create distribution lists manually to send messages to the entire class or to specific groups of students. Classlists and student email address are uploaded to Brightspace automatically and any groups created in Brightspace courses for other purposes (e.g., project teams) can be selected as email recipients in the Brightspace email tool. This may save instructors some time.
Instructions
There are two options for sending email to students from Brightspace courses. First, log into Brightspace with your StarID username and password and select a course. Then,...
Option 1: Using the Email Tool
- Select Email from the Communication menu at the top of the page.
- Select the Address Book button to open the Address Book window. Scroll down to see a list of all of your students.
- To send a message to the entire classlist, select the checkbox in the very upper left corner of the list of students. This will put a check in the checkboxes preceding each student's name, selecting all students in the list (Fig 1). To send a message to a group, select the Filter By dropdown list, pick the group, and then select the checkbox to select all the students in that group.
- Select the To, Cc, or Bcc link just above the list of students to transfer all the selected addresses to that field. NOTE: If you are emailing more than 50 students, you must select the Bcc link.
- All selected students will now be listed in the desired Recipients field in the Address Book window. Select the Add Recipients button to return to your message (Fig 2).
- All of your students' addresses should now be included in the proper field of the message. Finish your message, adding a Subject, Body, and any Attachments.
- Select the Send button.
Option 2: Using the Classlist Tool
- Select Classlist from the Communication menu at the top of the page.
- Select the recipients by selecting the checkbox to the left of their names. Select the uppermost checkbox to select all the names listed on that page. Adjust the number of students displayed per page using the menu at the bottom of the list.
- Select the Email icon at the top of the list (Fig 3). This will open the Compose New Message window and add all the selected email addresses to the Bcc: field of the message.
- Finish your message, adding a Subject, Body, and any Attachments.
- Select the Send button.
Screenshot gallery
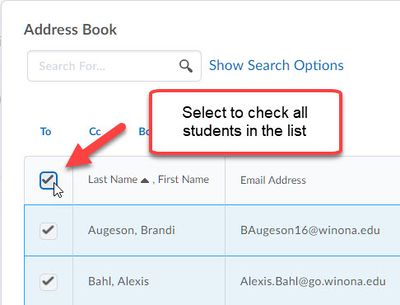
Fig 1. Select to choose all names in list

Fig 2. Select Bcc to transfer addresses, select Add Recipents
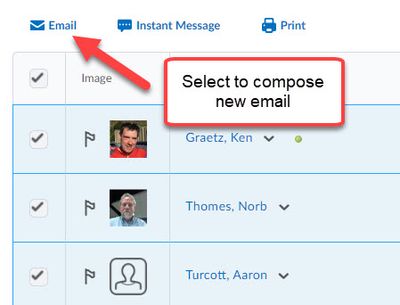
Fig 3. Select to choose all names on page


