Difference between revisions of "Setting Brightspace course start and end dates"
| Line 24: | Line 24: | ||
<gallery widths=300px heights=400px> | <gallery widths=300px heights=400px> | ||
File:Course offering info select.jpg|Fig 1. Mouse over the image and select ellipsis | File:Course offering info select.jpg|Fig 1. Mouse over the image and select ellipsis | ||
| − | File:Course offering info | + | File:Course offering info start.jpg|Fig 2. Set start and end dates and times, select Save |
</gallery> | </gallery> | ||
==More Information== | ==More Information== | ||
*[[Activating a Brightspace Course]] | *[[Activating a Brightspace Course]] | ||
Revision as of 16:59, 13 January 2019
About this article
This article includes instructions for setting start and end dates on Brightspace courses. It is intended for instructors.
Overview
WSU instructors have permission to adjust the start and end dates of their Brightspace courses. When empty course shells are created automatically every semester, default dates are added. The default start date is the first day of classes and the default end date is two weeks past the day final grades are due. Instructors can change those dates at any time, opening access to their Brightspace course earlier than the first day of classes and/or extending the end date indefinitely, for example. Note that any Brightspace course also needs to be active in order for students to access it.
Instructions
There are two options for accessing Brightspace course start and end dates. First, log into Brightspace with your StarID username and password. Then,...
Option 1: From My Courses
- Locate your course in the My Courses list on the Brightspace homepage. If you don't see it listed, select the View All Courses link at the bottom of the list. Hover your mouse over the course image and select the ellipsis icon. Select Pin. Close the All Courses window to return to the Brightspace homepage.
- Hover your mouse over the course image on the My Courses list and select the ellipsis icon. Select Course Offering Information (Fig 1).
- Scroll down until to the Start Date and End Date headings. (Fig 2). Adjust the dates and times accordingly.
- Select the Save button
Option 2: From Course Admin
- Open your course by selecting the corresponding course image on your My Courses list.
- Select the Course Admin link from the navigation bar at the top of the page
- Select the Course Offering Information link under the Site Setup heading
- Scroll down until to the Start Date and End Date headings. (Fig 2). Adjust the dates and times accordingly.
- Select the Save button
Screenshot gallery

Fig 1. Mouse over the image and select ellipsis
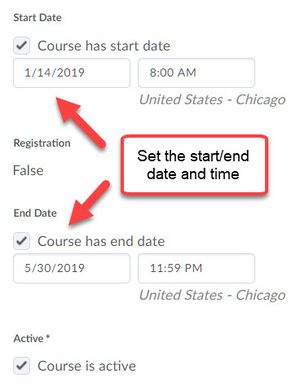
Fig 2. Set start and end dates and times, select Save

