Difference between revisions of "Sharing Qualtrics surveys"
Jump to navigation
Jump to search

(→Steps) |
|||
| Line 6: | Line 6: | ||
==Steps== | ==Steps== | ||
# Login to [[Qualtrics]] and open the survey you want to share. | # Login to [[Qualtrics]] and open the survey you want to share. | ||
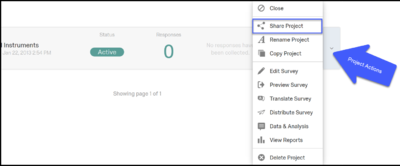
| − | # Click the '''Project Action''' pull-down menu (See image). | + | # Click the '''Project Action''' pull-down menu (See image). [[File:Sharing.png|400px|right]] |
| − | [[File:Sharing.png|400px|right]] | ||
# Click the '''Share Project''' option. | # Click the '''Share Project''' option. | ||
# Search and choose the User or Groups you wish to share the survey with and then select the '''Add Selected''' button. | # Search and choose the User or Groups you wish to share the survey with and then select the '''Add Selected''' button. | ||
Revision as of 21:12, 6 December 2017
Overview
This article provides an overview of Qualtrics Sharing Survey feature. Our Qualtrics instance is configured so that only faculty can distribute surveys. Any student who is looking to distribute a survey for a class or project will need to use the Share Survey with their faculty or staff member overseeing the research being conducted. The following steps cover the process of students sharing their project with the faculty so that this can be copied and distributed by the faculty or staff. You may also want to check out the A Project article on the Qualtrics University page.
Steps
- Login to Qualtrics and open the survey you want to share.
- Click the Project Action pull-down menu (See image).
- Click the Share Project option.
- Search and choose the User or Groups you wish to share the survey with and then select the Add Selected button.
- To the right of the User or Group select the Edit, View Results, and Copy options and save.
- Email the faculty or staff member that you shared the survey to letting them know that they can now copy and distribute your survey.
