Difference between revisions of "Sharing Video and Photos Between Devices (PC)"
| Line 27: | Line 27: | ||
2. Once downloaded open '''iCloud''' on your PC. You will then be prompted to enter your '''Apple ID'''. | 2. Once downloaded open '''iCloud''' on your PC. You will then be prompted to enter your '''Apple ID'''. | ||
| − | |||
3. Once you have entered your '''Apple ID''' the '''iCloud''' options home-screen will launch. Check the box next to '''"Photos"'''and select '''"Options"''' | 3. Once you have entered your '''Apple ID''' the '''iCloud''' options home-screen will launch. Check the box next to '''"Photos"'''and select '''"Options"''' | ||
Revision as of 16:00, 10 June 2015
About this article
This article describes three processes for sharing videos and photos from the Photos app on the tablet to a laptop computer. This article includes the PC version. This article is intended for all PC and iPad users.
Sharing Photos/ Videos
There are several different ways to share videos and photos from your Photos app on a tablet to your laptop computer. Enabling the iCloud and Photo Stream on all of your devices is one way to share that information through the cloud. This option does not require any physical connection between the devices. A third option is to manually connect your device to your laptop by using your tablet’s charging cord and importing items. The three options are described below.
Option 1:Photo Stream
Complete the following steps to share photos and videos through the Cloud. NOTE: You will want to complete the following steps before capturing your photos or videos.
Tablet
1. First you will need to make sure your iCloud account is set up. From your device open Settings > iCloud > Photos. From Photos tap the My Photo Stream button to turn it on. It should appear green.
2. There are also a variety of other photo settings to choose from in the settings. Selecting iCloud Photo Library will upload your entire library and store it in the iCloud. Apple automatically provides 5 GB of storage in the iCloud. This is a great option if you would like to share photos or videos you have already captured and would like to share between devices. The My Photo Stream only share images that were captured after this option was turned on.
3. There is also the iCloud Photo Sharing option in Settings. This allows you to create albums and share items with specific people by creating a Shared album.
4. You will now see an album title My Photo Stream in your photo albums in the Photos app. This album will automatically upload new photos and send them to all of your iCloud devices. You will not need to plug in your tablet to your laptop to share pictures or video. Any photos or videos in the Camera Roll photo album are photos that were taken on that particular device.
Laptop (PC)
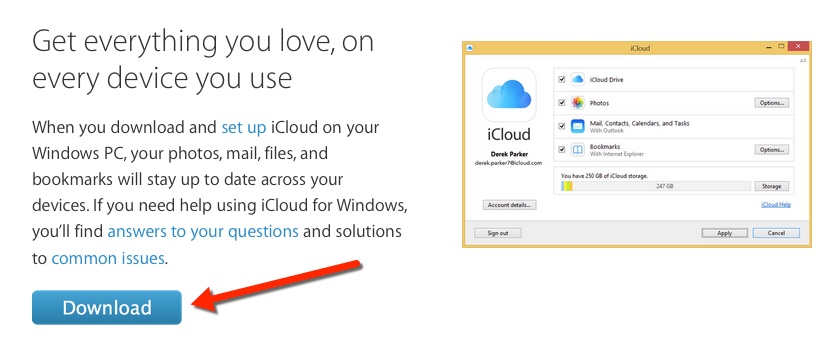
1. First you will need to download iCloud from Apple onto your laptop. Go to iCloud Download and select the Download buttonat the bottom of the screen.
2. Once downloaded open iCloud on your PC. You will then be prompted to enter your Apple ID.
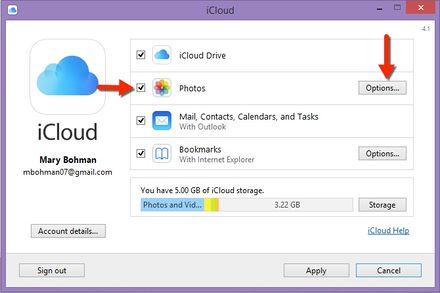
3. Once you have entered your Apple ID the iCloud options home-screen will launch. Check the box next to "Photos"and select "Options"
4. Check the "My Photo Stream" box to enable "My Photo Stream"on your PC. You will want to also select "iCloud Photo Sharing"of you have shared photo albums on your tablet.
5.To access "My Photo Stream" open your Picture Albumon your PC.
Option 2:AirDrop
AirDrop is a great option for quickly sharing one or two items between devices.Complete the following steps to share photos and videos through the AirDrop.
Laptop (Mac)
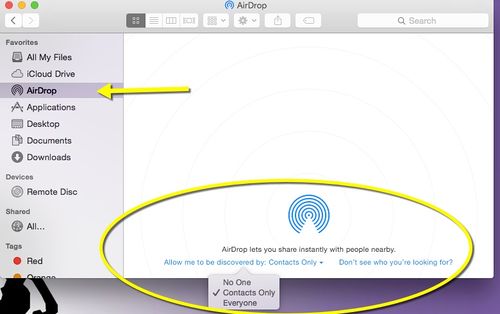
1. To turn on AirDrop on your laptop go to your Finder > AirDrop
2.Select the drop-down at the bottom of the screen tiled "Allow me to be discovered by:"
3. You will be presented with three options. Select the Contacts Only or Everyone option. At any time you can go back and turn this option on and off.
Tablet
1. To turn AirDrop on swipe up from the bottom of the screen to bring up the Control Center.
2. Tap the AirDrop box. You will be presented with three options. Select the Contacts Only or Everyone option. At any time you can go back and turn this option on and off.
3. Next open the Photos app and select the item you would like to share and choose the Share button at the bottom left corner.
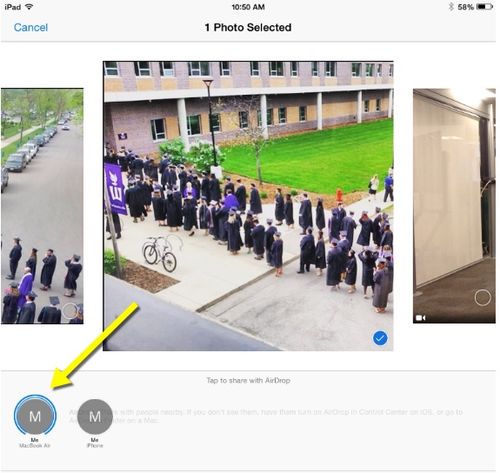
4. You will then be presented with a variety of options for how you would like to share the item. In the first quadrant you will see the AirDrop option. In this quadrant will be circles with the name of devices you have connected to AirDrop.
5.Tap the circle labeled MacBook. The item will automatically download to your Downloads folder on your laptop. If you do not see any devices in this area you will have to connect AirDrop on the other devices you would like to share with.
Option 3:Connecting Devices
Complete the following steps to share photos and videos through the physically connecting devices.
Laptop (Mac)
1. Connect your tablet to your laptop using the charging cord.
2. If this is the first time connecting your device you will want to select "Trust This Device" when prompted
3. Make sure that you have entered your pass code and your tablet is unlocked.
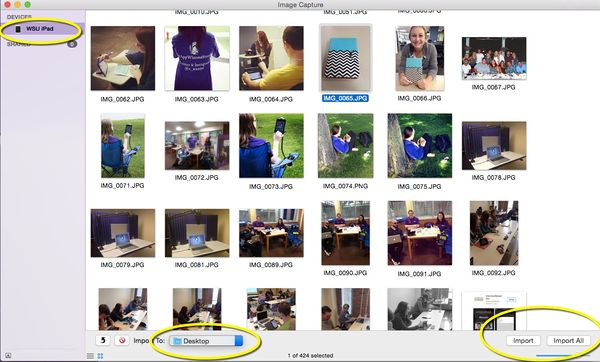
4. Open Image Capture from your Applications folder.
5. Select your device from devices list
6. You have the option of importing all items or selecting individual items.
7. Also select at the bottom of the screen where you would like your items to be downloaded.

