Difference between revisions of "Upload files to your MediaSpace account"
| (169 intermediate revisions by 5 users not shown) | |||
| Line 1: | Line 1: | ||
{{TOC_Float_Right}} | {{TOC_Float_Right}} | ||
| + | {{Revision}} | ||
| + | '''Upload files to your MediaSpace account''' for streaming, storage, and sharing with others. All {{WSU}} students and employees have a MediaSpace streaming media account and can upload a variety of image, audio, and video file formats. Once uploaded, a copy of that file will reside in your MediaSpace will be accessible from your My Media page. You can then share that file, post it to Brightspace, and even edit it using MediaSpace editing tools. Note that the original file is retained following the upload and remains wherever you stored it on your device. | ||
| + | ==Upload a file== | ||
| + | ===From your computer=== | ||
| + | #Browse to MediaSpace at [https://mediaspace.minnstate.edu https://mediaspace.minnstate.edu] | ||
| + | #Sign in with your [[StarID|StarID username and password]]. This will open your '''My Media''' page. | ||
| + | #Select '''Media Upload''' from the '''Add New''' new menu (Fig 1). | ||
| + | #Select '''Choose a file to upload'''. You will then be prompted to browse your device for a video or audio file. | ||
| + | #Once you have selected your file, a copy of it will begin to upload. | ||
| + | <gallery widths=400px heights=266px> | ||
| + | File:Mediaspace upload.png|Fig 1. Select Media Upload | ||
| + | </gallery> | ||
| − | == | + | ===From your phone=== |
| + | ====Browser==== | ||
| + | ====KMS Go app==== | ||
| + | #Install the KMS Go app on your | ||
| + | ==Enter file details== | ||
| + | #Once the file upload is complete, you can change the title, add a description, add keywords or tags, and select file access permissions. | ||
| + | #Select '''Save''' to complete the process. | ||
| + | #Select either '''Go To Media''', to play the file, or '''Go To My Media''' (6) to return to your My Media page. | ||
| + | <gallery widths=800px heights=600px> | ||
| + | File:MediaSpace_Settings_Upload.jpg|Fig 2. Select the Media Upload option | ||
| + | </gallery> | ||
| − | + | ==How do I upload a file from my tablet or smartphone?== | |
| + | There are two ways to upload a file from your mobile device to your MediaSpace account. First, you could transfer the file to your laptop or desktop computer and then upload it to MediaSpace. Second, you could upload the file directly to MediaSpace using the Web browser on your mobile device. For more detailed instructions, review the articles below: | ||
| + | *[[Sharing Video and Photos Between Devices (Mac)|How to copy videos from your iPad to your Macbook]] | ||
| + | *[[Sharing Video and Photos Between Devices (PC)|How to copy videos from your iPad to your HP Elitebook]] | ||
| + | *[[Uploading a file from your iPad to MediaSpace|How to upload a file from your iPad or iPhone to MediaSpace directly]] | ||
| − | == | + | ==Selecting sharing permissions== |
| − | + | When you upload media to your MediaSpace account, you will need to select one of three file sharing permission settings. This setting can be changed later, so pick the setting that best applies at the moment: | |
| − | + | *'''Private''': Only you will be able to access the file. If you are [[Using MediaSpace recordings in Brightspace courses|embedding the file into Brightspace using the Insert Stuff function]], you can still use this Private setting. | |
| − | + | *'''Unlisted''': Only those with a link to the file that you provide will be able to access it. Select this option if you want to share your video using a direct link to the video that you might share via email. | |
| + | *'''Published''': Assign the file to a channel. It will be visible to individuals if it's published in channels to which they have viewing rights. | ||
| − | == | + | ==Can I upload anything?== |
| − | + | By accessing and using the MnState MediaSpace system to upload video and audio content, you are confirming that you own the copyright to that content, or have cleared the copyright pursuant to [http://www.mnscu.edu/board/procedure/327p1.html Procedure 3.27.1 Copyright Clearance] and are in compliance with [http://www.mnscu.edu/board/procedure/522p1.html Procedure 5.22.1 Acceptable Use of Computers and Information Technology Resources]. | |
| − | |||
| − | + | ==What file formats can be uploaded?== | |
| + | MediaSpace allows you to upload common video and audio file formats, including files created using supported applications such as Camtasia, Premiere, and the camera app on your tablet. If the format is unsupported, you will receive an error when attempting to upload it. For best results with video, Kaltura recommends preparing videos in 1280x720 pixels and using the H.264 video codec at about 4000 kb/s. Here is a list of all the specific file formats supported by MediaSpace currently: | ||
| + | *'''Video formats:''' 3GP, ASF, AVI, F4V, FLV, M1V, M2V, M4V, MKV, MOV, MP4, MPG, MPEG, MVB, MXF, OGG, QT, RM, RV, TS, VOB, WEBM, WM, WMV | ||
| + | *'''Audio formats:''' 3GP, AAC, AIFF, AMR, ASF, AVI, F4V, FLV, MOV, MP3, MP4, OGG, QT, RA, RM, WAV, WEBM, WM, WMA | ||
| − | + | ==Is there a file size limit?== | |
| − | + | MediaSpace does not impose a limit on the upload size, however, your browser might (e.g., some older browsers limited the maximum file size to 2 GB). Larger files will take more time to upload and the process will consume more of your computer's working memory. We have also found that uploads that take longer than 2 hours to complete are more likely to fail, so we discourage uploading really large files if you are using a slower connection. If your file is really large, you may want to consider encoding it differently. Any questions about file formats, sizes, and resolutions can be directed to {{TLT}}. | |
| − | + | ==More information== | |
| + | *[[MediaSpace|What's MediaSpace?]] | ||
| + | *[[Using My Media in MediaSpace|A quick tour of the My Media page]] | ||
| + | *[[Recording_with_Kaltura_Capture|How to record using Kaltura Capture]] | ||
| + | *[[Using MediaSpace recordings in Brightspace courses|How to add MediaSpace recordings to {{D2L}} courses]] | ||
| − | |||
| − | + | [[Category: Content]][[Category: Content Organization]][[Category: Brightspace]][[Category:Faculty]][[Category: MediaSpace]][[Category:Reuse]] | |
| − | |||
| − | |||
| − | [[ | ||
| − | |||
| − | |||
| − | |||
| − | |||
| − | |||
| − | |||
| − | |||
| − | |||
| − | |||
| − | |||
| − | |||
| − | |||
| − | |||
| − | |||
| − | |||
| − | [[ | ||
| − | |||
| − | |||
| − | |||
| − | |||
| − | |||
| − | |||
| − | |||
| − | |||
| − | |||
| − | |||
| − | |||
| − | |||
__NOTOC__ | __NOTOC__ | ||
Latest revision as of 00:54, 2 November 2021
| REVISION IN PROGRESS: This article contains useful information, but is being revised to reflect recent updates. Direct questions to TLT (tlt@winona.edu). |
Upload files to your MediaSpace account for streaming, storage, and sharing with others. All Winona State University students and employees have a MediaSpace streaming media account and can upload a variety of image, audio, and video file formats. Once uploaded, a copy of that file will reside in your MediaSpace will be accessible from your My Media page. You can then share that file, post it to Brightspace, and even edit it using MediaSpace editing tools. Note that the original file is retained following the upload and remains wherever you stored it on your device.
Upload a file
From your computer
- Browse to MediaSpace at https://mediaspace.minnstate.edu
- Sign in with your StarID username and password. This will open your My Media page.
- Select Media Upload from the Add New new menu (Fig 1).
- Select Choose a file to upload. You will then be prompted to browse your device for a video or audio file.
- Once you have selected your file, a copy of it will begin to upload.

Fig 1. Select Media Upload

From your phone
Browser
KMS Go app
- Install the KMS Go app on your
Enter file details
- Once the file upload is complete, you can change the title, add a description, add keywords or tags, and select file access permissions.
- Select Save to complete the process.
- Select either Go To Media, to play the file, or Go To My Media (6) to return to your My Media page.
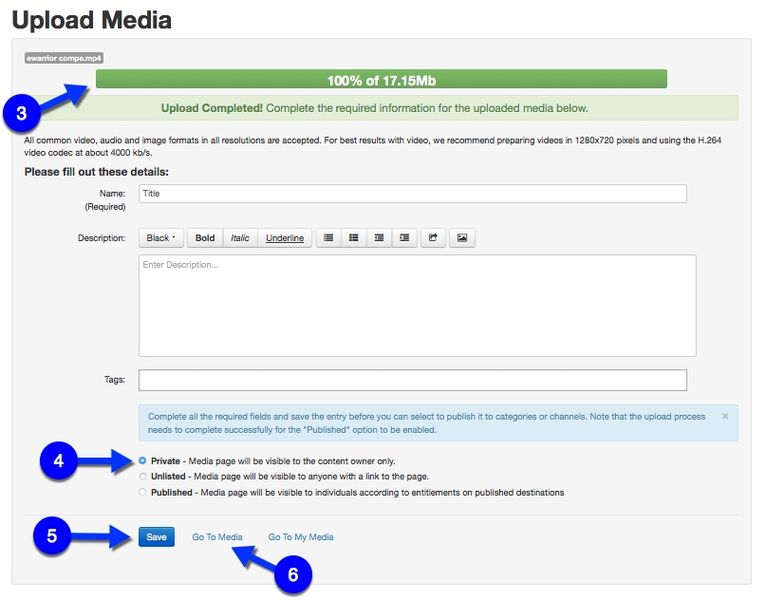
Fig 2. Select the Media Upload option

How do I upload a file from my tablet or smartphone?
There are two ways to upload a file from your mobile device to your MediaSpace account. First, you could transfer the file to your laptop or desktop computer and then upload it to MediaSpace. Second, you could upload the file directly to MediaSpace using the Web browser on your mobile device. For more detailed instructions, review the articles below:
- How to copy videos from your iPad to your Macbook
- How to copy videos from your iPad to your HP Elitebook
- How to upload a file from your iPad or iPhone to MediaSpace directly
Selecting sharing permissions
When you upload media to your MediaSpace account, you will need to select one of three file sharing permission settings. This setting can be changed later, so pick the setting that best applies at the moment:
- Private: Only you will be able to access the file. If you are embedding the file into Brightspace using the Insert Stuff function, you can still use this Private setting.
- Unlisted: Only those with a link to the file that you provide will be able to access it. Select this option if you want to share your video using a direct link to the video that you might share via email.
- Published: Assign the file to a channel. It will be visible to individuals if it's published in channels to which they have viewing rights.
Can I upload anything?
By accessing and using the MnState MediaSpace system to upload video and audio content, you are confirming that you own the copyright to that content, or have cleared the copyright pursuant to Procedure 3.27.1 Copyright Clearance and are in compliance with Procedure 5.22.1 Acceptable Use of Computers and Information Technology Resources.
What file formats can be uploaded?
MediaSpace allows you to upload common video and audio file formats, including files created using supported applications such as Camtasia, Premiere, and the camera app on your tablet. If the format is unsupported, you will receive an error when attempting to upload it. For best results with video, Kaltura recommends preparing videos in 1280x720 pixels and using the H.264 video codec at about 4000 kb/s. Here is a list of all the specific file formats supported by MediaSpace currently:
- Video formats: 3GP, ASF, AVI, F4V, FLV, M1V, M2V, M4V, MKV, MOV, MP4, MPG, MPEG, MVB, MXF, OGG, QT, RM, RV, TS, VOB, WEBM, WM, WMV
- Audio formats: 3GP, AAC, AIFF, AMR, ASF, AVI, F4V, FLV, MOV, MP3, MP4, OGG, QT, RA, RM, WAV, WEBM, WM, WMA
Is there a file size limit?
MediaSpace does not impose a limit on the upload size, however, your browser might (e.g., some older browsers limited the maximum file size to 2 GB). Larger files will take more time to upload and the process will consume more of your computer's working memory. We have also found that uploads that take longer than 2 hours to complete are more likely to fail, so we discourage uploading really large files if you are using a slower connection. If your file is really large, you may want to consider encoding it differently. Any questions about file formats, sizes, and resolutions can be directed to TLT (tlt@winona.edu).
More information
- What's MediaSpace?
- A quick tour of the My Media page
- How to record using Kaltura Capture
- How to add MediaSpace recordings to Brightspace courses