Using Kaltura Capture
About this article
This article includes an overview of the Screen recording option in Kaltura Capture. It is intended for all WSU students and employees.
What are the recording options?
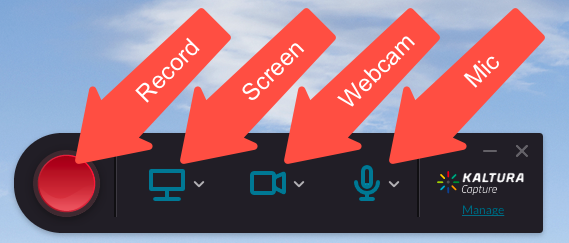
Kaltura Capture can record from three separate input sources:
- Computer screen: You can record the entire screen or a portion of it. You have the option to highlight the cursor in the recorded video.
- Webcam: Use your webcam to include the talking head on the screen. You can place the head anywhere but the viewer can move it around during viewing. See Changing Kaltura Capture video layout for more information.
- Audio: Record with the system microphone or use an external mic.

Selecting what to record
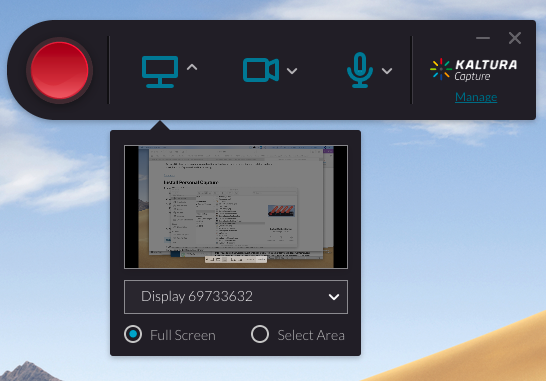
There is a small, downward-pointing arrow to the right of the screen, webcam, and mic icons. Clicking that arrow will cause the details of the input source to be displayed in a fly-out window. In the example on the right, the downward-arrow next to the screen icon has been clicked. The fly-out is displayed and the arrow is inverted to point upward.
- The screen details include which monitor to select and whether to record the entire screen or only a user-selected subset.
- The webcam details allow you select between and active webcams on the computer.
- The audio details allow you to select between active microphones.
To make input selections, click once on the icon(s) of the sources you do not want to record. For example, the webcam icon has been clicked in the example on the right. That means only the screen capture and audio capture will be included in the recording. Clicking the icon again will cause it to be reactivated and ready for recording.
Once you select your recording options and click the Record button, there is a three-second countdown before the recording begins.
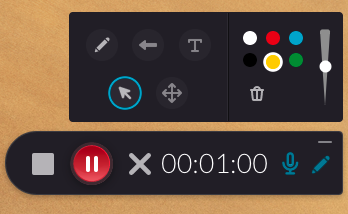
During recording, the toolbar shown above is replaced with a new toolbar, one that is more appropriate for working with live video. It looks like the example on the right.
From left to right, the tools in the toolbar are stop recording (the box), pause recording (the pause button), delete recording (the X), the length of the recording (the time), audio muting (the mic), and annotate (the pencil).
Clicking the annotate tool will cause the fly-out menu shown on the right to appear.
On the left half of the fly-out are the tool selectors.
- Draw (the pencil) brings up a pencil tool to hand draw on the surface. You control the color and the width of the line on the right side of the fly-out.
- Arrow (the left-pointing arrow) produces an arrow. Click your mouse where you want to arrow to begin and drag out the head of the arrow.
- Text (the T) supports the addition of text annotations.
- Mouse (the cursor arrow pointing at 10:30) flips you back to the traditional cursor, clearing your previous tool selections. (Not your annotations, that is done with the trashcan.) The mouse icon is highlighted with the circle meaning it is the currently active tool. Clicking the mouse icon deselects the annotation tools and returns you to a "normal" cursor.
- Move (four-pointer arrow) allows for the drag and drop of annotations on the work surface.
For the draw, arrow, and text tools, you control the color and the width of the line on the right side of the fly-out.
The trashcan on the right side of the fly-out deletes all annotations with a single click.
Note: The annotate tool is only available if you are recording the screen content. It does not activate to webcam- or audio-only recordings.
There is more information on recording with Kaltura Capture and the Kaltura Capture recording menu in the Kaltura Knowledge Base.
Tips on effective screen recording
- If you are capturing your entire screen, make sure to close all applications that are unnecessary or that might distract the viewer.
- Move your mouse a bit slower across the screen than usual. Use your mouse cursor or the drawing tools to focus the viewer's attention on specific areas on the screen.
- Rather than capturing a lengthy screen recording, consider chunking it up into shorter segments.
- If you are using Powerpoint or another slide-presentation tool and plan to include a talking head as a picture-in-picture, format your slides so there is a blank spot in the same location on each slide to house the PiP. This prevents the PiP from covering important text or graphics.


