Difference between revisions of "Zoom meeting quick guide"
| (6 intermediate revisions by the same user not shown) | |||
| Line 5: | Line 5: | ||
==Understanding the Zoom menu bar== | ==Understanding the Zoom menu bar== | ||
| + | |||
| + | <center> | ||
| + | {{#widget:YouTube|id= 4w_pRMBEALE}}<br /> | ||
| + | </center> | ||
| + | |||
To enter an Zoom meeting as a participant click on the link provided by the host of the meeting. When you join a Zoom room a menu bar will be at the bottom of your screen. You will need to hover your mouse near the bottom and the Zoom Menu Bar will appear. Below is a description of the items on the menu bar. | To enter an Zoom meeting as a participant click on the link provided by the host of the meeting. When you join a Zoom room a menu bar will be at the bottom of your screen. You will need to hover your mouse near the bottom and the Zoom Menu Bar will appear. Below is a description of the items on the menu bar. | ||
| + | |||
[[File:Zoom Menu bar.png|center|875 px]] | [[File:Zoom Menu bar.png|center|875 px]] | ||
| − | |||
<ol> | <ol> | ||
| Line 53: | Line 58: | ||
|- | |- | ||
| style="vertical-align: top; " | | | style="vertical-align: top; " | | ||
| − | + | Breakout Rooms allow you to split your Zoom meeting in up to 50 separate sessions. The meeting host can choose to split the participants of the meeting into these separate sessions automatically or manually, and can switch between sessions at any time. | |
| + | |||
| + | * Up to 50 breakout rooms can be created | ||
| + | * Max 200 participants in a breakout room (requires Large Meeting 200 add-on) | ||
| + | * Breakout room participants have full audio, video and screen share capabilities | ||
| + | |||
| + | If the meeting is being cloud recorded, it will only record the main room, regardless of what room the meeting host is in. If local recording is being used, it will record the room the participant who is recording is in. Multiple participants can record locally. | ||
| + | |||
| + | More information is available at [https://support.zoom.us/hc/en-us/articles/206476093-Getting-Started-with-Breakout-Rooms Getting Started with Breakout Rooms] from the Zoom support site. | ||
| | | | ||
| style="width: 40px; " | | | style="width: 40px; " | | ||
Revision as of 14:41, 25 June 2019
About this article
This article provides an overview of now to use the Zoom web conferencing system. It is intended for all WSU students and employees.
To enter an Zoom meeting as a participant click on the link provided by the host of the meeting. When you join a Zoom room a menu bar will be at the bottom of your screen. You will need to hover your mouse near the bottom and the Zoom Menu Bar will appear. Below is a description of the items on the menu bar.
- Mute/unmute audio
- Stop/start video
- View a list of participants in the room. This will also allow you to see if anyone raised their hand if they have questions.
- Screen share your desktop or specific application
- Conduct a group or private
- Leave the video meeting
How to mute and unmute your audio
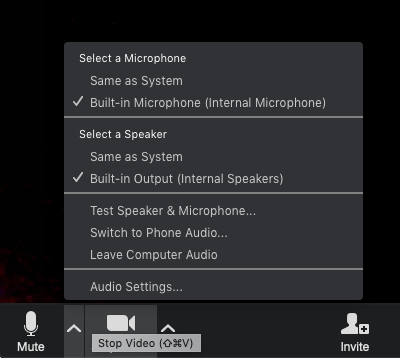
Select the microphone in the lower left-hand corner of the screen to activate your microphone. Select the icon again to mute.
To select a different microphone or adjust your audio settings select the drop-down next to the microphone icon.
How to Start and Stop Video
Select the camera in the lower left-hand corner of the screen to activate your video. Select the icon again to turn stop your video.
To adjust any video settings select the drop-down next to the video icon.
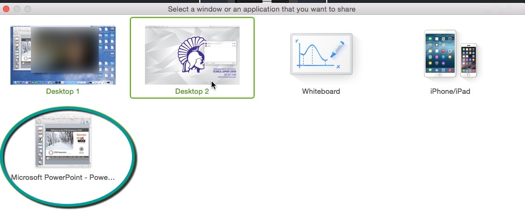
During a virtual meeting, you can switch back and forth between screen share and video as often as needed. To share your screen select the “Share Screen” icon.
Then click on the item you want to display, and then click “OK.” You can choose to share a variety of items including any applications that are open, your desktop or a whiteboard. Once you share, the Zoom Menu Bar will be at the top of your screen. Again, you can hover your mouse near the top so that the Zoom Menu Bar will appear.
Participating in a Zoom meeting
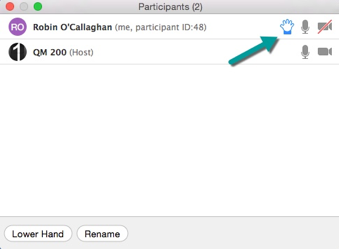
Participant Icon
Select the "Participant" icon to view who is listed in the room. From the participant window you can also raise your hand to ask a question and rename yourself by selecting your name from the participant list.
Chat icon
Select the "Chat" icon to chat with the entire room or an individual.
Joining or leaving a Zoom room
- To join a meeting, you simply click on the link provided by the host. The meeting will open once the host has joined the room.
- You can leave your meeting room by clicking on the “Leave Meeting” icon in the bottom right-hand corner.
Conducting small-group discussions during a Zoom session
|
Breakout Rooms allow you to split your Zoom meeting in up to 50 separate sessions. The meeting host can choose to split the participants of the meeting into these separate sessions automatically or manually, and can switch between sessions at any time.
If the meeting is being cloud recorded, it will only record the main room, regardless of what room the meeting host is in. If local recording is being used, it will record the room the participant who is recording is in. Multiple participants can record locally. More information is available at Getting Started with Breakout Rooms from the Zoom support site. |
|
More information
Zoom training
Related Wiki topics
- Student daily tips
- Instructor daily tips
- Draft:Article layout basic
- Send incoming Zoom Phone calls to voicemail
- Launch Zoom on startup
- Zoom Phone settings
- Zoom Phone preparation checklist
- Zoom Phone FAQ
- Zoom Phone
- Blended meetings
For a complete listing of topics, select from the category list below.


