Difference between revisions of "Virtual private network for employees"
Jump to navigation
Jump to search
| (48 intermediate revisions by one other user not shown) | |||
| Line 2: | Line 2: | ||
(Looking for the [[VPN for Students]] page?) | (Looking for the [[VPN for Students]] page?) | ||
| + | |||
| + | ==Step One: Configure an Authenticator App== | ||
'''Before you start, you must have access to an [https://www.login.gov/help/signing-in/what-is-an-authentication-app/ Authenticator app]. This is typically a mobile phone app that can generate six-digit verification codes to allow [https://en.wikipedia.org/wiki/Multi-factor_authentication multi-factor authentication.]''' | '''Before you start, you must have access to an [https://www.login.gov/help/signing-in/what-is-an-authentication-app/ Authenticator app]. This is typically a mobile phone app that can generate six-digit verification codes to allow [https://en.wikipedia.org/wiki/Multi-factor_authentication multi-factor authentication.]''' | ||
| − | + | [https://support.authy.com/hc/en-us/articles/115001945848-Downloading-and-Installing-Authy-Apps Download the authy app] | |
| − | + | [https://learn.winona.edu/Multi-Factor_Authentication_for_Office_365#Setup_Trust_Account Click here for instructions on how to set up Microsoft Authenticator with your WSU account] | |
| − | + | [https://support.authy.com/hc/en-us/articles/360006303934-Add-a-New-Two-Factor-Authentication-2FA-Account-Token-in-the-Authy-App Click here for instructions on setting up Authy Authenticator] | |
| − | |||
| − | |||
| − | |||
| − | |||
| − | |||
| − | |||
| − | |||
| − | |||
| − | ===Windows 10=== | + | ==Step Two: Enroll at https://otp.winona.edu== |
| + | |||
| + | # You must have access to an [https://www.login.gov/help/signing-in/what-is-an-authentication-app/ Authenticator app]. This is typically a mobile phone app that can generate six-digit verification codes to allow [https://en.wikipedia.org/wiki/Multi-factor_authentication multi-factor authentication.] | ||
| + | # Ensure your computer is connected to the [[Wazoo]] wireless network on campus | ||
| + | ::* If you are on a desktop computer your wired network connection should suffice | ||
| + | # All employees must start by setting up their One-Time Password (OTP) at this link '''while on campus''': https://otp.winona.edu | ||
| + | # Once on that page, enter your StarID in the Username field | ||
| + | # Enter your network password on the next screen | ||
| + | # Click Add OAUTH Token | ||
| + | # Click the radio button next to Online then click Add | ||
| + | # On the next page, scan the QR code with the authenticator app of your choice | ||
| + | |||
| + | ::* '''You MUST click 'Done' after you scan your QR code!''' | ||
| + | :::* We recommend [https://www.microsoft.com/en-us/account/authenticator Microsoft Authenticator] or [https://authy.com/download/ Authy] | ||
| + | |||
| + | |||
| + | '''For the next steps you must be connected to an off-campus (home) network or VPN will fail to connect.''' | ||
| + | |||
| + | '''If you would like to test your VPN connection while still on-campus, connect to the EduRoam wifi network.''' | ||
| + | |||
| + | |||
| + | ===Connect to VPN on Windows 10=== | ||
* Open the Start Menu and type Cisco | * Open the Start Menu and type Cisco | ||
* Select 'Cisco AnyConnect Secure Mobility Client' when it appears | * Select 'Cisco AnyConnect Secure Mobility Client' when it appears | ||
| − | * If | + | ** If Cisco AnyConnect does not appear in your start menu, open your internet browser and go to https://ot.winona.edu |
| − | * You will be prompted to | + | [[file:CACVPNPC.png]] |
| + | * Once Cisco AnyConnect opens, replace tunnel.winona.edu with ot.winona.edu then hit Connect | ||
| + | * You will be prompted to login with your StarID, your six-digit authentication code, and your StarID password | ||
| + | * Select your group from the drop down list. If you do not know your group, just choose grp_employee as shown in the screenshot below. | ||
| + | ** The format is '''StarID-123456''' for username. Do not forget the dash between your StarID and the six-digit code from your [https://www.microsoft.com/en-us/account/authenticator Microsoft Authenticator] or [https://authy.com/download/ Authy] app | ||
[[file:VPNmfa.png]] | [[file:VPNmfa.png]] | ||
| − | ===macOS=== | + | ===Connect to VPN on macOS=== |
| − | * Click on Spotlight in the upper right corner | + | * Click on Spotlight in the upper right corner of your Mac |
* Type in "Cisco" | * Type in "Cisco" | ||
| − | * Select "Cisco AnyConnect Secure Mobility Client" | + | * Select "Cisco AnyConnect Secure Mobility Client" when it appears |
| + | ** If Cisco AnyConnect does not appear, open your internet browser and go to https://ot.winona.edu | ||
[[File:VPN_Mac_Cisco_Search.png|400px]] | [[File:VPN_Mac_Cisco_Search.png|400px]] | ||
| − | + | * Once Cisco AnyConnect opens, replace tunnel.winona.edu with ot.winona.edu then hit Connect | |
| − | * | ||
[[File:otVPN.png|400px]] | [[File:otVPN.png|400px]] | ||
| − | * | + | * You will be prompted to login with your StarID, your six-digit authentication code, and your StarID password |
| + | * Select your group from the drop down list. If you do not know your group, just choose grp_employee as shown in the screenshot below. | ||
| + | ** The format is '''StarID-123456''' for username. Do not forget the dash between your StarID and the six-digit code from your [https://www.microsoft.com/en-us/account/authenticator Microsoft Authenticator] or [https://authy.com/download/ Authy] app | ||
| + | [[file:macVPNmfa.png|400px]] | ||
=How do I access my network storage?= | =How do I access my network storage?= | ||
| + | |||
| + | '''If you want to connect to personal network or department network drives from off-campus, you will first need to connect to VPN.''' | ||
==Windows 10== | ==Windows 10== | ||
| − | + | * Open your Start Menu and click the "Click to Map Network Drives" tile located at the top middle of the screen | |
| − | * Open | + | * Re-open your Start Menu and click the "File Explorer" tile in the middle of the screen |
| − | + | * Your network storage drives will be located under the "Network locations" heading. You may have to scroll down to find it. | |
| − | |||
| − | * | ||
| − | * | ||
| − | + | ==macOS== | |
| − | * In Finder, hold | + | |
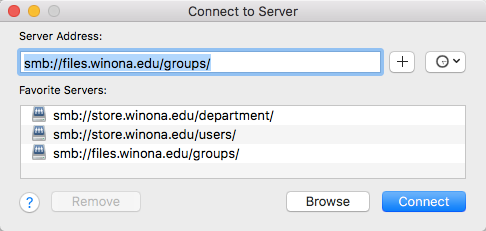
| + | * In Finder, press and hold the '''<Command>''' key then tap the '''<K>''' key to bring up the "Connect to Server" prompt | ||
* Connect to one of the network locations listed in Fig 2. | * Connect to one of the network locations listed in Fig 2. | ||
| − | * | + | * Just copy/paste one of the addresses below if your list is not pre-populated |
| − | * Personal storage: smb://store.winona.edu/users/ | + | * Personal storage: smb://store.winona.edu/users/ |
| − | * Department drive: smb://store.winona.edu/department | + | * Department drive: smb://store.winona.edu/department/ |
[[File:ConnectToServer.png|frame|Fig 2. Here is a sample of the server addresses you may need to connect to.]] | [[File:ConnectToServer.png|frame|Fig 2. Here is a sample of the server addresses you may need to connect to.]] | ||
| − | |||
| − | |||
| − | |||
| − | |||
| − | |||
| − | |||
| − | |||
| − | |||
| − | |||
| − | |||
| − | |||
| − | |||
| − | |||
| − | |||
=Related information= | =Related information= | ||
Revision as of 17:05, 19 January 2019
(Looking for the VPN for Students page?)
Step One: Configure an Authenticator App
Before you start, you must have access to an Authenticator app. This is typically a mobile phone app that can generate six-digit verification codes to allow multi-factor authentication.
Click here for instructions on how to set up Microsoft Authenticator with your WSU account
Click here for instructions on setting up Authy Authenticator
Step Two: Enroll at https://otp.winona.edu
- You must have access to an Authenticator app. This is typically a mobile phone app that can generate six-digit verification codes to allow multi-factor authentication.
- Ensure your computer is connected to the Wazoo wireless network on campus
- If you are on a desktop computer your wired network connection should suffice
- All employees must start by setting up their One-Time Password (OTP) at this link while on campus: https://otp.winona.edu
- Once on that page, enter your StarID in the Username field
- Enter your network password on the next screen
- Click Add OAUTH Token
- Click the radio button next to Online then click Add
- On the next page, scan the QR code with the authenticator app of your choice
- You MUST click 'Done' after you scan your QR code!
- We recommend Microsoft Authenticator or Authy
For the next steps you must be connected to an off-campus (home) network or VPN will fail to connect.
If you would like to test your VPN connection while still on-campus, connect to the EduRoam wifi network.
Connect to VPN on Windows 10
- Open the Start Menu and type Cisco
- Select 'Cisco AnyConnect Secure Mobility Client' when it appears
- If Cisco AnyConnect does not appear in your start menu, open your internet browser and go to https://ot.winona.edu

- Once Cisco AnyConnect opens, replace tunnel.winona.edu with ot.winona.edu then hit Connect
- You will be prompted to login with your StarID, your six-digit authentication code, and your StarID password
- Select your group from the drop down list. If you do not know your group, just choose grp_employee as shown in the screenshot below.
- The format is StarID-123456 for username. Do not forget the dash between your StarID and the six-digit code from your Microsoft Authenticator or Authy app

Connect to VPN on macOS
- Click on Spotlight in the upper right corner of your Mac
- Type in "Cisco"
- Select "Cisco AnyConnect Secure Mobility Client" when it appears
- If Cisco AnyConnect does not appear, open your internet browser and go to https://ot.winona.edu

- Once Cisco AnyConnect opens, replace tunnel.winona.edu with ot.winona.edu then hit Connect

- You will be prompted to login with your StarID, your six-digit authentication code, and your StarID password
- Select your group from the drop down list. If you do not know your group, just choose grp_employee as shown in the screenshot below.
- The format is StarID-123456 for username. Do not forget the dash between your StarID and the six-digit code from your Microsoft Authenticator or Authy app

How do I access my network storage?
If you want to connect to personal network or department network drives from off-campus, you will first need to connect to VPN.
Windows 10
- Open your Start Menu and click the "Click to Map Network Drives" tile located at the top middle of the screen
- Re-open your Start Menu and click the "File Explorer" tile in the middle of the screen
- Your network storage drives will be located under the "Network locations" heading. You may have to scroll down to find it.
macOS
- In Finder, press and hold the <Command> key then tap the <K> key to bring up the "Connect to Server" prompt
- Connect to one of the network locations listed in Fig 2.
- Just copy/paste one of the addresses below if your list is not pre-populated
- Personal storage: smb://store.winona.edu/users/
- Department drive: smb://store.winona.edu/department/

Fig 2. Here is a sample of the server addresses you may need to connect to.