Difference between revisions of "Virtual private network for employees"
Jump to navigation
Jump to search
| Line 24: | Line 24: | ||
* If it does not appear, open your internet browser and go to https://ot.winona.edu | * If it does not appear, open your internet browser and go to https://ot.winona.edu | ||
* You will be prompted to Connect and login to WSU with your StarID, password, and two-factor authentication code | * You will be prompted to Connect and login to WSU with your StarID, password, and two-factor authentication code | ||
| + | [file:VPNmfa.png] | ||
===macOS=== | ===macOS=== | ||
Revision as of 17:19, 4 December 2018
(Looking for the VPN for Students page?)
Before you start, you must have access to an Authenticator app. This is typically a mobile phone app that can generate six-digit verification codes to allow multi-factor authentication.
How do I connect to the employee VPN?
Enroll at https://otp.winona.edu/enroll
- First, ensure your computer is connected to the Wazoo wireless network on campus.
- All employees must start by setting up their One-Time Password (OTP) at this link while on campus: https://otp.winona.edu/enroll
- Once on that page, enter your StarID in the Username field
- Enter your network password on the next screen
- Click Add OAUTH Token
- Click the box next to Online then click Add
- On the next page, scan the QR code with the authenticator app of your choice.
- You MUST click 'Done' after you scan your QR code!
- We recommend Microsoft Authenticator or Authy.
Windows 10
- Open the Start Menu and type Cisco
- Select 'Cisco AnyConnect Secure Mobility Client' when it appears
- If it does not appear, open your internet browser and go to https://ot.winona.edu
- You will be prompted to Connect and login to WSU with your StarID, password, and two-factor authentication code
[file:VPNmfa.png]
macOS
- Click on Spotlight in the upper right corner
- Type in "Cisco"
- Select "Cisco AnyConnect Secure Mobility Client"

- Connect to ot.winona.edu

- Use your StarID and password along with your six-digit code from your Microsoft Authenticator or Authy app when prompted to login.
How do I access my network storage?
Windows 10
You will need to manually map your Personal Network Storage also referred to as R: drive.
- Open File Explorer from the Taskbar
- Use the drop down arrow in the top menu for 'Map network drive' and select Map network drive
- Type the following in Folder: \\store\users\(your StarID)
- Select 'Reconnect at sign-in'
- Finish
macOS
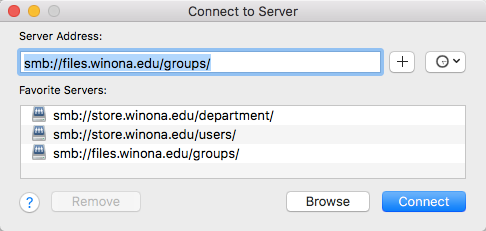
- In Finder, hold down <CommandKey> then hit the <K> key to bring up "Connect to Server"
- Connect to one of the network locations listed in Fig 2.
- You can just type the address if it is not pre-populated
- Personal storage: smb://store.winona.edu/users/YourStarID
- Department drive: smb://store.winona.edu/department

Fig 2. Here is a sample of the server addresses you may need to connect to.
More on network storage
If you want to connect to Personal Network or Department Network drives from off-campus, you will need to connect to VPN before you can use the network drives.
Windows 10
- Open the Start Menu then select the Map Network Drives shortcut.
- A black window will appear and map your drives. Do not close this window.
- Double-click 'This PC' on your desktop to access your network drives (See Fig 1.)
- Do not disconnect VPN or WiFi during use. Network access is required to maintain the VPN connection.
macOS
- In Finder, hold down <CommandKey> then hit the <K> key to bring up "Connect to Server"
- Mac users connect to one of the network locations listed in Fig 2.