Difference between revisions of "Windows Live Movie Maker (PC)"
| Line 104: | Line 104: | ||
* [http://edutech.tlt.winona.edu/wikis/TLTPedia/index.php/Flip_Video_Camcorder Flip Video Camcorder Information] | * [http://edutech.tlt.winona.edu/wikis/TLTPedia/index.php/Flip_Video_Camcorder Flip Video Camcorder Information] | ||
* [http://edutech.tlt.winona.edu/wikis/TLTPedia/index.php/Video_Resources Video Resources] | * [http://edutech.tlt.winona.edu/wikis/TLTPedia/index.php/Video_Resources Video Resources] | ||
| − | |||
=Helpful Information= | =Helpful Information= | ||
Revision as of 15:46, 15 January 2016
Movie Maker Live is part of Windows Live Essentials.
Windows Live Movie Maker
(Taken from Wikipedia) Windows Live Movie Maker is intended to replace Windows Movie Maker that is currently included in Windows Vista. It is a complete rewrite of the Windows Movie Maker application, focusing on the needs of general users, the streamlined design consists largely in the reduction of features considered unimportant to general users.[2] The program includes a redesigned ribbon interface. Windows Live Movie Maker allows users to publish videos to Windows Live OneDrive, Facebook, YouTube and Flickr, as well creating HD videos. However, it has received criticism over its removal of most of the features of the older versions, particularly the timeline.
There is no manual necessary when using Windows Live Movie Maker. The interface in intuitive and the tools are right where you want and need them to be - at your fingertips. Windows Live Movie Maker is the easy, fast way to turn photos and videos into great-looking movies and slideshows you can share—on the Web or on DVD.
Download Windows Live Movie Maker
Using Windows Live Movie Maker
(The Information below is taken from http://www.winsupersite.com/win7/wlmm.asp)
When you consider what it does, Windows Live Movie Maker is arguably as simple as it can be. The UI is logically split between a full-featured ribbon-type toolbar (which is much more impressive than the ribbon UIs in either Paint or WordPad in Windows 7), a video preview pane, and a content pane.
As you drag content into the application, it appears as clips in the content pane in a storyboard-style view. You can drag and drop clips to order them and can mix and match videos with photos. From here, you can proceed manually and discover some of the application's more advanced features, which we'll examine below.
Or you can simply click the AutoMovie button to quickly make a final, polished movie that includes a title, credits, and simple crossfade transitions between each clip. It can also optionally fit the length of the video to a song (or other audio track) of your choosing.
When the AutoMovie process is complete--it's surprisingly fast, even on large projects--you can edit the title and credits, which causes a new context-sensitive Text Tools tab group to appear in Movie Maker's ribbon. Editing each is as simple as can be expected, and most people will be up and running in no time.
If you are willing to dive a bit deeper into the Windows Live Movie Maker user interface, you'll be rewarded with a rich set of functionality. You can do things like add captions, which can be handy when you want to describe the location or subject of a particular photo or movie clip. Movie Maker's captions aren't static, however. They come complete with optional special panning effects, custom fonts, transparency settings, and even fine-tunable start and end times.
In addition to simple brightness control, Windows Live Movie Maker also sports 20 visual effects, and if you want you can easily use two or more on the same clip using a Multiple effects tool. Visual effects range from the expected grayscale filters to some horizontal and vertical mirror images.
Do you have the current version?
Start>Windows Movie Maker>Help>About: Check to make sure you have version 2 installed on your computer. If not, go to http://windowsupdate.microsoft.com/ and Microsoft should automatically check for updates on your computer.
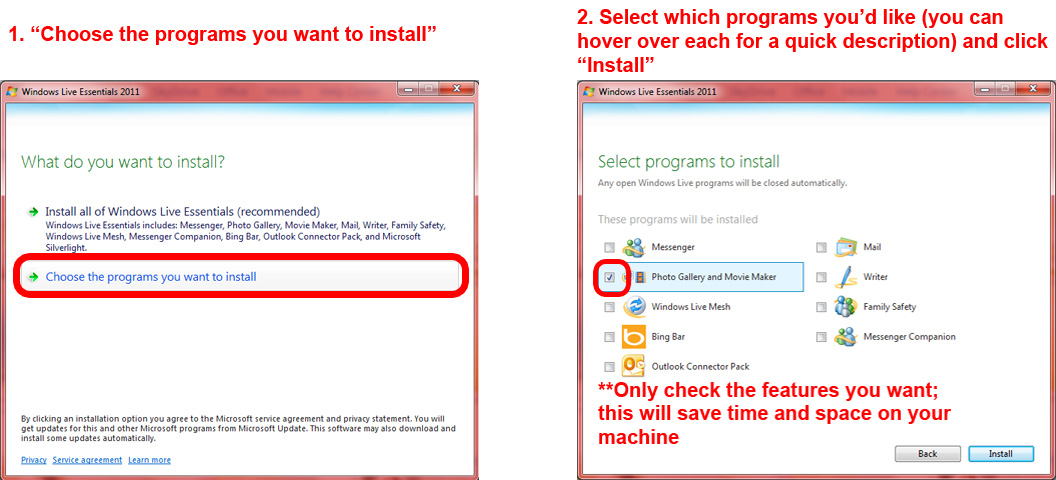
Installing Only Select Features
Necessary pre-editing information
- Our Digital Camera/Helpful Filming Techniques wiki page is full of information to teach you about some simple ways to optimize the filming of the raw videos, which will improve the overall quality of the final product, as well as add ease to the editing process.
FlipCam information
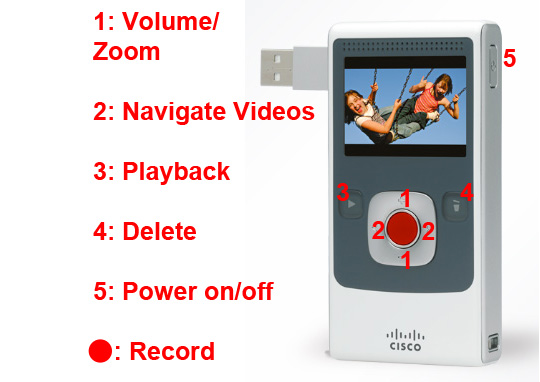
- The FlipCams have very basic functionality.
- The adjustable settings are: language, date, time, camera sounds (on/off), & recording light (on/off).
- To change any of these settings, press and hold the "Record" button immediately after turning the camera on until the options appear.
- While recording: you can zoom in and out.
- While reviewing: you can play videos, change the volume, and delete clips from the camera.
- The adjustable settings are: language, date, time, camera sounds (on/off), & recording light (on/off).
- What the Flip lacks:
- Microphone port
- Manual focus
- Different modes (for filming at night, sporting events, etc.)
- Auto-steady (to help counteract shaky filming)
- Zoom
- Not all FlipCams have a zoom function, but most do. To zoom in and out, use the + and - buttons on the left and right sides of the record button while filming.
- Tips for when to use zoom
- FlipShare Software Setup
- If the application is deleted from the camera, you can download it here; the Windows and Mac download links are about halfway down the page in the right column.
- Importing files onto your machine using FlipShare
Backup
- Once you've imported the raw video files onto your computer, BACK THEM UP. Keeping extra copies of your video files is good insurance against accidental deletion. If a file is deleted, you can just make a copy of the backup and begin working with it, instead of having to re-shoot your videos.
- Several options are available:
Saving each step in editing
- During the editing process, it's a good idea to save the project with a new file name each time you edit, instead of just saving over past work. If a mistake is made or a file is corrupted/lost, you can revert to the last copy without losing all your work up to that point.
- Every time you open the project to edit it, select File>Save Project As and rename the file; that way you can save several times during each editing session, and you won't accidentally write over the older files.
- Some common ways people successively name their files include:
- Numbering up: Example1.moviemaker, Example2.moviemaker, Example3.moviemaker, etc.
- Dates edited: Example3-10-11.moviemaker, Example3-13-11.moviemaker, Example3-20-11.moviemaker, etc.
Movie Maker’s toolbars
- Menu Bar: This is where you can do anything from customizing your view to editing video clips. This bar consists of: File, Home, Animations, Visual Effects, Project, and View
- Standard Toolbar: Consists of shortcuts to options located under the Menu Bar. Saving your movie and undoing an editing move are the two most used shortcuts located here. Another option, under this toolbar, is a scroll box where you can access different video clips, transitions and effects. This is primarily used while in the editing stage of your movie making process.
- Movie Task Toolbar: Consists of basic shortcuts such as capturing, editing and exporting your video. Beginners should look here if they need help during any stage of the video editing process. Also located under this toolbar are help files that can assist you in any questions you may have.

