Difference between revisions of "Participating in a Zoom meeting"
| Line 7: | Line 7: | ||
Adobe Connect is a full-featured web conferencing tool that can be used on desktops, laptops, and mobile devices. It supports video and audio over the Internet, document and screen sharing, and more. It is web-based and does not require the installation of any major software application. Meeting hosts can create meeting sites, provide access to those rooms through a URL, and then use the tools available in the room to facilitate engaging online meetings with anyone in the world via a web browser. WSU employees can create and host Zoom meetings. WSU students can create and host their own Zoom rooms for 1:1 or group meetings. Most faculty and staff use Zoom to support online meetings (e.g., remote classes, virtual office hours, exam review sessions), but it can also be used in a face-to-face meeting or classroom to support communication and collaboration. | Adobe Connect is a full-featured web conferencing tool that can be used on desktops, laptops, and mobile devices. It supports video and audio over the Internet, document and screen sharing, and more. It is web-based and does not require the installation of any major software application. Meeting hosts can create meeting sites, provide access to those rooms through a URL, and then use the tools available in the room to facilitate engaging online meetings with anyone in the world via a web browser. WSU employees can create and host Zoom meetings. WSU students can create and host their own Zoom rooms for 1:1 or group meetings. Most faculty and staff use Zoom to support online meetings (e.g., remote classes, virtual office hours, exam review sessions), but it can also be used in a face-to-face meeting or classroom to support communication and collaboration. | ||
| − | == | + | ==Zoom Menu Bar== |
| − | + | To enter an Adobe Connect meeting as a participant click on the link provided by the host of the meeting. When you join a Zoom room a menu bar will be at the bottom of your screen. You will need to hover your mouse near the bottom and the Zoom Menu Bar will appear. Below is a description of the items on the menu bar. | |
| − | [[File: | + | [[File:Zoom Menu bar.png|center]] |
| − | + | 1.Mute/unmute audio | |
| + | 2.Stop/start video | ||
| + | 3.View a list of participants in the room. This will also allow you to see if anyone raised their hand if they have questions. | ||
| + | 4.Screen share your desktop or specific application window. | ||
| + | 5.Conduct a group or private chat. | ||
| + | 6.Leave the virtual meeting | ||
| − | + | ===How to Mute and Unmute Your Audio=== | |
| − | [[File: | + | Select the microphone in the lower left-hand corner of the screen to activate your microphone. Select the icon again to mute. |
| + | [[File:Mute and unmute.jpg|center]] | ||
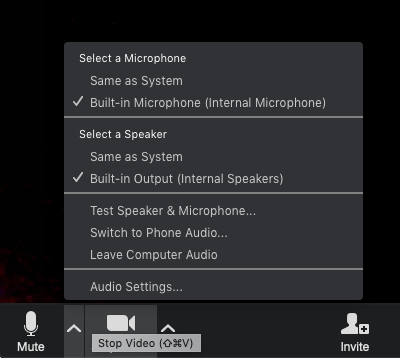
| + | To select a different microphone or adjust your audio settings select the drop-down next to the microphone icon. | ||
| + | [[File:Audio Settings.png|center]] | ||
| + | ===How to Start and Stop Video=== | ||
| + | Select the camera in the lower left-hand corner of the screen to activate your video. Select the icon again to turn stop your video. | ||
| + | [[File:Video one and off.jpg|center]] | ||
| + | To adjust any video settings select the drop-down next to the video icon. | ||
| + | [[File:Video settings.png|center]] | ||
| + | |||
| + | ===How to Share Your Screen=== | ||
| + | During a virtual meeting, you can switch back and forth between screen share and video as often as needed. To share your screen select the “Share Screen” icon. | ||
| + | [[File:Share icon.png|center]] | ||
| + | |||
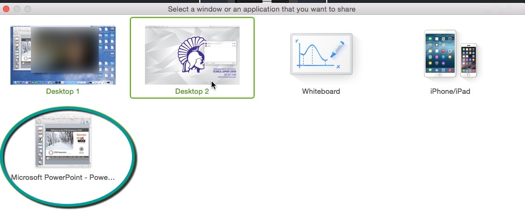
| + | Then click on the item you want to display, and then click “OK.” You can choose to share a variety of items including any applications that are open, your desktop or a whiteboard. Once you share, the Zoom Menu Bar will be at the top of your screen. Again, you can hover your mouse near the top so that the Zoom Menu Bar will appear. | ||
| + | [[File:Shrare screen.png|center]] | ||
==Using Adobe Connect== | ==Using Adobe Connect== | ||
Revision as of 00:24, 9 May 2019
About this article
This article provides an overview of the features and functions of the Zoom web conferencing system. It is intended for all WSU students and employees interested in attending online meetings using Zoom.
What's Zoom?
Adobe Connect is a full-featured web conferencing tool that can be used on desktops, laptops, and mobile devices. It supports video and audio over the Internet, document and screen sharing, and more. It is web-based and does not require the installation of any major software application. Meeting hosts can create meeting sites, provide access to those rooms through a URL, and then use the tools available in the room to facilitate engaging online meetings with anyone in the world via a web browser. WSU employees can create and host Zoom meetings. WSU students can create and host their own Zoom rooms for 1:1 or group meetings. Most faculty and staff use Zoom to support online meetings (e.g., remote classes, virtual office hours, exam review sessions), but it can also be used in a face-to-face meeting or classroom to support communication and collaboration.
Zoom Menu Bar
To enter an Adobe Connect meeting as a participant click on the link provided by the host of the meeting. When you join a Zoom room a menu bar will be at the bottom of your screen. You will need to hover your mouse near the bottom and the Zoom Menu Bar will appear. Below is a description of the items on the menu bar.
1.Mute/unmute audio 2.Stop/start video 3.View a list of participants in the room. This will also allow you to see if anyone raised their hand if they have questions. 4.Screen share your desktop or specific application window. 5.Conduct a group or private chat. 6.Leave the virtual meeting
How to Mute and Unmute Your Audio
Select the microphone in the lower left-hand corner of the screen to activate your microphone. Select the icon again to mute.
To select a different microphone or adjust your audio settings select the drop-down next to the microphone icon.
How to Start and Stop Video
Select the camera in the lower left-hand corner of the screen to activate your video. Select the icon again to turn stop your video.
To adjust any video settings select the drop-down next to the video icon.
During a virtual meeting, you can switch back and forth between screen share and video as often as needed. To share your screen select the “Share Screen” icon.
Then click on the item you want to display, and then click “OK.” You can choose to share a variety of items including any applications that are open, your desktop or a whiteboard. Once you share, the Zoom Menu Bar will be at the top of your screen. Again, you can hover your mouse near the top so that the Zoom Menu Bar will appear.
Using Adobe Connect
Training
Review the Adobe Connect visual quick start guide for participants for training. This document provides an overview of the features and troubleshooting information.
Participation Quick Guide
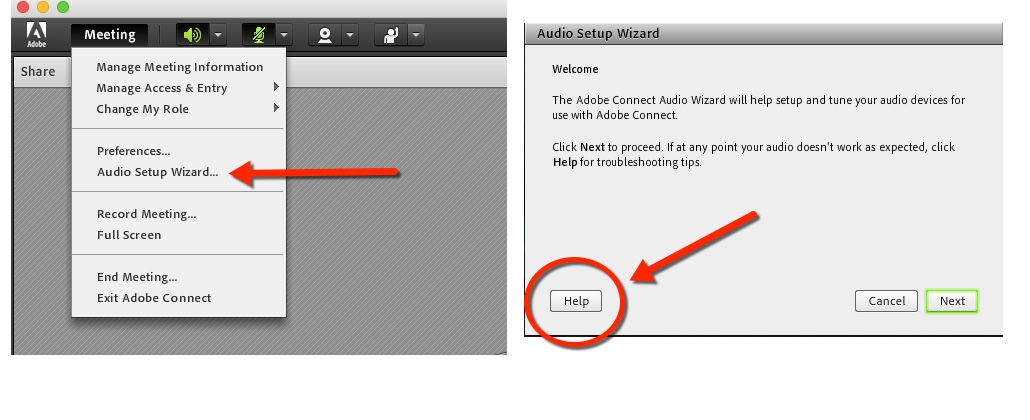
- Complete the Audio Setup Wizard before your first session to test your audio. The Audio Setup Wizard can be found under Meeting at the top of the screen. The Audio Setup Wizard will prompt you to complete a series of 4 audio tests. At any point if your audio is not working as expected select the Help button.
- For the best quality audio use a headset during your meeting. This will improve the audio and will control the echo and feedback experienced when using video conferencing tools.
- Select a location that is quiet and does have distracting background noise (pets, construction, talking etc.). Adobe Connect will pick up any noise present and this can be very disruptive during a meeting.
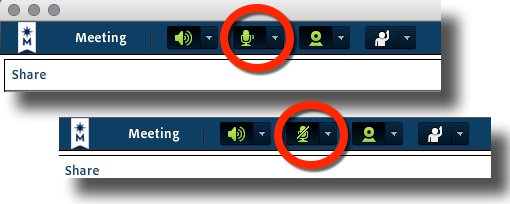
- To open your microphone select the microphone icon at the top of the screen. When the icon is green your microphone is connected.
- When you are not speaking mute your microphone. To mute your microphone select the microphone icon and a slash will appear on the icon. To open your microphone select the icon again.
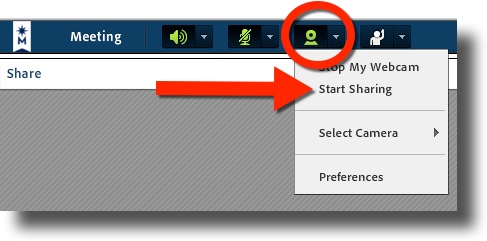
- To turn on your camera so the rest of the meeting can see you select the dropdown next to WebCamera icon and select "Start Sharing".
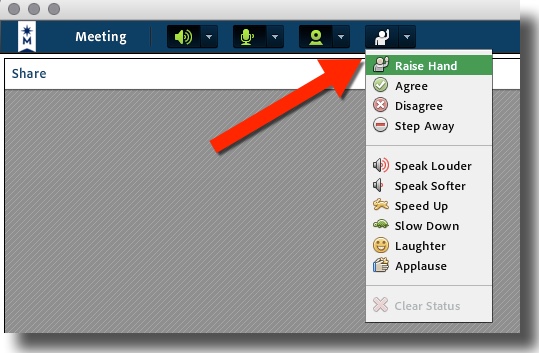
- Adobe Connect is designed to allow the user to actively participate during a meeting. However it can be distracting when multiple individuals are using their microphone to ask questions. It is important to communicate you have a question without interrupting the speaker. One way to do this is to use the Raise Your Hand feature by selecting the icon at the top of the page. Once you have selected this icon an image of a figure raising its hand will appear next to your name on the Participant List indicating to the participants you have something to say. Make sure your microphone is unmuted before you ask your question. There are also a variety of other icons you can select from this list.
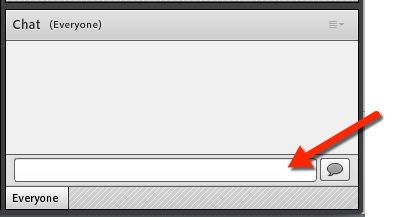
- Another way to avoid interrupting the speaker is to use the chat feature located at the lower right corner of the screen. Use the chat to type your questions or comments for all participants to see.
Support
Contact TLT with any questions regarding Adobe Connect. Email TLT at TLT@Winona.edu, please include Adobe Connect in the subject line. Phone support is available by dialing 507-457-5240, option 2 Monday-Thursday 8:00am-8:30pm, Friday 8:00am-4:00pm
If you would like to set up a testing session with a TLT staff member please send a request to TLT@Winona.edu.
Lynda Training
Adobe Connect Essential Training
Related articles


