WSU Technology Knowledge Base:Camtasia Studio 8 for PC
About this article
This article includes instructions for downloading, installing, and configuring TechSmith Camtasia Studio. It is intended for instructors.
What's Camtasia Studio?
TechSmith's Camtasia Studio is a software application that gets installed on your laptop and allows you to record your screen activity and save it in the form of a video. Your movies include all mouse movements, pen and key strokes, any software application activity, and even web browsing activity. You can also choose to record audio from both system output (i.e., what's coming out of your speakers) and microphone input (e.g., your narration of a PowerPoint slide show). Camtaisia also includes a set of tools for editing your video, adding instructional and interactive elements such as callouts, transitions, and quizzes, adding audio tracks, and publishing your video in multiple formats, both locally and online (e.g., to YouTube). TechSmith offers both PC and Mac versions of Camtaisia Studio.
TLT Support
TLT maintains a multi-user Camtasia license for WSU faculty who are interested in using it to develop instructional videos for class purposes. We strongly recommend talking to Chad Kjorlien, TLT Faculty Development Coordinator, Robin O'Callaghan, TLT Senior Instructional Designer, or Ken Graetz, Director of TLT, before investing in this tool. Give TLT a call (x5240 Option 3), send an email to tlt@winona.edu, or drop in to the Maxwell 130 Professional Resource Center during normal business hours. TLT offers consultation and training on the development of effective instructional videos and can help you match your instructional strategies with the right tool.
Installing Camtasia Studio
Download and install either the PC or Mac free trial version of Camtasia Studio directly from the TechSmith Camtasia website. Then contact TLT for a license code.
Where are your Camtasia files stored?
When you install Camtasia Studio, the default save location is C:\Users\[your StarID]\Documents\Camtasia Studio. If you select your Home folder and then select Documents, you should see it. This is the default save location for the raw screen capture files (.trec) and the Camtasia project files (.camproj). When you produce a project (e.g., for Web publication), the resulting file(s) are stored in a subfolder that has the same name as the Camtasia project. These default save locations and subfolder names can be changed if you wish.
Getting started
TechSmith has produced a wonderful series of introductory tutorials for Camtasia Studio. These are listed below to help you learn the basics:
- TechSmith Tutorial: Prepare, Script, Audio - Offers good advice about preparing for a recording session.
- TechSmith Tutorial: Record Your Screen - How to configure your microphone, choose a capture frame size, and start and stop recording.
- TechSmith Tutorial: Save Camrec and Project Management - How to save and organize raw video files and move them into the Camtasia Studio tool.
- TechSmith Tutorial: Editing Dimensions and Saving - How to select video dimensions and save the Camtasia project file.
- TechSmith Tutorial: Explore the Editor - The anatomy of the Camtasia Studio interface.
- TechSmith Tutorial: Apply SmartFocus to Zoom and Pan - Learn how to zoom and pan around a large video frame and how to edit SmartFocus instances.
- TechSmith Tutorial: Cut Unwanted Media on the Timeline - How to remove segments of video and audio from your video.
- TechSmith Tutorial: Add a Callout to Direct Viewers' Attention - How to add various callouts to focus attention on components of your video.
- TechSmith Tutorial: Visual Properties and Animations - More depth on visual properties of callouts and the application of animations.
- TechSmith Tutorial: Produce and Share Your Video - This covers how to produce your video and share it to the TechSmith ScreenCast service. Publishing your videos to other locations, such as YouTube, follows a similar process.
Closed Captioning
The ability to add closed captioning is an important consideration as you start to make content accessible to all. You are strongly encouraged to check out the Universal Design articles where we are starting to focus on all of the core elements of accessibility. The PC version of Camtasia allows you to take any speech spoken during your video and convert it to text and export this Closed Caption file (i.e. SubRip file captioning format that will have .srt in the file name) to be uploaded to the media server (e.g. MediaSpace or YouTube). The major factor in converting speech to text is quality audio. With recordings that have a high quality microphone that is away from any laptop fans, quite recording space, and two of fewer people speaking are ideal conditions for converting spoken word over to text.
Steps to Creating Closed Captions within Camtasia
1. Open the project you will be adding captions and select the audio track. (Note: If you recorded video you will need to separate this from the audio track by right-clicking on the track and select the Separate video and audio option from this menu)
2. Activate the Captions options from the Tools menu.
3. Choose the Speech-to-Text button and select either the Entire Timeline or Selected Meadia if you only want to transcribe a part of the video.
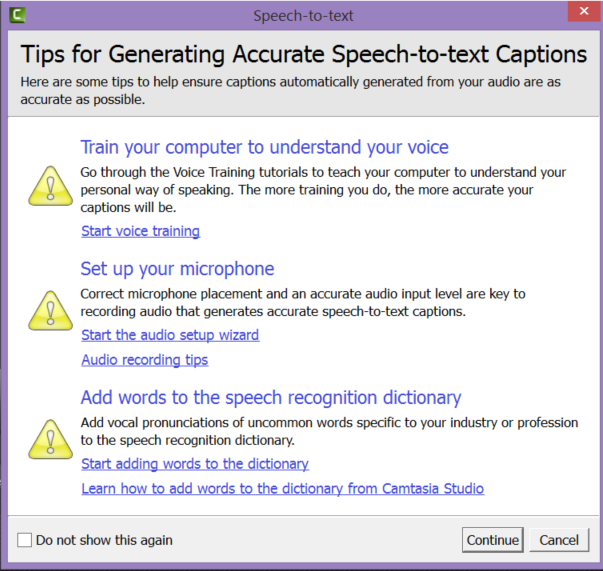
4. From the Speech-to-Text Tips page you can configure your voice, microphone, and add specific words to the dictionary. Once you have configured click on the Continue button.
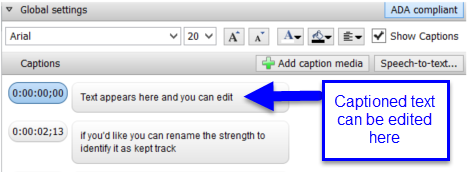
5. Proof and edit text after captioning has completed by going to the text bubble show belwo and edit as needed.
6. Once captions have been edited save project (see File menu and Save Project).
7. Select the Export Captions from the Advance section of the Caption box (see below) and save this file (Note this SubRip Caption File will have a .srt behind the file name) to your computer. We will be uploading this to MediaSpace.
Below are links to relevant Camtasia videos to check out that cover the above steps and more.
Steps to Upload Closed Captioned File to MediaSpace
This process allows you to provide students the option of viewing Closed Captions below the videos you upload to MediaSpace.
1. Open up MeadiaSpace and go your My Media and click on the title of the video you would like to add the captions.
2. Select Actions the button and choose Edit.
3. From the new tabs below your video select the Captions option.
4. Click the Upload Captions File button.
5. Locate the saved SubRip Caption File (*.srt) on your computer by clicking on the Browse button, select English from the pull-down menu, and label the video and select Save button.


