How to connect your Windows laptop to a classroom projector
It is recommended to put your machine to sleep in the same state you expect to wake it up.
- Avoid adding or removing any cables or peripherals while the lid is closed.
- Avoid undocking the laptop from a docking station while the lid closed.
Once you get to the classroom, turn on the projector, wake up the laptop, then connect the VGA cable to the VGA port on the laptop.
- Following this order should ensure your display is detected once the projector is plugged into the laptop.
- If you cannot get your laptop to display at all, rebooting the laptop will usually resolve the issue. To avoid having to reboot, follow the instructions above.
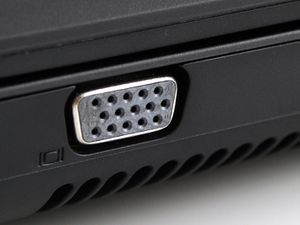
This is what the VGA port on your laptop looks like:
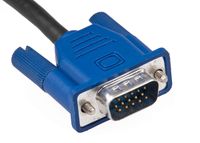
The VGA cable that you plug into the laptop looks like this:
The audio cable that you plug into the laptop looks like this:
- Wait a moment after plugging in the VGA cable and you should see your display appear on the projector.
- If the projector does not detect your laptop, hold down the Windows key
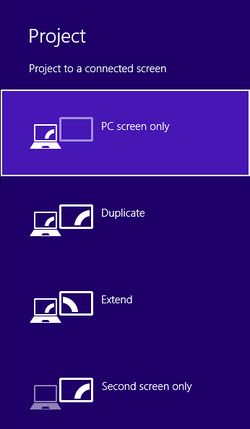
 (to the left of the spacebar) and press the P key. This will open Windows Project options that will allow you to control what is shown on the projector.
Projector Options
- PC screen only: doesn’t project anything onto the projector.
- Duplicate: Duplicates your laptop display onto the projector. What you see on your laptop is what the projector will show.
- Extend: The projector acts as a secondary display. You may have to drag your files and windows off the side of the screen for them to be visible on the projector.
- Second screen only: Displays your laptop screen on the projector only, while blacking out the screen on your laptop.
When finished, disconnect the VGA cord from your laptop before closing your laptop, and then turn off the projector. Avoid unplugging the cables after closing the lid.
Example Scenario
If you have the laptop on a docking station in your office and are headed to a classroom, undock the laptop, wait a moment (the screen may blink or flicker), and then close the lid. When you arrive at the classroom, turn on the projector, open the lid to wake the laptop, then plug in the projector once the laptop is powered up (the screen may blink or flicker again as the projector is detected).
To leave the classroom and go back to your office, just reverse the order of the process above. Unplug the projector, wait a moment (the screen may blink or flicker), and then close your lid. When you arrive at your office, open the laptop lid to wake the laptop, and then dock the laptop once it is powered up (the screen may blink or flicker again as the docking station is detected).
Watch the video!
More Help
If you continue to have trouble getting your Windows laptop to project correctly in the classroom, please call Classroom Support at 507-457-2900 or dial x2900 from the classroom phone.


