Capturing webcam recordings in MediaSpace
About this article
This article includes instructions for using the Webcam Recording tool to capture webcam video recordings in MediaSpace. It is intended for all WSU students and employees.
What's the Webcam Recording tool?
MediaSpace includes the capacity to record video using a webcam attached to your computer. Typically, as is the case with the built-in webcams in laptops, your webcam captures your face as you are talking. However, you might also have an external webcam that can be oriented to capture other things. These recordings can then be saved to your MediaSpace account and shared with others.
Webcam Recording tool versus CaptureSpace Lite
CaptureSpace Lite also includes a webcam-only recording mode. The quality of the CaptureSpace Lite webcam recording is much better and you can use the editing tools in CaptureSpace Lite to do some basic editing. For most purposes, you will want to do your webcam recordings in CaptureSpace Lite. The Webcam Recording tool is intended for very quick, basic recordings where playback quality is not a high priority.
How do I use the Webcam Recording tool?
Follow the steps below to start, stop, upload, and save webcam recordings:
- Use your favorite web browser to login to your MediaSpace account at mediaspace.minnstate.edu using your Star ID username and password. This will take you to your My Media page.
- Select Webcam Recording from the Add New menu (Fig 1).
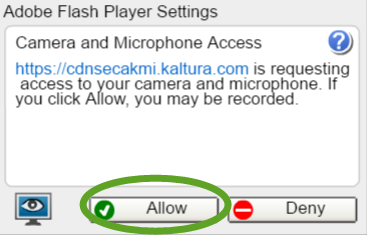
- Select Allow when prompted to give MediaSpace access to your webcam (Fig 2).
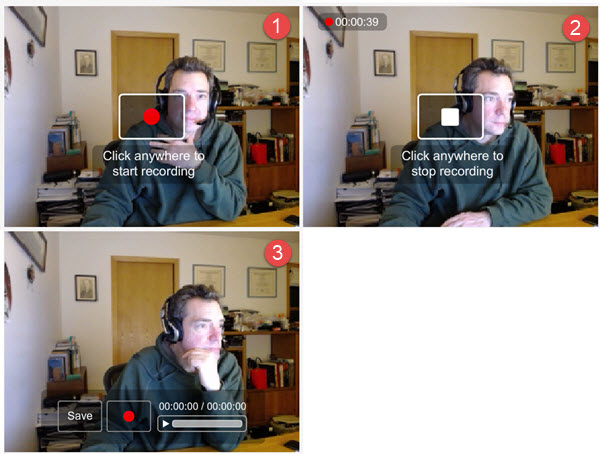
- Click anywhere on your webcam playback window (Fig 3) to start recording (1), click anywhere to stop the recording (2), and select Save to begin the process of saving your video file (3).
- Once the file upload is complete, you can add a title, add a description, add keywords or tags, and select the access permissions applied to the file
- Select Save to complete the process.
- Select either Go To Media, to play the file, or Go To My Media to return to your My Media page.
Selecting sharing permissions
When you upload media to your MediaSpace account, you will need to select one of three file sharing permission settings. This setting can be changed later, so pick the setting that best applies at the moment:
- Private: Only you will be able to access the file. If you are embedding the video into Desire2Learn, you can leave this setting as private.
- Unlisted: Only those with a link to the file that you provide will be able to access it. Select this option if you want to share your video using a direct link to the video that you might share via email.
- Published: File will be visible to individuals if it's published in channels where they have viewing rights.
What webcams are supported?
MediaSpace supports most webcams that are either built into your computer or attached to your computer via a USB cable. Both the Apple Macbook and HP Elitebook laptops distributed to students and employees through the eWarrior Digital Life and Learning Program have built-in webcams.
Can I use the Webcam Recording tool on my tablet and smartphone?
No. Currently, the Webcam Recording tool does not function on either tablets or smartphones. However, you can record video on these devices using applications other than MediaSpace and then upload the resulting files to your MediaSpace account.


