Difference between revisions of "Brightspace Notifications"
(Created page with "=Overview= In D2L you can edit your notification settings to receive notification to your email about activity in your D2L courses. This can help you keep on top of due dates,...") |
|||
| Line 4: | Line 4: | ||
==Step 1: Select Notifications== | ==Step 1: Select Notifications== | ||
From the D2L '''Homepage''' or within any D2L course select your name in the top right corner of the page. Then select '''Notifications''' from the drop-down. | From the D2L '''Homepage''' or within any D2L course select your name in the top right corner of the page. Then select '''Notifications''' from the drop-down. | ||
| − | [[File:Notifications 1.jpg|center| | + | [[File:Notifications 1.jpg|center|500px]] |
==Step 2: Select Contact Method== | ==Step 2: Select Contact Method== | ||
This next page is your D2L notifications page. First determine the email you would like your notifications sent to. By default your Winona State email will be listed. If you would like them sent to a different email select '''Change your email settings'''. Here is where you can enter a different email address. | This next page is your D2L notifications page. First determine the email you would like your notifications sent to. By default your Winona State email will be listed. If you would like them sent to a different email select '''Change your email settings'''. Here is where you can enter a different email address. | ||
| − | [[File:Notifications 2.jpg|center| | + | [[File:Notifications 2.jpg|center|500px]] |
==Step 3: Select Instant Notifications== | ==Step 3: Select Instant Notifications== | ||
| − | Next you will select which items you would like instant notifications for. | + | Next you will select which items you would like instant notifications for. To select an item check the boxes in the column on the right side of the screen. Below are descriptions of the items your can select. It is recommended to only select the items you find the most important. You will receive separate notifications each time an item is triggered. It may become distracting to receive notifications for all of the items listed. The most common items students select are in bold. |
| − | [[File: | + | [[File:Notifications 4.jpg|center|500px]] |
| − | + | ||
| − | + | ===A: Announcements === | |
| + | * Announcement Updated: Receive a notification if a new announcement is edited with new information | ||
| + | * '''New Announcement Available:''' Receive a notification if a new announcement is posted. | ||
| − | === | + | ===B. Assignments=== |
| − | + | * '''Submission Folder Due Date or End Date is 2 Days Away:''' Receive a notification 2 days before an assignment folder due date or end date. | |
| − | + | ===C. Content=== | |
| + | * Content Item Created: Receive a notification when a new piece of content is created in the course. | ||
| + | * Content Item Updated: Receive a notification if a piece if content is updated. | ||
| + | * Content Overview Updated: Receive a notification if the overview section is updated. | ||
| − | == | + | ===D. Discussions=== |
| − | + | * New Post in a Forum, Topic, or Thread That I Subscribed to in Instant Notifications: Receive a notification if there is a new post of an item you subscribed to. | |
| − | + | === E. Grades=== | |
| + | * '''Grade Item Released:'''Receive a notification when a grade item is released in the gradebook with your grade. | ||
| + | * '''Grade Item Updated:'''Receive a notification when a grade item is updated in the gradebook with your grade. | ||
| + | ===F. Quizzes=== | ||
| + | *'''Quiz End Date is 2 Days Away:''' Receive a notification 2 days before quiz end date. | ||
| + | |||
| + | ==Step 4: Customize Notifications== | ||
| + | Next you can customize your notifications further by determining if you would like your grade value released in the notification and if you would like to these setting apply to past, future or inactive courses. To select a setting check the box on the left side of the screen. | ||
| + | [[File:Notifications 3.jpg|center|500px]] | ||
| + | |||
| + | |||
| + | ==Step 5: Exclude Some Courses== | ||
| + | Next you can decide if you would like these settings to apply to all of your courses. If you would like to exclude certain courses select '''Manage my course exclusions'''. From the next screen you can select the courses you would like to exclude. When you are done select '''Save ''' at the bottom of the screen. | ||
| + | [[File:Notifications 5.jpg|center|500px]] | ||
[[category: D2L]][[Category:Students]][[Category:Content]] | [[category: D2L]][[Category:Students]][[Category:Content]] | ||
Revision as of 19:47, 22 May 2018
Overview
In D2L you can edit your notification settings to receive notification to your email about activity in your D2L courses. This can help you keep on top of due dates, new content and important news announcements. To customize your notification settings follow the steps below.
Step 1: Select Notifications
From the D2L Homepage or within any D2L course select your name in the top right corner of the page. Then select Notifications from the drop-down.
Step 2: Select Contact Method
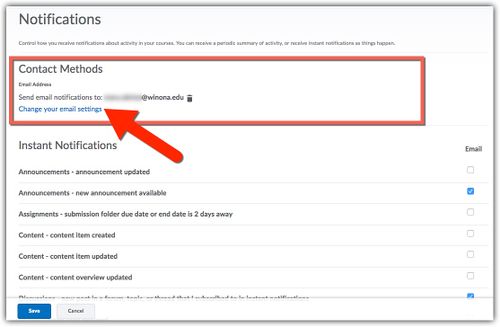
This next page is your D2L notifications page. First determine the email you would like your notifications sent to. By default your Winona State email will be listed. If you would like them sent to a different email select Change your email settings. Here is where you can enter a different email address.
Step 3: Select Instant Notifications
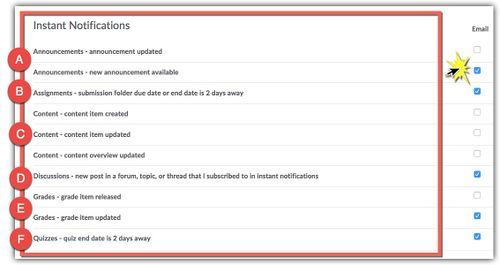
Next you will select which items you would like instant notifications for. To select an item check the boxes in the column on the right side of the screen. Below are descriptions of the items your can select. It is recommended to only select the items you find the most important. You will receive separate notifications each time an item is triggered. It may become distracting to receive notifications for all of the items listed. The most common items students select are in bold.
A: Announcements
- Announcement Updated: Receive a notification if a new announcement is edited with new information
- New Announcement Available: Receive a notification if a new announcement is posted.
B. Assignments
- Submission Folder Due Date or End Date is 2 Days Away: Receive a notification 2 days before an assignment folder due date or end date.
C. Content
- Content Item Created: Receive a notification when a new piece of content is created in the course.
- Content Item Updated: Receive a notification if a piece if content is updated.
- Content Overview Updated: Receive a notification if the overview section is updated.
D. Discussions
- New Post in a Forum, Topic, or Thread That I Subscribed to in Instant Notifications: Receive a notification if there is a new post of an item you subscribed to.
E. Grades
- Grade Item Released:Receive a notification when a grade item is released in the gradebook with your grade.
- Grade Item Updated:Receive a notification when a grade item is updated in the gradebook with your grade.
F. Quizzes
- Quiz End Date is 2 Days Away: Receive a notification 2 days before quiz end date.
Step 4: Customize Notifications
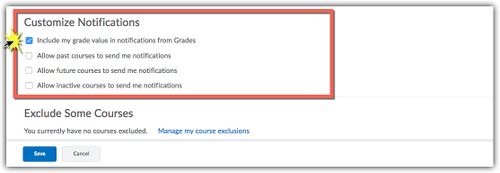
Next you can customize your notifications further by determining if you would like your grade value released in the notification and if you would like to these setting apply to past, future or inactive courses. To select a setting check the box on the left side of the screen.
Step 5: Exclude Some Courses
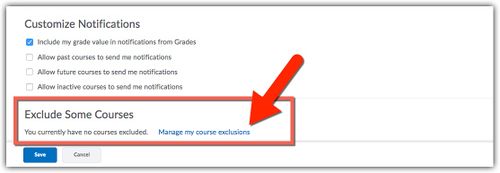
Next you can decide if you would like these settings to apply to all of your courses. If you would like to exclude certain courses select Manage my course exclusions. From the next screen you can select the courses you would like to exclude. When you are done select Save at the bottom of the screen.


