Draft:Add images using the Brightspace HTML Editor
Add images using the Brightspace HTML Editor anywhere the editor is used in a Brightspace course. This can be useful when creating course content or submitting an assignment or discussion post that includes images (e.g., a photo). This Brightspace feature is available to both students and instructors.
Copyright clearance
Per Minnesota State Board System Procedure 3.27.1, you are responsible for following federal copyright law when adding images to HTML Editor content. Do not make copies of images owned by others unless you have permission or the image is licensed in a way that permits copying without permission (e.g., a Creative Commons license). All Creative Commons licenses, except CCO, require proper attribution. If you are making a Fair Use claim, remember to consider all four factors, with the transformative factor being the most important. If you have any questions as to whether you can copy an image, contact your Liasion Librarian or TLT (tlt@winona.edu).
Accessibility
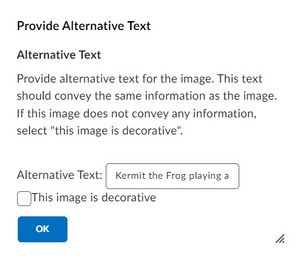
When adding images to Brightspace content, the final step will ask for an alternative text-based description (aka alt text) or, instead of adding alt text, you can specify that the image serves a decorative purpose only (Fig 1). Please consider this carefully. Viewers using screen readers require alt text to understand what's depicted and where it's located. The alt text should be a concise description of the image's purpose.
Three ways to add images
In Brightspace, you create web content using the HTML Editor. The editor includes a feature that allows you to insert images into your content in several ways. You can upload the image from an external location (e.g., computer, mobile device), you can insert an image you have already uploaded to your Brightspace course, or you can display an image that's already published on the Web using its URL. To begin, select the Insert Image button in the HTML Editor (Fig 2). Then, follow the steps below based on how you are inserting the image.
Upload a new image
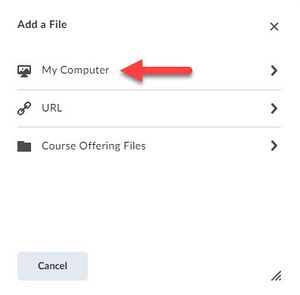
- Select My Computer from the list (Fig 3).
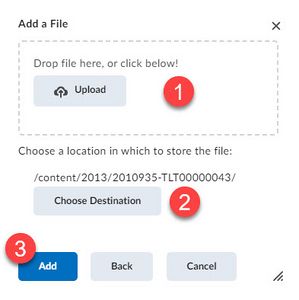
- Either select Upload, find the image file on your device, and select Open or drag and drop the image file into the box provided (Fig 4).
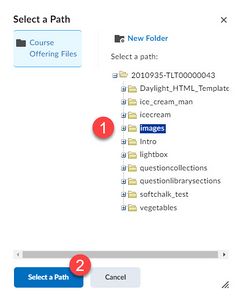
- If you wish, choose a destination other than the root folder of your Brightspace course to save the image file. Pick a location and select the Select a Path button. You can also create new folders (Fig 5).
- Select Add.
- Add alt text for screen readers or select the This image is decorative checkbox. Select OK (Fig 1).
Insert a previously uploaded image
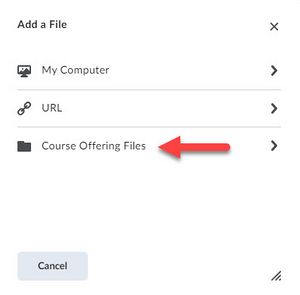
- Select Course Offering Files from the list (Fig 6).
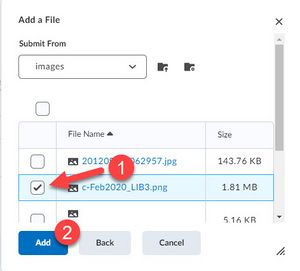
- Find the image file.
- Select the checkbox to the left of the file name and select Add (Fig 7).
- Add alt text for screen readers or select the This image is decorative checkbox. Select OK (Fig 1).
Insert an image using its URL
- Copy the web address of the external image.
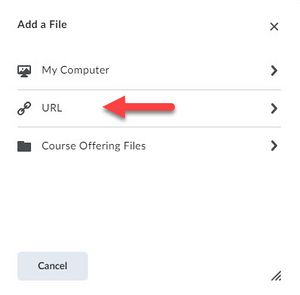
- Select URL from the list (Fig 8).
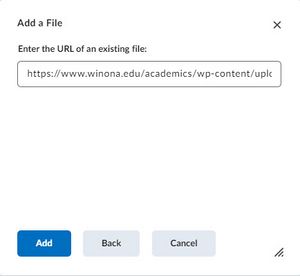
- Paste the image address into the Enter the URL of an existing file box and select Add (Fig 9).
- Add alt text for screen readers or select the This image is decorative checkbox. Select OK (Fig 1).
Pro tips
- If you insert an image using its URL and it doesn't work (e.g., you don't see the image), there are a couple of possible explanations. First, there may be hexadecimal representations of special characters (e.g., %2C for a comma) in the web address that the Brightspace HTML Editor recodes (e.g., %252C) when it inserts the link, breaking the link. Try copying the link into the HTML source code manually. Second, the application from which you are copying the image link may not allow the direct inclusion of the image on another web page. If available, try using the embed code to insert the image instead.
- Don't forget to attribute copyrighted images to their owners. You can cite images in several ways.
More wiki articles
External links
Except where otherwise noted, text is available under the Creative Commons Attribution-NonCommercial-ShareAlike 4.0 International License.
