Add links to VoiceThread activities to Brightspace
Instructors can add links to VoiceThread activities to Brightspace by adding a corresponding topic to a module in the Content area of their course. Both the instructor and the students can then use these links to travel to specific graded and ungraded VoiceThread activities.
Individual VoiceThread versus Assignment Builder
Instructors can create a link to a specific VoiceThread activity that already exists in their VoiceThread account or that they create in the process of adding the link. This is a good way to guide students to specific activities without requiring them to search their VoiceThread accounts. The Assignment Builder allows instructors to create links to specific VoiceThread activities configured for grading. Again, instructors can link to an existing activity or create one from scratch when they add the link. These graded activities create a corresponding column in the Brightspace grade book automatically and allow instructors to assign a percentage score or pass/fail grade to the student's work that is transferred to the grade book automatically. Note that you can add as many links to as many specific VoiceThread activities as you wish and place them anywhere in your Brightspace table of contents.
Assignment types
Using the Assignment Builder, instructors can post links to three types of graded assignments: Watch, Comment, and Create. In Watch assignments, students are required to watch or listen to an entire VoiceThread activity (i.e., the central video, image, document, or presentation and all the associated comments). In Comment assignments, students are required to add a comment to a VoiceThread activity. In Create assignments, students are required to make a VoiceThread activity themselves using a video, image, document, or presentation.
Create a link
- Open your Brightspace course and select Content from the Materials menu.
- Navigate to the module in your table of contents in which you want to insert the link.
- Select the Existing Activities button (Fig 1.1) and then select VoiceThread from the menu (Fig 1.2).
- Wait for the VoiceThread popup window to open. It may take a minute.
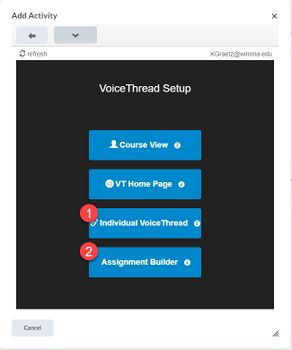
- Select either Individual VoiceThread (Fig 2.1) or Assignment Builder (Fig 2.2).
Individual VoiceThread
- Select a specific VoiceThread from the list or select the Create New VoiceThread button and create a new one. Because you will be working in a popup window, it will probably be easier to create VoiceThread activities in advance by opening your VoiceThread homepage or course view in a separate browser tab.
- In the Activity name field, enter the text that you would like to serve as the link (e.g., "Week 1 VoiceThread Discussion").
- Select the Save and Continue button.
Assignment Builder
Select one of the three types of assignments, Watch (Fig 3.1), Comment (Fig 3.2), or Create (Fig 3.3), and then select the Continue button
Watch
- Select a specific VoiceThread from the list or select the Create New VoiceThread button and create a new one.
- Choose the options you want on the Watch assignment and select the Continue button.
- Add an Assignment name (e.g., "WATCH - Week 1 VoiceThread Assignment"). Add instructions, a post-submission message, and a Start Date and/or Due Date if you wish. Allow students to view their assignments after submitting if you wish. Select the Publish button.
Comment
- Select a specific VoiceThread from the list or select the Create New VoiceThread button and create a new one.
- Choose the options you want on the Comment assignment and select the Continue button.
- Add an Assignment name (e.g., "COMMENT - Week 1 VoiceThread Assignment"). Add instructions, a post-submission message, and a Start Date and/or Due Date if you wish. Allow students to view their assignments after submitting if you wish. Select the Publish button.
Create
- Choose the options you want on the Create assignment and select the Continue button.
- Add an Assignment name (e.g., "CREATE - Week 1 VoiceThread Assignment"). Add instructions, a post-submission message, and a Start Date and/or Due Date if you wish. Allow students to view their assignments after submitting if you wish. Select the Publish button.
Edit a link
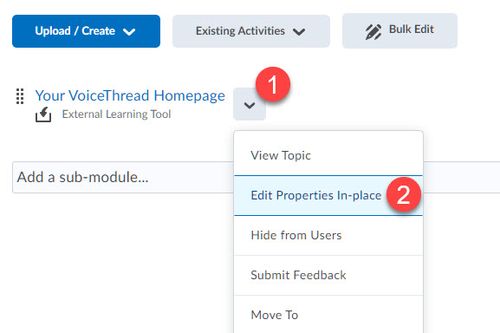
- Select the down arrow to the right of the link in your table of contents (Fig 5.1) and select Edit Properties In-place from the menu (Fig 5.2).
- Select the topic name to change it (Fig 6.1), select Add dates and restrictions... (Fig 6.2) to add/change them, select Add a description... to do so (Fig 6.3). Use the three icons in the upper right (Fig 6.4) to hide, require, or delete the topic. If you want the homepage or course view to open in a separate browser tab, select the Open as External Resource checkbox (Fig 6.5).
More wiki articles
External links
Except where otherwise noted, text is available under the Creative Commons Attribution-NonCommercial-ShareAlike 4.0 International License.


