DLC Spring 2011 Workshops/WordPress Intro/WordPress
- For the most current information about WordPress go to: Create a WordPress Website
- Audience - WSU students, faculty, and staff interested in learning more about the WordPress blogging tool
- Summary - WordPress is a free, open source, content management system that people with access to the Web can use to express themselves, typically in writing, but increasingly using images, audio, and video. Aside from being free, the beauty of WordPress is its flexibility and ease of use. Although billed as a "blogging tool," WordPress can actually be used as the foundation for a variety of Web sites and services (e.g., personal homepages, electronic portfolios). This article provides general information about WordPress and its support at WSU.
Creating a WordPress Account
- Go to www.wordpress.com
- On the right hand side of the web page, there is a Sign Up button. At the time this tutorial was written, the button was orange and very easy to spot.
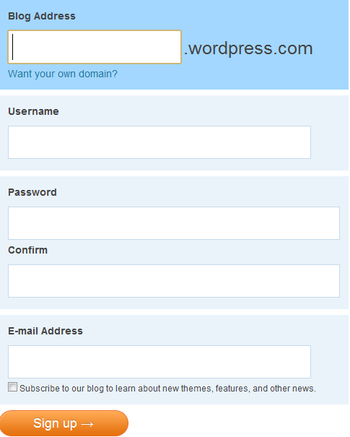
- The following window is the sign up page. Here, the web address and username for the website will be created. You may choose whatever you'd like.
- After hitting Sign Up ->, WordPress will send you a confirmation email that may take up to 30 minutes to arrive. When we set it up, it showed up in our inbox within a minute. If after 30 minutes you still don't see the confirmation email, check your Junk Mail folder to see if it accidentally got routed in there.
- While waiting for the email to arrive, you will have the opportunity to fill out some basic information about yourself for your profile.
- Once you get the email, follow the link included to activate your account. You will then need to log in.
- Once logged in, you will be taken to your Dashboard. This is where you will create and maintain pages and posts.
The Dashboard
- At first, the Dashboard looks horrendously complicated/confusing. Let's sift through it make sense of it all.
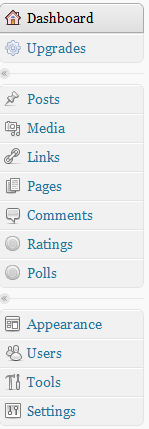
- On the left, you'll see a list of links. All of these (except Comments) have drop down menus associated with them. We'll go through them all briefly and then go into more detail later on where relevant.
- There are a few of these links that you will probably never use and can ignore, especially if this is for a class project. You may use some or all of these if you're doing this for yourself.
- Upgrades - This link brings you to a page where you can purchase upgrades to your side.
- Comments - This is where you can view any comments on your page that other users make.
- Ratings - Here you can select whether or not other users can rate your posts.
- Polls - If you wish to have polls on your site that other users can vote in, you can manage those here. You will need an account with PollDaddy.com for these to work.
- Users - Here you can add other WordPress users to have control over the site. For classroom purposes, this would be useful if you are working in groups.
- The other links are fairly useful:
- Dashboard - Gives you relevant data concerning your site including things like content stats (number of pages/posts/etc), recent comments, change your theme, and a space for quick posting.
- Posts - Where you'll go to make new blog posts, should you include a blog into your website
- Media - This is where you can upload music and pictures to post to your site. Videos can not be uploaded unless you purchase the video upgrade.
- Links - If you link to any other website, those links appear here in list form. There are some default ones listed right off the bat.
- Pages - This is where you will go to create new pages for your website.
- Appearance - Here you can change many layout aspects to your website.
- Tools - Here you can import, export, or delete your site.
- Settings - Edits general info about your website.
- The header on the Dashboard contains some important links.
- My Account - contains links to general info and profile editing.
- My Blog - contains links to various features for your blog.
- Blog Info - Gives different controls for viewing other people's blog posts.
- Subscribe - Subscribe to a blog and get updates when new posts are up.
- Your Username - In the picture above, this is the "dlcwsu". Clicking this brings you to a preview of your site.
- Search Engines Blocked - Clicking this will change settings related to how public your site is.
Creating Pages
- In the interest of simplicity, we decided not to change the theme away from the default "Twenty Ten" one we were given when we signed up. We did, however, change the picture in the header.
- To create your site, you need to have at least two pages. To make these, click on the
 link on the left side.
 - There will probably be a page or two created by default. We'd suggest deleting these and starting new. Don't worry, it's not nearly as bad as it sounds.
- To delete a page, hover over the page and four options appear underneath. One of these is "Trash". Click on it, then go to Trash up at the top, hover over it again and choose "Delete Permanently".
- Now, back over on the left side, click Add New under the Pages link. Title the first page "Home" and fill in any body text you want. You can edit either at any time. Click the
 button on the right hand side to publish the page.
 - Create at least one more page using the same method as above. This could be an "About" page, a page for blog posts, etc.
- At this point, the site functions more like a blog and less like a website. To change this, we need what's called a static page. The static page is the first page that users see when they visit your site.
- To set the static page, click on
 on the left side. In the resulting drop-down menu, select Reading.
- Select the Static page option. Set your Home page as the Front page and select another page for your posts. We created a "Blog" page for this purpose.
- If you click on your username now, it will bring you to a preview of your website. This is just about exactly what other users will see, except for the Edit links and other Admin controls.
- Here's what ours looks like right now. Bear in mind, we kept the default theme, just changed the picture on the banner. You can change your picture by going to Appearance -> Header.
- You'll notice that any pages you create will appear in a list under the picture. In our case, we have three pages made.
Uploading Documents
- When editing the page or the blog post you wish to up load the document to, you'll notice the following section just above where you edit the body text:
- The fourth button in that list, the one that looks like a seven-pointed star, is the upload media button. Click on that and follow the instructions on the window that pops up.
- File types that WordPress allows you to upload are: jpg, jpeg, png, gif, pdf, doc, ppt, odt, pptx, docx, pps, ppsx, xls, xlsx, mp3, m4a, wav, and ogg.
MP3 Information
The easiest way to link to a *.mp3 file without installing a plugin in WordPress is to first save it to your StudentWebs folder. Once you have done this you can type the name of the file on your WordPress page and create a hyperlink to the file.
WordPress Plugin Information
There are WordPress Plugins available that can be installed to do almost anything you can imagine but these must be purchased from WordPress.com. One of these things is managing mp3 files.
Conclusion
With the information above, you should be well on your way to creating a functioning website in WordPress. All that's left is adding your own content and tweaking some things such as the theme, pictures, backgrounds, etc. All of the aesthetic elements are found under the Appearance link on the left in the dashboard.


