Draft:DLC Fall 2018 Class Projects/Jennifer Whetstone Adobe Connect
Project Details
Professor Whetstone is using Adobe Connect allow students to connect virtually in this desktop conferencing software. In this Custom Student Support, we will attend classes during the first week of the semester to introduce you to the Adobe Connect online rooms Found in D2L BrightSpace. Adobe Connect is a full-featured web conferencing tool that can be used on desktops, laptops, and mobile devices. It supports video and audio over the Internet, document and screen sharing, and more. It is web-based and does not require the installation of any major software application. While every student can access their own instance of Adobe Connect (see directions for Activating and Accessing Your Adobe Connect Accounts the following directions provided below are specifically for accessing online rooms via your D2L BrightSpace Adobe Connect.
Hardware/Software
- D2L BrightSpace Adobe Connect
Before You Begin
When participating in a Connect online rooms you will want to make sure to take two important steps to make the experience of participating in this meeting a success.
- Have a set of earbuds or headphones to separate the sound from your speakers and microphone so you do not have feedback.

- Before you start using Adobe Connect, use this link Adobe Connect Diagnostic Test to make sure you have a good connection, the Flash media player, and Adobe Connect presenter app installed.
Accessing Adobe Connect Online Rooms via D2L BrightSpace
Your professor has set up a link in your D2L BrightSpace class that allows you to easily access the Adobe Connect online room to conduct classwork.
Connect Audio Settings
Your professor may want you to participate with audio for the class and this requires you to launch the Audio Setup Wizard that is found within the Meeting menu. The following steps walk you through this process
- Click Next to begin testing your laptop audio output.
- On the Sound Output page, click Play Sound button. If you did not hear the sound sample, click Help button for more information.
- After successful audio test click Next button.
- On the Select Microphone page, select your microphone type from the pull‑down menu.
- Click Next and on the Test Microphone page, click Record button to test your microphone. If a dialog box appears requesting access to your camera and microphone, click Allow to allow Acrobat Connect Professional to access your camera and microphone.
- After 5 seconds of recording click Record button again and then Play Recording button to see if the level of audio is appropriate.
- Click Next button and on the Tune Silence Level page, click the Test Silence button. Remain silent until progress is complete. Acrobat Connect Professional sets a microphone sound level that compensates for background noise in your environment.
- Select Finish button and you will be returned to the online room. Make sure to activate your microphone (i.e. White=Inactive and Green=Active) on the Application Bar at the top of your screen in the Connect online room (see Figure 1 below).
Using Chat
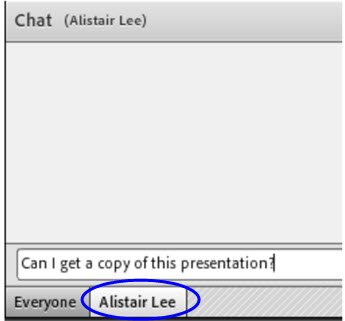
Sometimes faculty just want you to use the Chat feature to send a message to everyone in your class. The chat feature allows you to also select a specific person and have a private chat. By default the Chat box will send your messages to all, but if you choose from the Attendees pod a specific person by hovering over their name you can select the Start Private Chat and a new Tab will appear in the Chatbox (see Figure 2 below) and you can start a private conversation with this person.
Activating Webcam Video
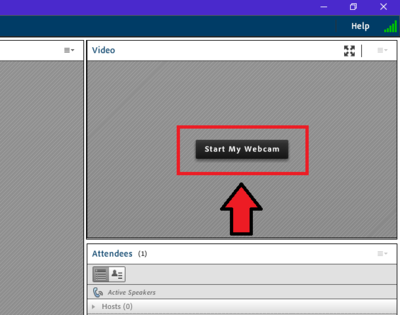
Your professor may have you use your laptop webcam to share video. When you see the Video pod in your online room you will have a Start My Webcam button in the center of this pod. Important:You will then be asked to Start Sharing and one you click on this button you will be live. You can also use the webcam icon in the Application Bar to access your webcam and preference.
Presenting You Screen
You may be asked to present your screen when using your online room. Sharing your screen requires you to have the Adobe Connect Add-in that the Adobe Connect Diagnostic Test (see Before You Begin above) checks for this add-in and automatically downloads it if you are missing this file on your laptop. Once you give Presenter or Host status, you will see in the Share pod a Share My Screen button. Select this and choose the screen you wish to share and you will see a smaller Connect menu appear and your screen will be viewed by all participants in the online room.
The Sharing your screen video from Lynda provides much more detail about why and how to use the feature when presenting something in your Connect online room.
Alt 1 --Share this YouTube video on sharing? https://youtu.be/2KZD5Rrbhqs
Alt 2 --Adobe Connect support page on Sharing https://helpx.adobe.com/adobe-connect/using/sharing-content-meeting.html
DLC STARS/Presenter
- Chad Kjorlien
Resources/Helpful Links
The Lynda course Adobe Connect Essential Training is the definitive resources on Connect that you will want to check out to learn all about this tool. If you have not already created a Lynda account you can learn how here.
Other Resources
DLC Support
- Phone: 507-457-2206
- Email: dlc@winona.edu
- 1:1 Support: Krueger Library #105


