Draft:DLC Spring 2011 Class Projects/Andrea Wood (English 111) In-Class Training1
Jump to navigation
Jump to search
Necessary pre-editing information
- Our Helpful Filming Techniques wiki page is full of information to teach you about some simple ways to optimize the filming of the raw videos, which will improve the overall quality of the final product, as well as add ease to the editing process.
FlipCam information
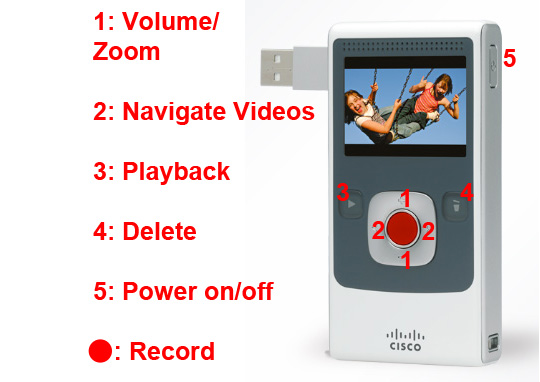
- The FlipCams have very basic functionality.
- The adjustable settings are: language, date, time, camera sounds (on/off), & recording light (on/off).
- To change any of these settings, press and hold the "Record" button immediately after turning the camera on until the options appear.
- While recording: you can zoom in and out.
- While reviewing: you can play videos, change the volume, and delete clips from the camera.
- The adjustable settings are: language, date, time, camera sounds (on/off), & recording light (on/off).
- What the Flip lacks:
- Microphone port
- Manual focus
- Different modes (for filming at night, sporting events, etc.)
- Auto-steady (to help counteract shaky filming)
- Zoom
- Not all FlipCams have a zoom function, but most do. To zoom in and out, use the + and - buttons on the left and right sides of the record button while filming.
- Tips for when to use zoom
Backup
- Once you've imported the raw video files onto your computer, BACK THEM UP. Keeping extra copies of your video files is good insurance against accidental deletion. If a file is deleted, you can just make a copy of the backup and begin working with it, instead of having to re-shoot your videos.
- If a video file is deleted in iMovie, the file WILL BE deleted from the computer, so backing up data is even more important on the Macs.
- Several options are available:
Saving each step in editing
- During the editing process, it's a good idea to save the project with a new file name each time you edit, instead of just saving over past work. If a mistake is made or a file is corrupted/lost, you can revert to the last copy without losing all your work up to that point.
- Every time you open the project to edit it, select File>Save As and rename the file; that way you can save several times during each editing session, and you won't accidentally write over the older files.
- Some common ways people successively name their files include:
- Numbering up: Example1.imovieproj, Example2.imovieproj, Example3.imovieproj, etc.
- Dates edited: Example3-10-11.imovieproj, Example3-13-11.imovieproj, Example3-20-11.imovieproj, etc.
File formats
- The FlipCams automatically save the raw video as one of two file formats:
- The original Flips save the files as .avi
- The HD versions of the Flip save files as .mp4
- iMovie supports these files types
- Older versions of Windows Movie Maker cannot work with these file types, so the videos must be converted (preferably to .wmv)
- Windows Live Movie Maker 2011, however, can work with the FlipCam's exported files with no modification or conversion
- Download and installation instructions for Windows Live Movie Maker 2011
iMovie General Overview
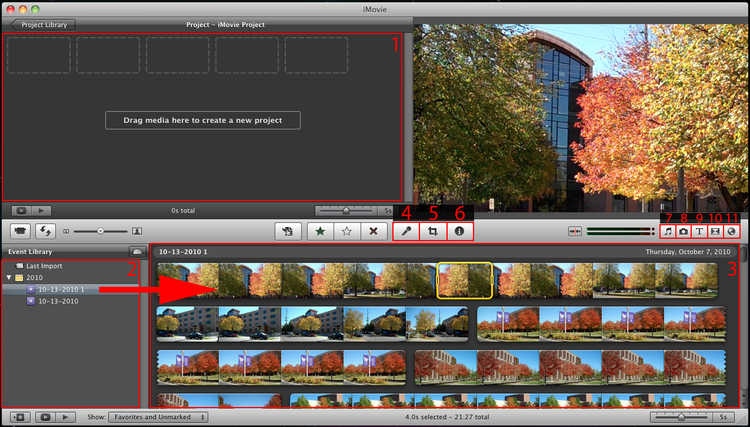
- 1 (Project): This window is where you will build your project. To add clips to your project, drag them to this window from the Event Library.
- 2 (Event Library): This window contains all video files that have been imported to your computer.
- 3 (Expanded Library View): Video files that have been imported will be displayed in this window after selecting an event from the Event Library.
- 4 (Voiceover): Allows you to add narration to a video.
- 5 (Crop Options): Allows you to crop a clip and/or add a Ken Burns effect.
- 6 (Inspector): Allows you to change options associated with a video or audio clip. Double clicking on a clip will also display this box.
- 7 (Audio): Allows you to add audio from your iTunes library or an iLife sound effect.
- 8 (Photos): Allows you to browse and add files from your iPhoto library.
- 9 (Text): Allows you to add a text overlay, opening title, or credits to a still frame or video.
- 10 (Transitions): Allows you to add transitions between video clips and still frames. This option also allows you to choose a theme for your project.
- 11 (Maps and Backgrounds): Allows you to add an animated map or background to your project.
Interactive demonstration
- Four sample video files can be acquired from..... The class will use these files to practice editing in iMovie for the duration of the training session. We won't be creating any specific final video, but using these sample files (as opposed to the student's personal video files) will cut down on distractions for a more effective learning experience.
- Each section includes step-by-step instructions, and other information.
- A link to a YouTube video is available for each topic.
Importing videos into iMovie
- Before you edit any video using iMovie, you must first create an Event, and import the files into the program.
- An Event is essentially a set of files, grouped together by the user, which may be used in the current project to add to the ease of finding all the relevant videos while editing.
- The "Import" options (import from camera, import from computer, etc.) can be found in the file menu, or by right-clicking in the Events area.
- After selecting the appropriate Import option, you simply need to select the files you'd like to add to the Event.
- Holding Command while clicking allows you to select multiple files one at a time.
- Selecting one file, holding Shift, then clicking another file down the list will allow you to select those two files as well as every one in between.
- Importing Videos From the FlipCam
- Importing Videos Saved On Your Computer
Adding, cutting & rearranging clips
- You probably won't want to use every bit of video you recorded, and the files will not be in the proper order, so knowing how to cut and rearrange is crucial.
- Hover over any of the newly imported files, and a preview of that moment will appear in the window above.
- Click and drag to select any of the video you'd like to work with, and then drag those clips to the top left editing window, one at a time.
- It's a better idea to add too much footage to the editing pane than not enough, because more can always be cut out during the rest of the process.
- Once all your desired video is added, the clips can be moved around one another in the same way they were added.
- You CANNOT move a segment in the editing pane without moving the entire clip.
- This can be solved by secondary-clicking where you'd like to cut a clip apart, then selecting "Split Clip." Now the clip is two independent parts; this can be done as many times as you'd like.
- Adding/cutting/rearranging
Adding PowerPoint slides/photos
- Photos are added to the time line/editing window the same way as videos, and may be moved and manipulated in the same manner
- All photos must be added to an iPhoto album before they can be imported into iMovie
- PowerPoint presentations (or specific slides) can be sent to iPhoto, which will create a separate .jpg image of each slide
- An image can be created from any frame of video in the editing area by right-clicking that frame and selecting "Add Freeze Frame"
Cropping
- The cropping screen can be accessed by double-clicking the crop icon in the corner of a clip, or by hitting the crop button near the center of the screen
- Fit-Fits a clip (typically a still image) fully in the frame of your video, instead of cropping it
- Crop-Cuts down a clip to show a specific part of the image/video of your choosing
- Ken Burns-Begins and ends a clip at different parts of the image/video to create a panning effect through the duration
- Rotate-Rotates a clip at 90 degree intervals
- Cropping & rotation window
Adding title screens/subtitles/name introductions/credits
- All four of the functions are the actually the same step
- The panel may be found underneath the preview window, by clicking the Titles button
- Each of the options can be dragged into the timeline
- Can be inserted over existing video/images to show text over the scene
- Can be inserted before/between/after clips and then a background is chosen for the text
- All text may be personalized and added to
- Adding on-screen text
Transitions
- The transitions button is below the preview window
- Transitions are dragged into the timeline like everything else
- You can choose the length of time and how much the transition actually overlaps your clips through the settings
- Adding transitions
Effects
- Effects are all found through the settings option of each clip
- The overall color and appearance can be manipulated, but the effect will apply to the entire clip
- Splitting the clip will allow you to add different effects to different segments
- Many preset effects, such as romantic (softens the picture and adds a glow around the perimeter) and old film (grainy, sepia toned effect that also adds occasional black flecks and lines) are available by default
- Adding Effects
Audio-background audio/music
- iMovie and iLife each come with an assortment of sound effects and music clips
- iTunes songs may be added from your library into a video
- Basic audio controls, such as fading and ducking are available in the settings menu
- More advanced manipulation will require another program, such as GarageBand
- Adding & Adjusting Audio
Copyright information
Q&A
- During the session, the class may now practice editing on their own and ask questions.

