Draft:KeePass
What is KeePass?
KeePass is WSU's recommended password safe or password manager. With KeePass you only need to remember one password for KeePass and then you have access to the program’s highly encrypted database that stores all your passwords. The database can be easily transferred from one computer to another. There is a version of the software for PCs and Macs, it comes with a strong random password generator and it is free. When you create your password entries you can also document information regarding your accounts, the url to the site, document when you last changed your password or any other notes or directions you might need. We recommend storing your Master Key file for KeePass on your personal network storage or R:\ drive with a sync’d version on your PC for offline access. Benefits of storing the Master Key on the network drive is that if your laptop gets stolen you can still open the file from another computer. If you use VPN you will also be able to access the Master Key from home or off campus.
Download the Software
- PC users: Here is the link to download KeePass Password Manager for PC.
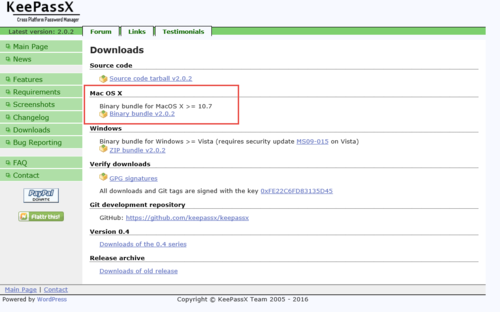
- MAC users: Here is the link to download KeePassX Password Manager for Macs.
Note: For both the PC and Mac versions, make sure that you download the latest version.
Create a new database
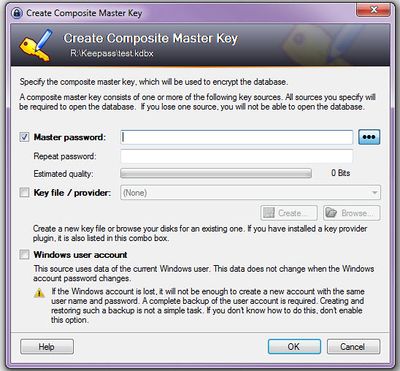
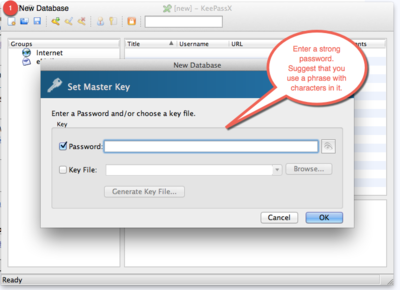
Click ‘File – New…’ in the main menu or click the leftmost toolbar button. Below are images of both the PC and Mac Version. The first screen is to set a strong password to use for the database you are creating. IT will not be able to recover this password you set to open your KeePass database. So it is critical that you remember this one password.
- Enter your Master password. The field is not limited in length, so you could even enter a whole sentence, it should be built up of mixed characters (just keep in mind that you’ll need to remember it).
- The Three Dot icon toggles on/off the view of the password
- Click [OK]
- A Database Settings window will come up,
- For now, just leave everything as it is and click [OK]
You will be prompted to give your new encrypted database a name. You can also change the location of where you want to store this database. The database file can be stored on network storage or your hard drive. Network storage is a better option because it is backed up each night. If you save it to your hard drive, it is highly recommended that you back up this file somewhere else. If the file gets corrupted, you could lose the record of all your passwords.
Now you see the main window. On the left, you see the entry groups. On the right, you see the actual password entries. The password entries are grouped together into the password groups you see on the left. So, depending on which group on the left you selected, it'll show you the entries in this group in the right view. KeePass has created a few default groups for you, but you're totally free to delete them and create your own ones.
Adding an entry
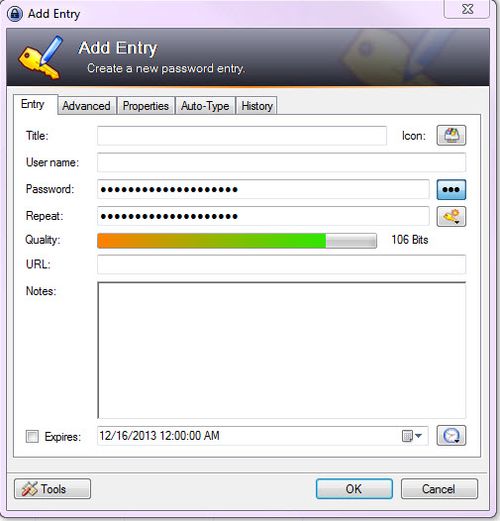
Click on the group that you would like to add an entry to. Next click on the key icon in the top menu. Choose 'Add Entry...'
Enter some title for it, an username, an URL, the actual password, etc. If you don't need some of the fields, just leave them empty. When you're done, click [OK]. You'll see your new entry in the password list on the right now.
Saving the database
Save your Master Key database each time you make changes. If you keep your database on your hard drive, make sure to make back up copies of this file periodically. For best practice, it is recommended that you save this .kdbx or .kdb file to network storage space and then sync an offline copy of it to your hard drive. You can copy the Master Key database file to any location for back up purposes, but remember that it holds all your passwords so be careful. Note: IT will not be able to help you recover the password to this database if it is lost.
More Advanced Features
Passwords and Key Files: In the above tutorial the database was encrypted using a password. But KeePass also supports key files, i.e. you can lock your database using a file (which you can carry around on your USB stick for example). It even supports combining those two methods for maximum security.
TAN Entries: TAN entries are one-time passwords. Many banks are using TANs for better security. KeePass supports TAN entries, by making them expire automatically when using them.
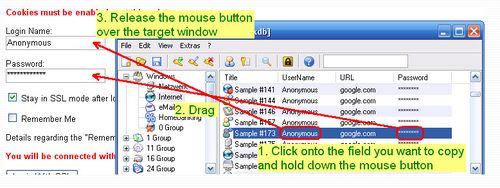
Auto-Type: The auto-typing functionality is a very powerful feature. In the tutorial above you've copied the username and password of an entry to the clipboard. Wouldn't it be nice if KeePass would just type those strings for you into other windows? Wouldn't it be nice if you could define whole sequences of keypresses that KeePass should type for you? That's exactly what the Auto-Typing feature does: it sends simulated keypresses for you to other windows!
URL Field Capabilities: The URL field supports URLs of course. In the tutorial, you've learned that you can enter simple URLs into this field and KeePass will open the browser window for you. But the URL field can do more! It actually supports many different protocols (not just http) and supports executing Windows command lines through the cmd:// virtual protocol. The field also features a powerful substitution engine, replacing codes by other fields (username, password, ...) of this entry.
Command Line Capabilities: You can open .kdb files by passing the filename to the KeePass executable file. But did you know that you can also send the password for the database and key file location over the command line? You can also use the command line to pre-select a key file for you. For more information check out Keepass help documentation.

