GarageBand (Mac)/Mixing
Mixing
You can create multitrack sound by adding loops and samples and recordings to more than one Track.
Tracks play simultaneously, meaning the sound in one track is played at the same time as the sound in the other. In this way you can have sound track (such as music) playing “behind” your recorded voice. Where you place these in the time line or measure bar will mix them automatically. When you create the final product or mix it into one file or project, the sounds will all be blended according to all the effects and audio controls you have applied.
Basic Track Edits
See Basic Editing for description of how to individually modify the audio and effects of individual tracks.
Using the Master Track
The Master Track sets volume and other audio effects ACROSS ALL TRACKS simultaneously. To show/hide the Master Track, use the menu TRACK.
The controls for the Master Track are virtually identical for individual tracks.
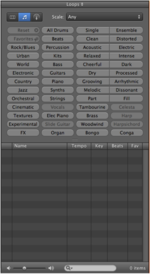
Add a Loop or Sound Effect from the Loop Browser Choose from the buttons on the lower right corner of the basic window, the button for Loop Browser. The buttons or categories will show sounds in a genre which you can preview and/or drag into an track to use and/or edit. Audio files can be previewed. Just click on it to play it.
To install a loop, drag it into the track panel. The loop can be placed into any existing track. If it is placed in an existing track, the name and the instrument settings for that track will not change. If you drop the loop into the empty space on the panel, a new track will be created for you. Creating a new track for the loop will automatically name it and include preset instrumental effects (which of course can be modified). NOTE: once a category has been selected in the Loop Browser, only similar or harmonic items will be active for additional inclusion.
Use the button for RESET in order to restore all possible categories. See Handout: Task 3—Basic Edits for description of how to individually edit the samples.
 Add a Loop or Sound Effect from the Loop Browser
Choose from the buttons on the lower right corner of the basic window, the button for Loop Browser.
The buttons or categories will show sounds in a genre which you can preview and/or drag into an track to use and/or edit.
Audio files can be previewed. Just click on it to play it.
To install a loop, drag it into the track panel.
The loop can be placed into any existing track.
If it is placed in an existing track, the name and the instrument settings for that track will not change.
If you drop the loop into the empty space on the panel, a new track will be created for you.
Creating a new track for the loop will automatically name it and include preset instrumental effects (which of course can be modified).
- NOTE: once a category has been selected in the Loop Browser, only similar or harmonic items will be active for additional inclusion.
Use the button for RESET in order to restore all possible categories.
See Basic Editing for description of how to individually edit the samples.
 Add a Sample or Sound Effect from the Media Browser
Choose from the buttons on the lower right corner of the basic window, the button for Media Browser.
Choose the tab for the kind of media you want to use.
- Audio media will give you access to any file in your iTunes library.
- Photo media is stored in iPhotos.
- Movie Media is stored in iTunes or iMovie.
- NOTE: you can use your “playlists” to sort your iTunes audio files and that you can search for a file by name.
Audio files can be previewed. Just click on it to play it.
To install an iTune sound file, drag it into the track panel.
If you have selected an empty sound track, the file will be converted and installed on that track. If you do not have an empty track, a track will be named and created for the sound file as it is converted and installed.
- NOTE: the converted file is installed in the GarageBand file itself. The original file will not be changed or affected in any way by what you to do to it in GarageBand. The installed file can be edited like any other file.
See Basic Editing for description of how to individually edit the sound files that you import from iTunes.
Importing a Recorded Sound Outside from the Finder
You can also import audio files of the following file types into a GarageBand project directly from the Finder:
- AIFF
- WAV
- AAC (except protected AAC files, such as items purchased from the iTunes Store)
- Apple Lossless
- MP3
To import an audio file:
- Drag the audio file you want to import from the Finder into the timeline, to the empty area below the existing tracks. A new Real Instrument track is created, and the audio file appears as an orange region in the track. Imported audio files should have a sample rate of 44.1 kilohertz (kHz) and a bit depth of 16 bits. Files with a different sample rate might play back faster or slower (for example, files with a sample rate of 48 kHz, a common format for camcorders, will play faster).
- To keep the same speed, convert the file to 44.1 kHz using Audacity before importing the file into GarageBand. Audio files you import from the Finder do not change to match the tempo or key of your project. Compressed audio files you import into a project remain compressed, saving space and time.
Ducking Backing Tracks
When you are creating a podcast, you may want to lower the volume of backing tracks to hear spoken narration or dialogue more easily. Lowering the volume of some tracks to make others easier to hear is called “ducking.”
You apply ducking in GarageBand by setting some tracks as lead tracks and others as backing tracks. Whenever there is sound on a lead track, the volume of the backing tracks is lowered, while the volume of all remaining tracks stays the same. You can apply ducking to any Real Instrument or Software Instrument track in your podcast project.
To apply ducking:
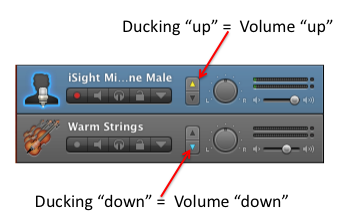
- Use the menu CONTROL→ DUCKING. A ducking control (with arrows pointing up and down) appears in each track’s header.
- Click the arrow pointing up on each track you want to make a lead track. The upward-pointing arrows on the lead tracks light up. The rest of the tracks become backing tracks, and their downward-pointing arrows light up.
- Click the downward-pointing arrow on each track you want to be neither a lead track nor a backing track.
- Choose TRACK→ SHOW TRACK INFO. Click Master Track, and then click Edit.
- To adjust the Ducker effect, choose a preset from the Ducker pop-up menu, or click its Edit button (the large rectangular button next to its name) and adjust the effect settings.
- To disable ducking, deselect the LED for the Ducker effect.
When you play the project, send it to iWeb, or export it, the backing tracks are ducked whenever there is sound on the lead track.
Creating Final Product – the Down Mix
Down-mix or create your mixed file by using the menu item SHARE→SAVE TO DISK. You can choose to save the file as AAC (Apple QuickTime) or MP3. Under most circumstances you will use MP3 format.
Our Internal Help Pages for GarageBand Include
"GarageBand" has no sub pages.
Other Resources
On the Web a good resource for help and tutorials for GarageBand is to be found at The GarageDoor
The web-author (that, Webautur) has put up some really easy to use, really easy to understand topics. Go to his tutorials at http://www.thegaragedoor.com/tutorials/open.html


