IPhoto (Mac)/Exporting, Sharing and Printing IPhoto Pictures
You have several ways to "export" your pictures. They can be output and saved as files, printed singly or in batches, saved to a web page, or made into a DVD movie.
Your iPhoto Library
iPhoto saves its pictures in a single consolidated file it called iPhoto Library. It is kept in the Pictures folder of your Home directory.
It keeps files and other program data inside it as "package-contents."
You can open this "package-contents" just as if it were a file folder, by selecting Photo Library and bringing up a right-click menu, as shown in the thumb.
The Package Contents will reveal a folder of your original pictures, called "Originals" and other folders and items including your "modified" copies.
This folder of "Originals" can be copied to another hard drive if you wish. That is one way to export your pictures. You can do the same with the folder of "modified" pictures you have created.
Export Photos
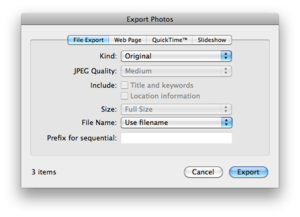
You can use File>Export to open a dialog box and choose options for several ways to output your photos.
Exporting Pictures as Files
Under the menu item File>Export you can open an export dialog box with several options shown in the top tabs.
The first tab is File Export.
Files can be saved in the "original" format, the selected format or output specifically to jpg, tif or png formats and various quality/compression settings.
Files can include notational information you have added to iPhoto or just be output with file names.
Exporting files this way you will be prompted to select the folder where you want them to be saved.
You can create a folder for them to be placed, if you want.
Exporting Pictures as a Web Page or Quicktime Movie File
Select the tab on the Export Dialog for Web Pages to choose the second option for exporting is to create a web page.
This option will: 1) generate an "index.html" file and encode it to display the thumbnails and links to enlargements; 2) create a folder called "Images" and will created thumbnails and "full-size" copies of the photos for this web page.
This exporting option is good for creating portfolio presentations which can be used on a web site or for copying to a DVD or CD disk for display on another computer.
Select the tab on the Export Dialog for Quicktime to choose the third option for exporting is to create a quicktime movie file of your photos.
The Quicktime movie will display pictures for a fixed interval until the last one has been displayed. You can set the number of seconds for that interval.
You can also set the size or resolution of the pictures for the Quicktime.
The format will default to a .mov file.
Exporting a iPhoto Slide Show as a Movie
Select the tab on the Export Dialog for Slideshow to choose the fourth option for exporting.
This option will output your iPhoto Slideshow as you have defined it in iPhoto into your selected format.
Choose from formats of available sizes/resolutions for iPod, iPhone, MPEG-4, Quicktime, or other.
Choose also for "options" on MPEG-4 or Quicktime movie output.
To set up your slideshow, see instructions in iPhoto.
Another option for outputting your photos is to use the menu item Share photos in various ways including:
- e-mailing it
- burning photos to a CD
- setting the photo as a desktop
- and more.....
Menu and Toolbar Options
Choose various internet/web services:
- MobileMe Gallery
- Flickr
For a fee through an online service you can also create a greeting card, or publish a coffee table photo album, or make a calendar out of your photos. Click on the toolbar for options.
Also in the Share menu, you can also use related iLife applications (if they are installed on your computer):
- iWeb (for web pages or blog pages)
- iDVD for a DVD movie
Sharing to iDVD
The Share>iDVD command will open iDVD for the assembly of a DVD for playing as a movie. It automatically loads the pictures and then may be configured with music and other other options, including an interactive menu.
See iDVD for more information.
Sharing to iWeb
The Share>iWeb command will open iWeb for the assembly of a web page or a Blog page for posting to a web or blog site. It automatically loads the pictures into an interactive page(s) with thumbnails, provides a script for slideshows, menuing, and access to larger copies.
See iWeb for more information.
Burning Pictures to an iPhoto (Mac only) CD/DVD or an Ordinary CD/DVD (Mac or PC)
The Share>Burn command will burn a selected collection of photos as an iPhoto library onto a blank CD or DVD.
This can only be opened with a iPhoto on a Mac system.
If you wish to burn your photos to an ordinary CD or DVD, you must first "export" them as a file and then follow instructions for burning them to a CD or DVD found here!
Printing Pictures
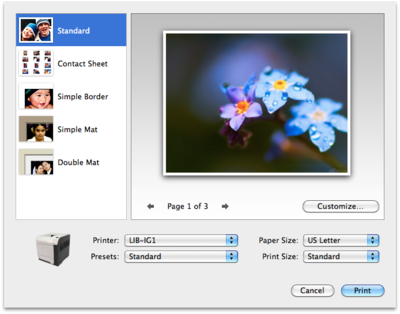
After selecting the photos you want to print, you can use File>Print to choose among several options for printing photos, including:
- contact sheets (which you can modify for number per page)
- prints with borders
- mat prints
- double mat prints
Other Resources
For official Apple help on using iPhoto: Click Here!
For Apple Tutorials (videos) on using iPhoto: Go to Here!
Our Help Pages:


